Geovision Remote View System Setup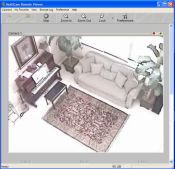 The Geovision Remote View System is used to view security cameras that are connected to a Geovision system over the Internet or a network (LAN) connection. The Remote View application is limited to only one login at a time, so multiple PCs and locations cannot connect simultaneously. The Remote View software gets installed on the client computer (not the Geovision DVR) that will be viewed remotely. Please follow below for step-by-step setup instructions. These instructions assume the following: The Geovision Remote View System is used to view security cameras that are connected to a Geovision system over the Internet or a network (LAN) connection. The Remote View application is limited to only one login at a time, so multiple PCs and locations cannot connect simultaneously. The Remote View software gets installed on the client computer (not the Geovision DVR) that will be viewed remotely. Please follow below for step-by-step setup instructions. These instructions assume the following:
- You have already installed your Geovision DVR card into your computer.
- The Geovision software (Multicam Surveillance System) is already installed on the computer where your card is installed.
- The Geovision DVR is connected to a router/switch that is connected to the Internet.
- The Geovision DVR may be connected to an Internet connection that has a Dynamic IP address, such as cable or DSL. If you are unsure about this, please contact your Internet provider first. If your Geovision computer is connected to a Dynamic IP address, start by installing the Geovision Dynamic DNS Service. You can install and start the DDNS Service by following the instructions in Chapter 11, page 277 of the Geovision manual.
Configure Port Forwarding On Your RouterIn order to connect from the Internet or a local network to your router, your router needs to be configured to forward Internet traffic requests (TCP/IP) on port 3550 to your Geovision computer. 3550 is the default port that Geovision uses. Please consult the owners manual of your router for instructions on how to setup port forwarding. CCTV Camera Pros has instructions for Linksys and Dlink routers. Please note to use port 3550 even if the instructions say something different.
Geovision Remote View Server SetupThe first part of this setup takes place on the Geovision DVR computer. If you have not already done so, please start the Geovision Multicam System that you installed from the Geovision CD. Take note of the controls in the lower right-hand corner of the screen. A screenshot of the controls can be found below along with a reference of the menu that each control opens.
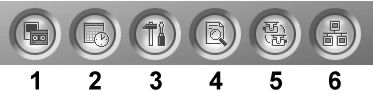
- Monitor
- Schedule
- Configure
- View Log
- Camera Scan
- Network
Setup- Click on the Configure button and select System Configure.
- Under the General Settings tab and the Startup box, make sure that TCP/IP Server is checked. Click OK.
- Click on the Configure button again and select Password Setup -> Remote Authentication Setup.
- Make sure that all three checkboxes are checked on the Remote Authentication Setup screen as seen below.
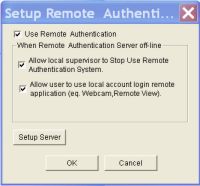
- Click the Setup Server button on the Remote Authentication screen.
- Leave the Server IP and Server Port fields set to their defaults.
- Create an Authorized ID and Authorized Password that you will remember.
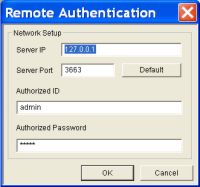
- Click OK. Then click OK again on the Remote Authentication Setup screen.
Geovision MultiCam Remote View Client SetupNow that the Geovision DVR (server) is set up, the Remote Viewer software needs to be installed and setup on the Client computer (the one accessing remotely over the Internet).
- Insert the Geovision software CD into the client PC. The Goevision install program should auto-run and the main installation screen should appear.
- Select Install Geovision V8.1.X System.
- Click Yes to agree to the software license agreement.
- Select Geovision RemoteView.
- Follow the on-screen instructions to complete the installation.
- When the installation is complete, open the Multicam Remote View application.
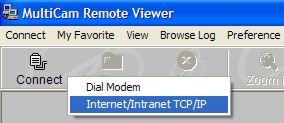
- Click on the Connect button, then select Internet/Intranet TCP/IP from the menu as seen below.
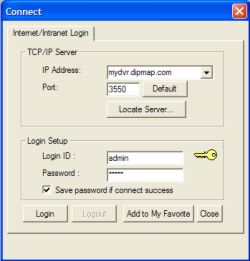
- On the Connect screen, type the hostname that you set up with the Dynamic DNS service or you can enter the IP address of your router if your Internet connection uses a static IP address in the IP Address field. Enter port 3550 in the Port field. Enter the Login ID and Password that you set up for remote authentication on the Geovision DVR. Check the save password checkbox. Then, click the Login button as seen below.
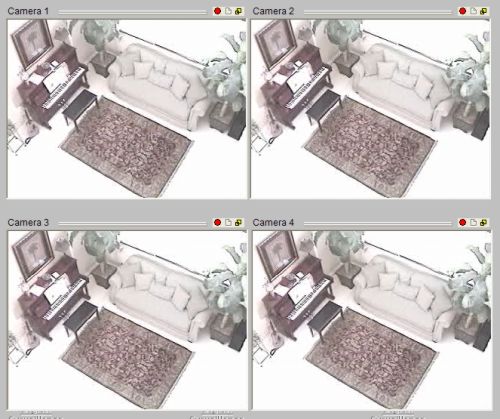
- The remote viewer will connect and you should see video from your security cameras like the below screenshot.
|
|


