Live Video Stream PC Setup w/ Multiplexer & Multiple Cameras
This setup guide is provided for use with our
multi-camera livestreaming video systems which include a livestream capable Windows PC, video multiplexer and HD security cameras. The live-stream systems that we supply include HD security cameras and work with Facebook Live, YouTube streaming,Twitch and every other major live video streaming platform that is compatible with Open Broadcaster software (which comes pre-installed). Our specialty is multiple camera systems that are stationary / permanently installed at locations such as businesses, churches, and any type of event locations.
Streaming PC Setup
Setup the livestream PC initially like any other computer.
- Connect the power cable from the back of the PC to a power source.
- Connect the USB mouse to one of the front or rear USB ports.
- Connect the USB keyboard to a front or rear USB port.
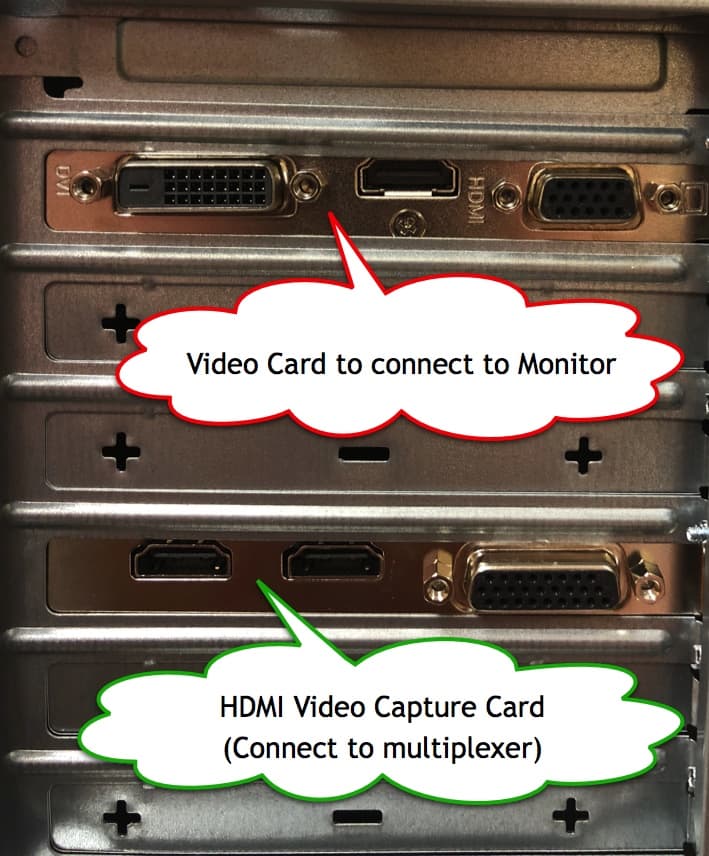
- Connect a VGA, HDMI, or DVI monitor to the video card of the PC. Please note the location below because the monitor video card looks similar to the BlackMagic HDMI video capture card.
Video Multiplexer Setup
The multi-camera livestream systems that CCTV Camera Pros supplies can include a
4, 9, or 16 channel CCTV or HD CCTV multiplexer. The setup is the same for all models.
- Connect the power supply that is included from the back of the multiplexer to a power source.
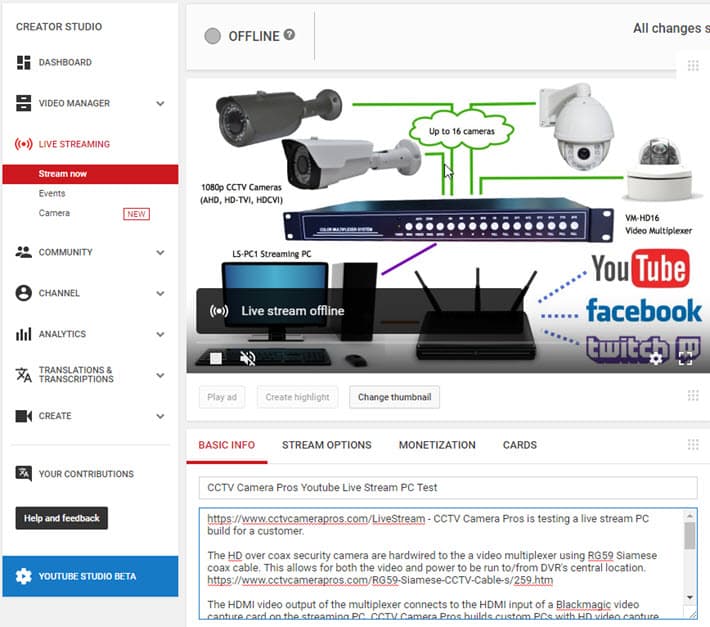
- Connect an HDMI cable from the back of the multiplexer to the outer HDMI port on the HDMI capture card (back of PC). Please refer to the above image. Connect to the HDMI input on the left (NOT the one in the middle).
System Wiring / Cable Setup
CCTV Camera Pros typically supplies
HD security cameras with the video streaming systems that we sell, however, these systems can also be used with older analog CCTV cameras (standard definition). The wiring / cable setup is the same and simple enough for any professional cable installer and most DIY installer to perform.
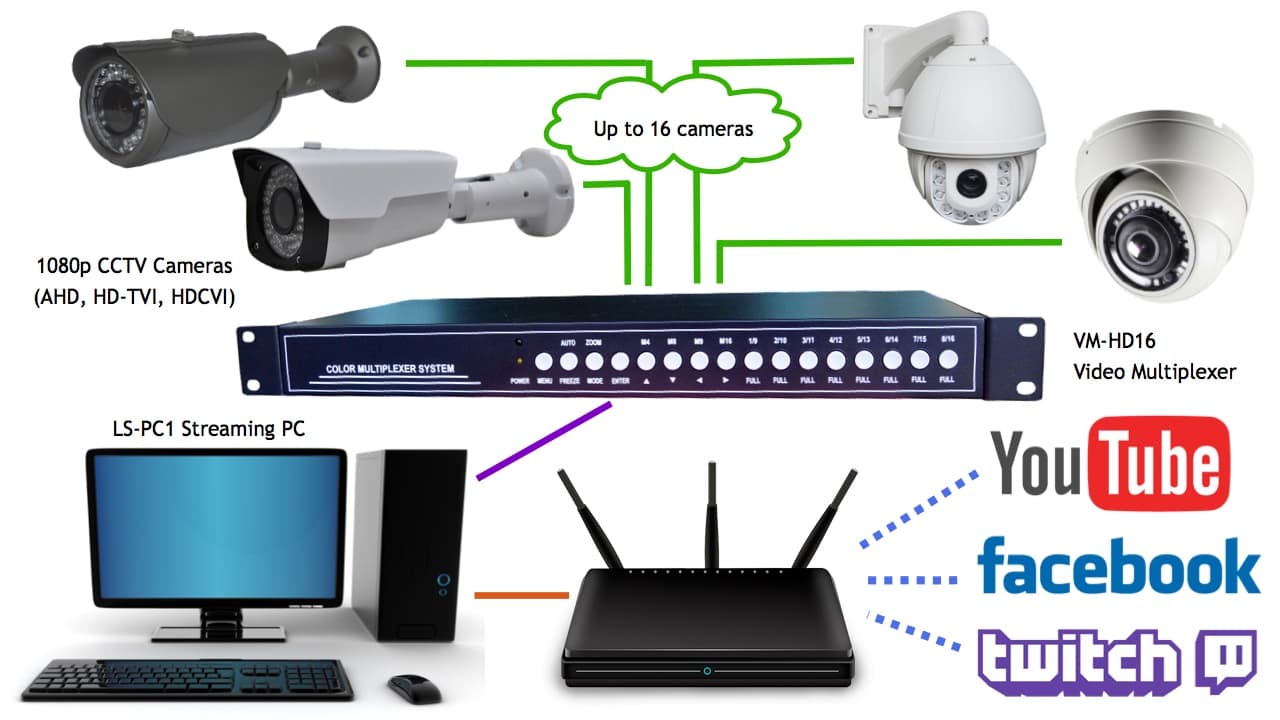
- Siamese coax cable (green cable above) is run from each security camera back to the multiplexer. Pre-made Siamese cable or spools of RG59 Siamese cable can be used for this.
- The coax video portion of the Siamese cable connected the video output of the camera to a video input channel on the back of the CCTV video multiplexer.
- The power portion of the Siamese cable connects the camera's power input to either a single power supply / transformer (included with the cameras we supply) or a multi-camera power supply box. If you need it, you can find more detailed wiring guides here: pre-made security camera wiring guide, RG59 Siamese cable wiring guide for security camera systems.
- HDMI cable is connected from the back of the multiplexer to the HDMI input on the PC's video capture card (purple cable above).
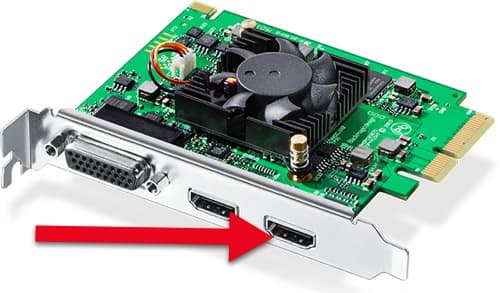
Please note that the HDMI input on the outside of the card is the input.
- The PC is connected to a high speed internet connection using network cable / CAT5 (orange cable above).
Open Broadcaster Streaming Software Setup
Open Broadcaster Software comes pre-installed on the streaming servers that CCTV Camera Pros builds. Below is a quick start guide to get up and running quickly. You can find
additional guides on the Open Broadcaster Software forum here. Please note that CCTV Camera Pros performs the below setup steps for customers on the PCs that we build. If you bought a PC from us, you can skip this section.
- Boot up the streaming PC.
- Using the icon on the Windows desktop, open the OBS Studio application.
- Scenes and sources are core concepts to understand in the OBS Studio. When you go live with a stream, you organize the screen via scenes. Everything that is on the screen is a scene. A scene can be made up of one or more sources. Below is the section in the software where you can create new scenes and add new sources.
- There is one default scene created for you names "Scene".
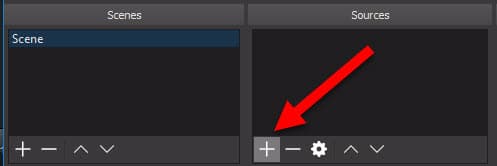
- To add the HDMI video capture card as a source to this scene, click on the plus '+' button in the sources section.
- Select "Video Capture Device" as the type.
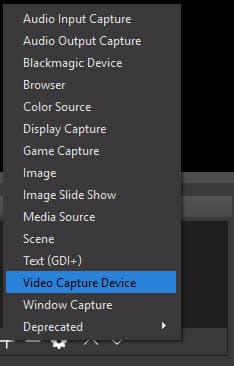
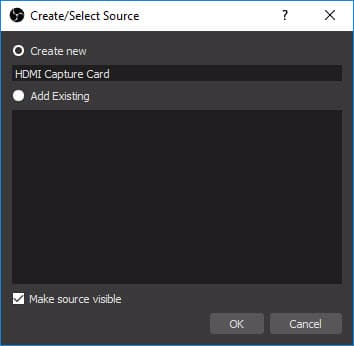
- Select the "Create New' radio button, then name the source. We typically name ours something like "HDMI Video Capture Card". Then press OK.
- This will bring up a configuration screen for the new source. Use the following settings for the BlackMagic Design Intensity Pro 4k cards that we are currently installing in our streaming PCs.
Device: Blackmagic WDM Capture
Resolution / FPS Type: Custom
Resolution: 1920 x 1080
FPS: Match FPS Output
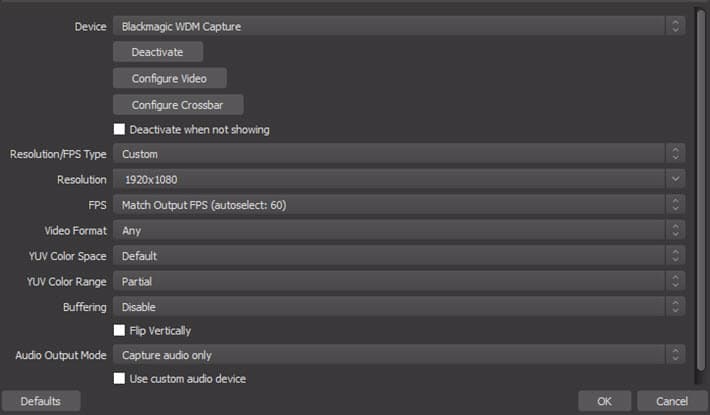
- Click OK.
- Click on the Settings button in the lower right.
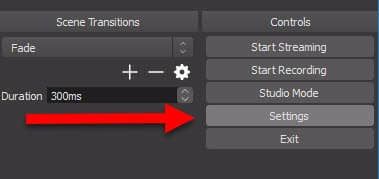
- Select Output on the settings screen.
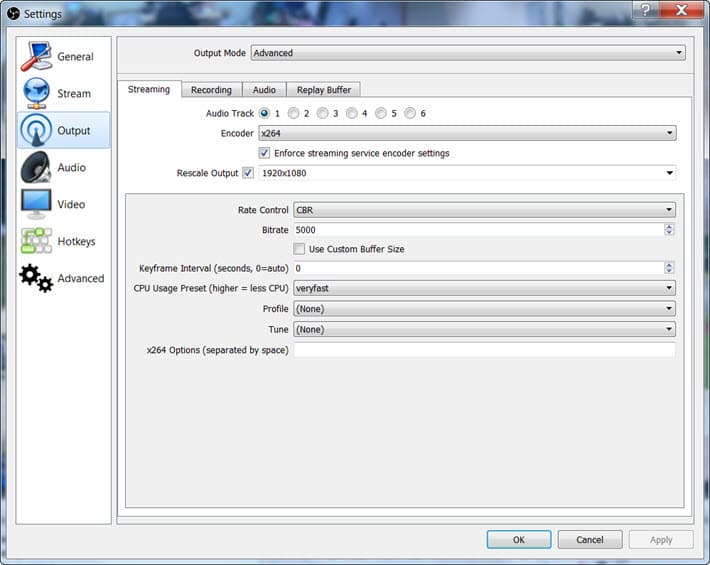
- Change the Output Mode to Advanced. Then check Rescale Output and select 1920 x 1080 if you want to stream in HD.
- You can also adjust the bitrate higher to get even better quality if you have a very high speed internet connection (upload speed). The higher the bit rate, the greater the video quality. Try something in the 3000-5000 range.
- Click OK.
Audio Microphone Setup (optional)
If you want to stream live audio in addition to video, follow these instructions.
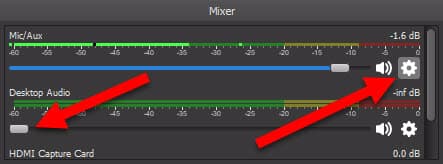
- In the Mixer section of the OBS, click on the gear icon for Mic/Aux, then select Properties.
- On the Properties screen, select your USB microphone from the drop-down menu. Then, click OK.
- Slide the Desktop Audio volume slider all the way down unless you plan on using audio from a desktop source.
Facebook Live Streaming Setup
Following these instructions to start a Facebook Live from a Facebook page.
- Login to Facebook from the Chrome web browser on your streaming PC and go to the Facebook page that you want to live stream from. You must be an administrator for the page.
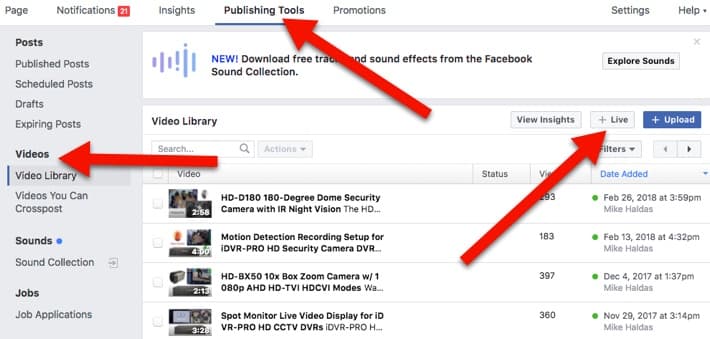
- Click on the "Publishing Tools" link from the top menu.
- On the publishing screen, click on the "Videos" link on the left navigation menu.
- Click on the "Live" button.
- The "Connect Your Live Stream" screen will open.
- Select "Connect" at the top of the screen.
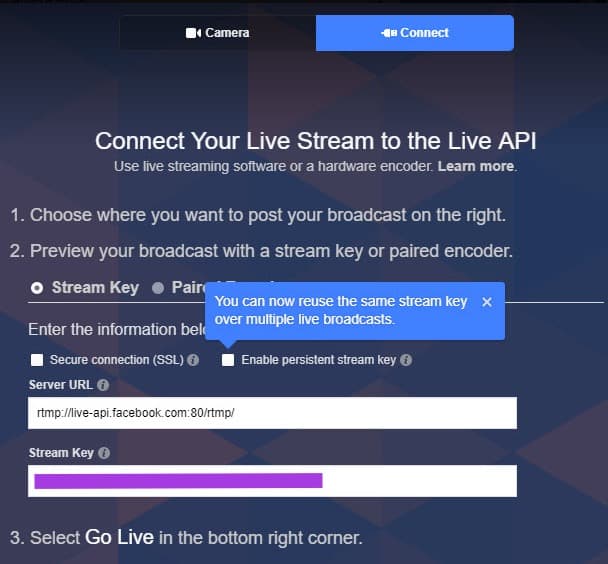
- On this screen, copy the Stream Key that is displayed.
- In the Open Broadcaster Software, click on the Settings button in the lower right.
- On the settings screen, click on the Stream icon in the left menu.
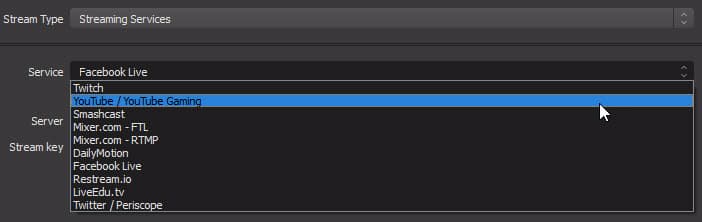
- On the Stream settings screen, select or enter the following:
Stream Type: Streaming Services
Service: Facebook Live
Server: Default
Stream Key: <Paste your Facebook Live Stream Key Here>

- Click OK.
- Go back to the Facebook Live Connect screen and enter a Title for the video and a comment for the post. You can optionally also Tags.
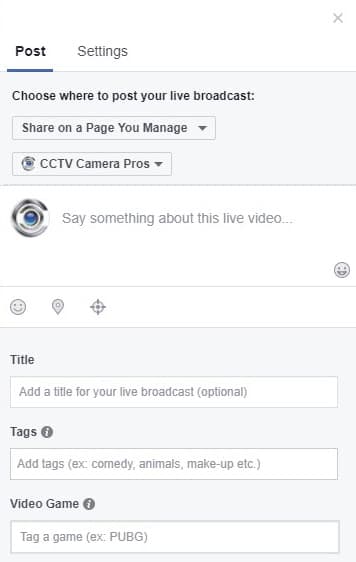
- In the Open Broadcaster Software, click Start Streaming.
- Go back to the Facebook streaming page. The Facebook streaming API should detect that the OBS is streaming to the Facebook server.
- You will see a live video preview. You can click "Go Live" on the Facebook page when you are ready to start the broadcast.
YouTube Live Streaming Setup
YouTube live streaming is just as easy to setup.
to your YouTube account in the Chrome web browser on the streaming PC. You must be the owner of the YouTube channel that you want to broadcast from.
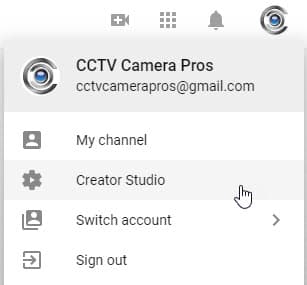
- Click on your YouTube channels profile picture at the top right and click on the Creator Studio button.
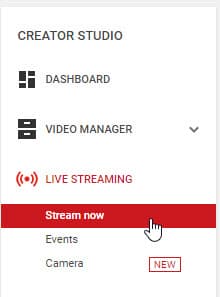
- In the Creator Studio screen, click on Live Streaming -> Stream Now.
- If this is your first time streaming from the channel, YouTube will let you know what your sharable link will be. It is typically something like youtube.com/c/username/live. After you enter your phone number, agree to the terms and conditions of using YouTube Live. Then youll be taken to your YouTube Live dashboard.
- On the Live Dashboard, you can upload a thumbnail for the stream. It is highly recommended that you upload a well designed 1280 x 720p image to help attract viewers to the broadcast. You can also enter the Title, Description, Category, and specify if this broadcast will be Public, Unlisted, or Private.
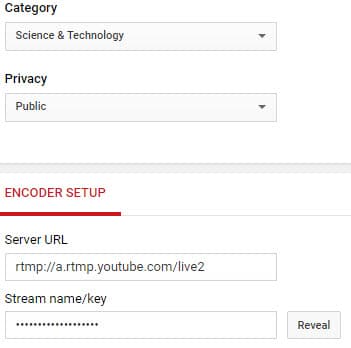
- On the bottom of the screen, you will see the Stream name/key. Click on the "reveal" button and copy the key.
- In the Open Broadcaster Software, click on the Settings button in the lower right.
- On the settings screen, click on the Stream icon in the left menu.
- On the Stream settings screen, select or enter the following:
Stream Type: Streaming Services
Service: YouTube / YouTube Gaming
Server: Primary
Stream Key: <Paste your YouTube Live Stream Key Here>
- Click OK.
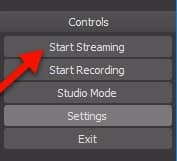
- When you are ready to start your broadcast, click on the Start Streaming button.
- YouTube will automatically begin your Live stream.
- When you want to end the broadcast, click on Stop Streaming in the OBS software.
Switching Camera Views
The main benefit of using a CCTV multiplexer with our systems is that it enables the ability to stream video from multiple cameras and control which camera or cameras are in view during the live broadcast. The video display of all of our multiplexers can be controlled using the buttons on the front of the unit or via the wireless remote control that is included.
Being that the Blackmagic HDMI capture card is capturing the full video output from the multiplexer, any view switching that you perform on the multiplexer naturally flows through to your live stream.
Wireless Remote Control

Here is the wireless remote control included with our
4 channel HD video multiplexer. The remotes for our 9 and 16 channel models is almost identical. Using the remote control, you can switch the view to any of the cameras. You can also switch between a single cameras view and various multi-camera views. You can find our 9 channel multiplexer and 16 channel multiplexer here.
Security Camera Articles & Products
Here are some additional products and articles that you may be interested in.
About the Author

This article was written by
Mike Haldas, co-founder and managing partner of CCTV Camera Pros. If you have any questions related to video surveillance systems, please email Mike at [email protected].
|


