LinkSys Port Forwarding
Follow these instructions to setup LinkSys port forwarding rules. Port forwarding allows you to configure inbound Internet connections to
your router to be routed to specific devices on your network. For CCTV cameras and surveillance systems, your router is configured to forward requests to your surveillance DVR (standalone or Geovision) or directly to IP cameras. The IP address that your router assigns to your DVR is an internal IP address (LAN) that normally can not be accessed from outside of your local network. This is why port
forwarding is needed.
To setup Linksys port forwarding
- Open the linksys router control panel by going to the IP address http://192.168.1.1/
in a web browser. You will be prompt for a password. If you did not setup a password on your router, the default LinkSys password is "admin". Leave the userid blank and enter "admin" for the password. For older LinkSys routers enter "admin" for both the userid and password.
- Confirm the IP address of your DVR by following these steps, or if you are working from your Geovision computer, you can also view the IP address of your computer in Windows.
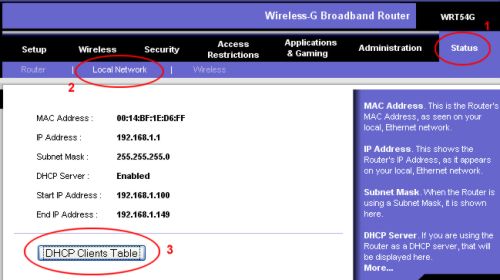
- Click on the "Status" link
- Click on the "Local Network" link
- Click on the "DHCP Clients Table" button
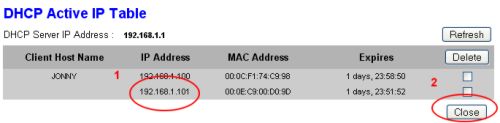
- The DHCP Client will open as seen below. On the DHCP follow these instructions:
- Note the IP address of your DVR
- Click the "Close" button when done
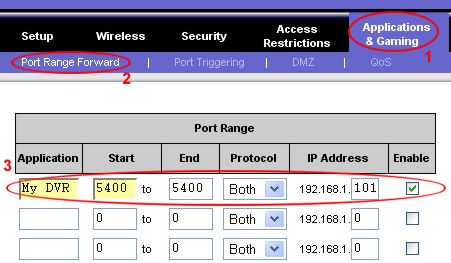
- Open the Port Range Forwarding screen by following these steps. Refer to the below screen for reference:
- Click on the "Applications & Gaming" link
- Click on the "Port Range Forward" link
- Enter a name for your DVR in the "Application" field. This can be anything that you choose. Enter the default port for your DVR in the "Start" and "End" fields (3 need top be setup for Geovision 80, 4550, 5550 for Geovision). For
"Protocol" select "Both". Enter the IP address that you noted above.
Click the "Enable" checkbox.
- Click the "Save Settings" button on the bottom of the screen.
If successful, port forwarding is now setup on your router.
What is my Geovision DVR IP?
- If you do not know what the IP address is of your computer, in Windows press the start button then select Run.
- In the Open field of the Run window type cmd, then press OK. A command screen will open.
- On the command line type ipconfig
- The results should look similar to below.

|


