D-Link Router Setup - Dynamic DNS Service
D-Link routers typically support updating dynamic DNS service. If you have already setup free dynamic DNS service with dyndns.com, you can follow these instructions to setup your D-Link router to update your DDNS automatically for you whenever your Internet connection's IP address changes.
For these instructions, will used a D-Link DI-624 router/switch. The setup process for all D-Link routers that support DDNS should be similar to this.
- Open the D-Link router control panel by going to the IP address in a web browser. You will be prompt for a password. If you did not setup a password on your router, enter admin for the username and leave the password blank.
- Once you are logged into the router 1) click on the "Tools" tab, then 2) Click on the "DDNS" button, as seen below:
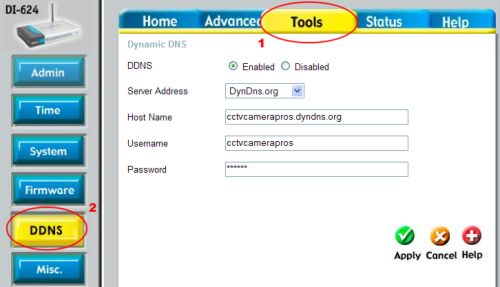
- On the Dymanic DNS page do the following:
- Select the "Enabled" radio button for the DDNS field
- Select DynDns.org from the Server Address drop down menu
- Enter the complete Host Name that you setup with DynDns.com
- Enter your DynDns.com Username and Password that you setup
- Click the "Apply" button.
- If everything is correct, the page will tell you that your router is restarting.
Dynamic DNS service with dyndns.com is now configured for your router to automatically update.
|
|


