Geovision WebCam Server Internet Setup
 The Geovision Webcam Server is used to view security cameras that are connected to a Geovision system over the Internet or a network (LAN) connection using an Internet Explorer web browser. No viewer software is required to be installed on the client computer (the one viewing remotely) except for Internet Explorer. The Geovision webcam server can be configured to allow more that one computer to access video remotely. Please follow below for step-by-step setup instructions. These instructions assume the following: The Geovision Webcam Server is used to view security cameras that are connected to a Geovision system over the Internet or a network (LAN) connection using an Internet Explorer web browser. No viewer software is required to be installed on the client computer (the one viewing remotely) except for Internet Explorer. The Geovision webcam server can be configured to allow more that one computer to access video remotely. Please follow below for step-by-step setup instructions. These instructions assume the following:
- You have already installed your Geovision DVR card into your computer.
- The Geovision software (Multicam Surveillance System) is already installed on the computer where your card is installed.
- The Geovision DVR is connected to a router/switch that is connected to the Internet.
- The Geovision DVR may be connected to an Internet connection that has a Dynamic IP address, such as cable or DSL. If you are unsure about this, please contact your Internet provider first. If your Geovision computer is connected to a Dynamic IP address, start
by installing the Geovision Dynamic DNS Service. You can install and start the DDNS Service by following the
instructions in Chapter 11, page 277 of the Geovision manual.
Configure Port Forwarding On Your RouterIn order to connect remotely from Internet Explorer to your Geovision webcam server, you must configure your router to forward Internet traffic requests (TCP/IP) on port 80 to your Geovision webcam server. Port 80 is the default port that Geovision uses for the webcam server. Please consult the owners manual of your router for instructions on how to setup port forwarding. CCTV Camera Pros has instructions for LinkSys and Dlink routers.
*Important Note: the following ports need to be forwarded to your Geovision computer in order for the Geovision webcam server to work: 80, 4550, and 5550.
Geovision Webcam Server Setup
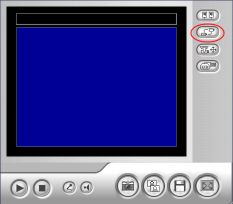
The first part of this setup takes place on the Geovision DVR computer. If you have not already done so, please start the Geovision Mutlicam System that you installed from the Geovision CD. Take note of the controls in the lower right hand corner of the screen. A screenshot of the controls can be found below along with a reference of the menu that each control opens.
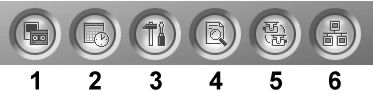
- Monitor
- Shedule
- Configure
- View Log
- Camera Scan
- Network
Setup- Click on the Configure button and select System Configure.
- Under the General Settings tab and the Startup box, make sure that WebCam Server is checked as seen below.
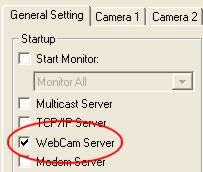
Then, Click OK. This ensures that the webcam server automatically restarts if Geovision restarts.
- You can leave the Server IP and Server Port fields set to their defaults. If you have more than one Geovision system on the same network, then you will want to adjust these values.
- Click on the Network button (6) noted above and select WebCam Server. The Server Setup screen will appear and the General tab should be selected as seen below:
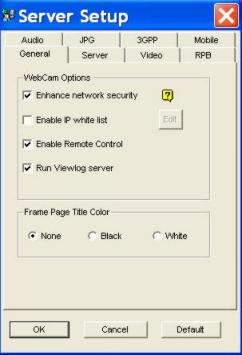
Select the Enable remote control checkbox. Check the enable network security if you want your users to always confirm a series of letter and numbers when they log in (not necessary). Check the viewlog server. - Click on the Server Tab.
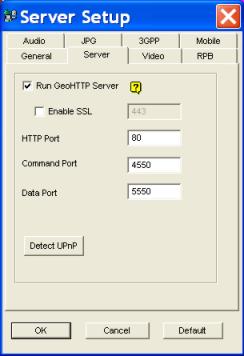
Make sure that the "Run GeoHTTP Server" checkbox is checked and confirm that the HTTP port is set to 80. Leave all port configurations set to the defaults unless you have more than one Geovision system on your network, in which case you need to setup unique ports for each system. Click OK.
- After you click ok, you can confirm that the GeoHTTP webcam server has started by looking at the blue box in the upper right hand corner of the Geovision multicam server screen. It should say "Web" as seen below.
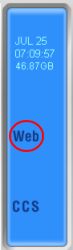
The Geovision web camera server is now started and ready to receive connections.
 bookmark this page for future reference
In order to access the Geovision webcam server from Internet Explorer, you must enable certain security settings. To check if Internet Explorer is ready to run active X controls required by the Geovision webcam server, please do the following.
- Open Internet Explorer.
- Select the Tools menu and then select Internet Options.
- Click on the Security tab at the top of the Internet Options screen.
- Click on the Custom Level button as seen below.

- Ths will open the Security Settings - Internet Zone screen. Scroll down the Settings list until you reach the settings that enable active X controls. The following two settings need to be set to "Prompt" or "Enable". It is more secure to set these to prompt as seen below.
- Download unsigned ActiveX Controls
- Initialize and script ActiveX controls not market as safe for scripting

- When you are done. Press OK. Then OK again to save those settings. Windows may ask you to also confirm that you want to change these settings. Confirm.
Now that the Geovision webcam server is setup, you can access your cameras remotely using the Internet Explorer web browser.
- Open Internet Explorer and type the IP address (for static IP addresses) of your router or the hostname (for dynamic IP addresses) that you created when you setup the Geovision Dynamic DNS Service in the address bar of your browser.
- The first screen that you will see is the Select Compression screen as seen below.

- Select MPEG4 Encoder Viewer.
- Click on the Submit button.
- The next screen that you will see in your browser is the Select Connection screen.
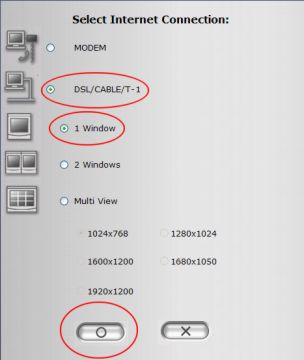
- Select DSL/Cable/T-1
- For this example we will use the single window mode so we will select 1 Window. Please select 2 Windows or Multiview if you wish to view all of your security cameras.
- Click submit.
- Next, the webcam screen will open.
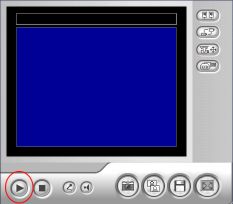
Click on the Play button.
- The userid and password screen will open. Enter the userid and password that you previously setup and click OK.
- The Word Verification screen will open. Enter the word that you see and press OK. You will now be connected to the Geovision WebCam server.
- Click on the select camera/channel button as seen below and select the camera that you want to view.
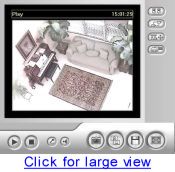
- Your camera view should appear in your browser like the below image.
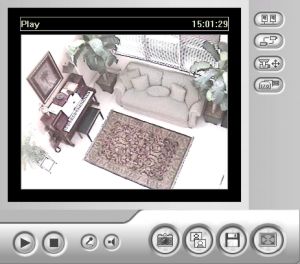
Click image for Large Internet Explorer View
Here is a screen shot of the Geovision webcam view in two camera mode:
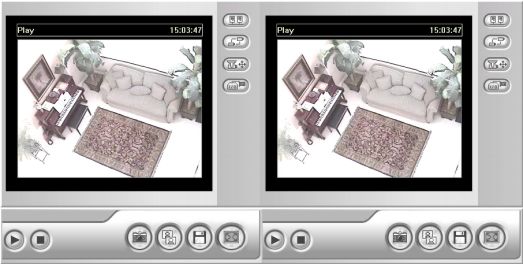
Click image for Large Internet Explorer View
|
|


