|
DVR Viewer Remote Internet Setup for MPEG4 Surveillance DVRs
 |
Our MPEG-4 Surveillance DVRs come with remote internet access software that allows you to control all of the functions of the DVR, including live video viewing, remotely over the internet. The software comes on the CD that ships with the DVRs or the most recent version can be downloaded here: MPEG-4 Series DVR Viewer Software. The DVR viewer software runs on a Microsoft Windows based computer. |
New! iDVR-PRO CCTV / HD Security Camera DVRs
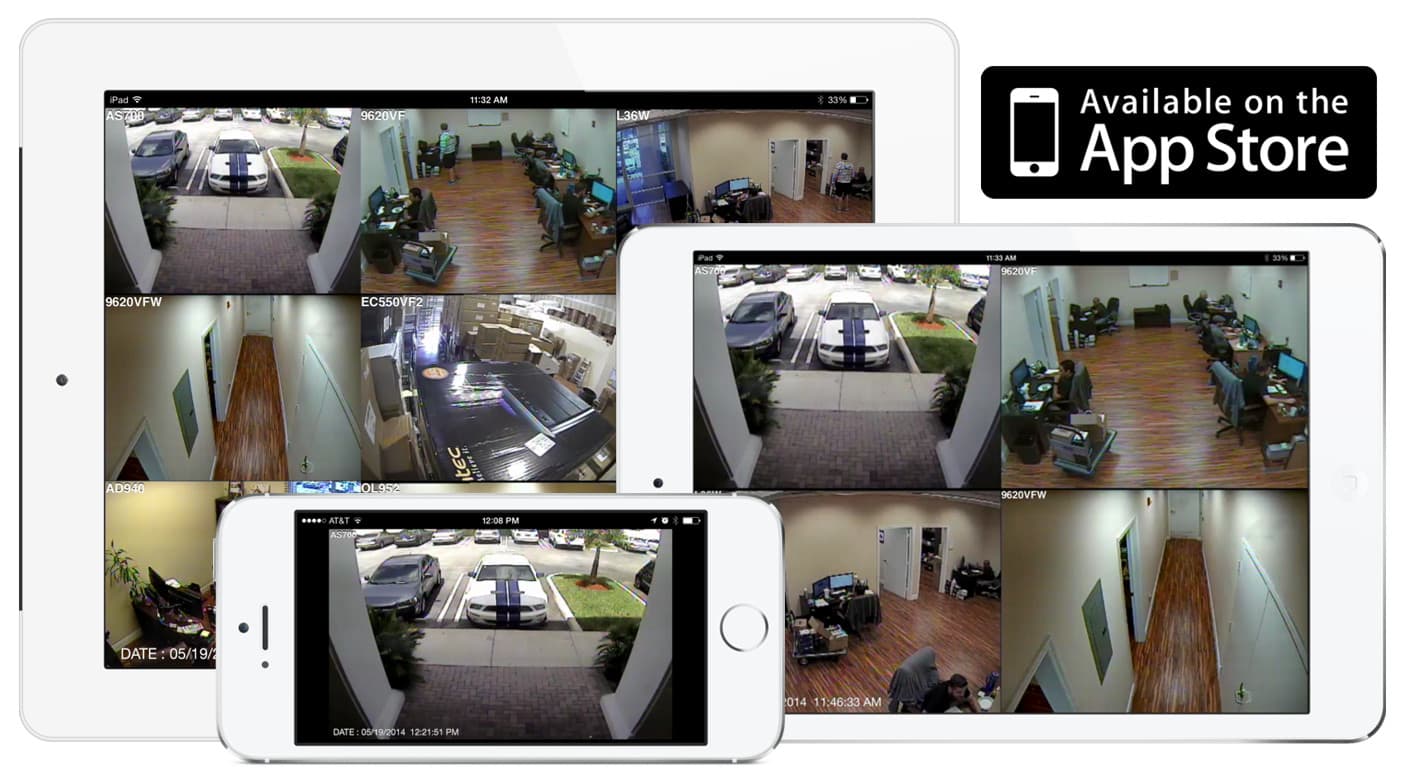
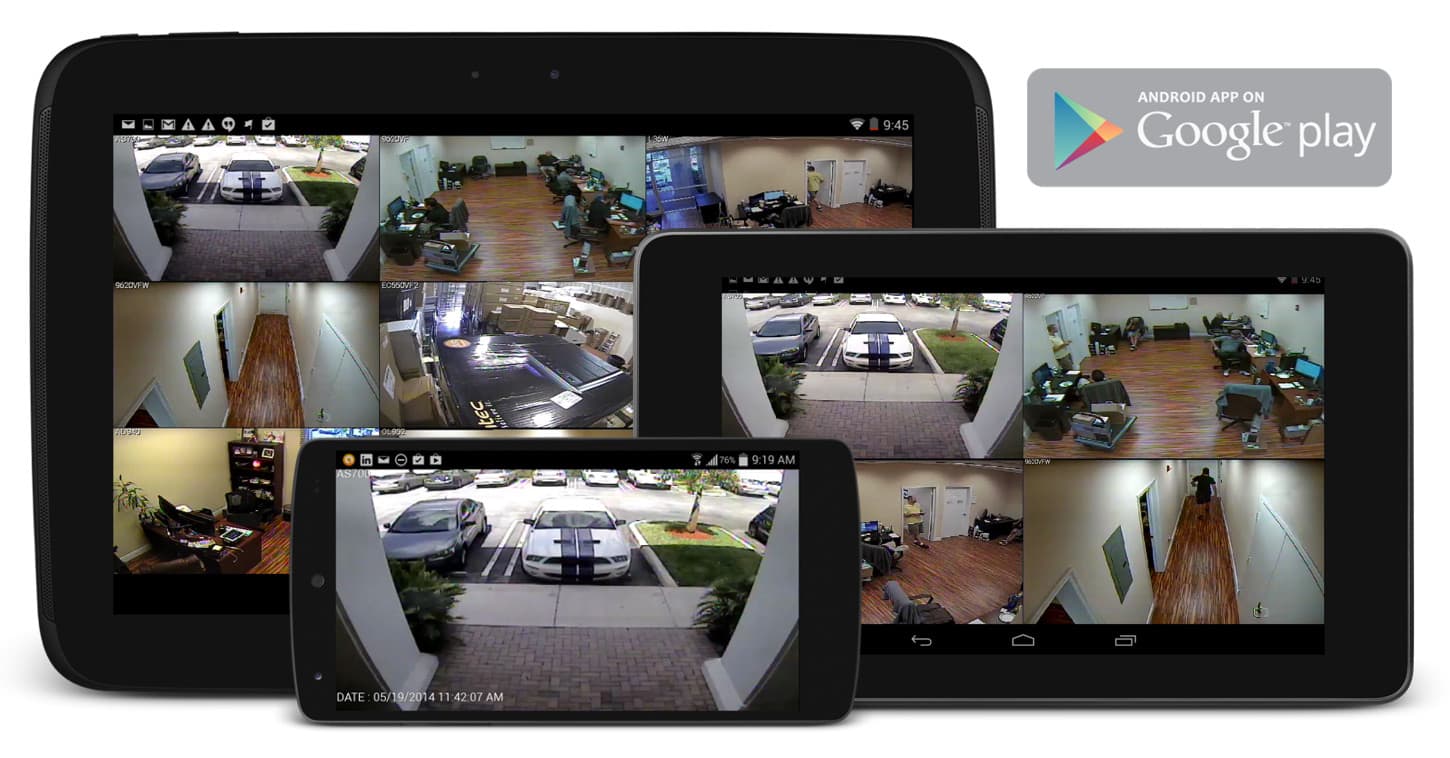
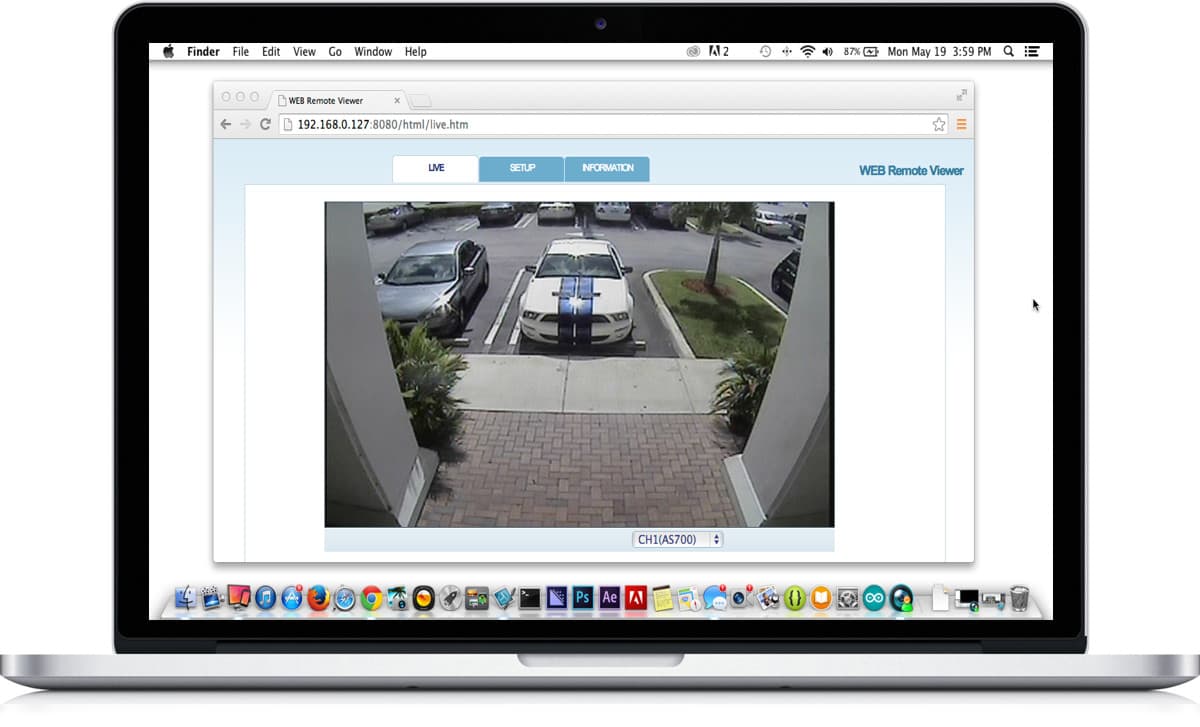
Update! The MPEG H.264 DVR has been replaced by the new iDVR-PRO CCTV / HD security camera hybrid DVRs. iDVR-PRO security camera DVRs include client software for Mac and Windows. All iDVR-PRO DVRs also include free mobile apps for iPhone, iPad, and Android mobile devices. These new hybrid models work with analog CCTV and HD security cameras (720p and 1080p). Users can view their security cameras live from remotely over the Internet, as well as search and playback surveillance video that has been recorded to the DVR's hard drive. Click on the below images to watch sample surveillance videos and images that show why iDVR-PRO is our best selling video surveillance DVR.
iPhone / iPad Compatible
 |
Android Compatible
 |
Mac Compatible
 |
Remote Camera View Setup
For these instructions, our Surveillance DVR will be connected to the internet using a D-Link DI-624 Router which supports DDNS (aka DynDNS). The internet connection that the router is connected to is through a Motorola cable modem. The computer that will connect to the DVR remotely is connected via a separate internet connection using DSL. Our instructions are broken up into 5 phases:
- Creating and Configuring a Dymamic DNS Account
- Setting up Dynamic DNS on your Router
- Locating the Network Address (IP) of your DVR
- Setting up a Virtual Service on your Router to your DVR
- Installing the Remote Viewer Software for Remote Internet Access
Dynamic DNS, also known as DynDNS or DDNS, is a service that allows you to configure a domain name, such as www.mydvr.com to route to a dynamic IP address. Typically cable and DSL internet access providers use dynamic IP address each time you connect to the internet. This means that your connection is assigned a different IP address each time you connect. DDNS allows you to remotely connect to your surveillance DVR over the internet if your DVR is connected to a cable or DSL internet connection. It is recommended that you purchase a router that supports DDNS and connect the router to your cable or DSL modem. There are many vendors that provide DDNS service. Follow the setup instructions in this section to create and configure an account with Dynamic Network Services. NOTE: if your internet connection supports a static IP address, you can skip this section of the instructions. If you are unsure, please contact your internet service provider.
- Go to Dynamic Network Services website at www.dyn.com and sign up for an account. (Please note that there is a monthly fee for this specific DDNS provider.)
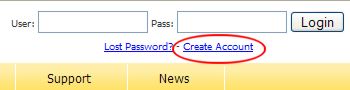
- On the home page click on the Create Account link as seen below:
 - Fill on all of the required fields on the sign up page and submit the sign up form.
- The confirmation screen will let you know that an account confirmation email will be sent to you. Wait a few minutes to check your mail.
- When you receive the email, click on the link to confirm opening your account with DynDNS, then login to your account. The confirmation link will being you to a login link. After that, you can login from the dyndns.com home page anytime.
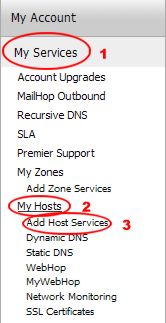
- Once logged into your account, 1) Click on the "My Services" link, 2) then the "My Hosts" link, 3) then the "Add Host Services" link as seen below:
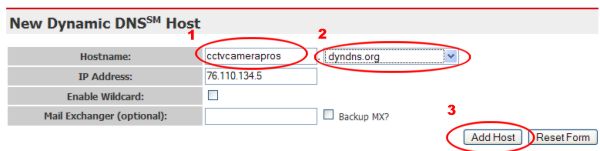
 - The New Dynamic DNS Host screen will open. In the hostname field, 1) create a prefix and 2) select a domain name from the dropdown box. The page will automaticall detect your IP address, which you can leave for now. The other fields can be left blank. 3) Click on the "Add Host" button as seen below.
 - If successful, a screen will be displayed to let you know that the hostname was created.

For these instructions, will use a D-Link DI-624 router. We assume that the setup process for all D-Link routers that support DDNS will be the same or similar to this. You can use any brand router that has Dynamic DNS support. Please consult your routers manual or call the router companies technical support to determine if your router has DDNS capabilities. If your internet connection has a static IP address, you do not need to setup DDNS and can skip this section. The below instructions assume that you are working from a computer that is connected to the D-Link router.
- Open the routers control panel by going to the IP address http://192.168.0.1/ in a web browser. You will be prompt for a password. If you did not setup a password on your router, enter admin for the username and leave the password blank.
- Once you are logged into the router 1) click on the "Tools" tab, then 2) Click on the "DDNS" button, as seen below:
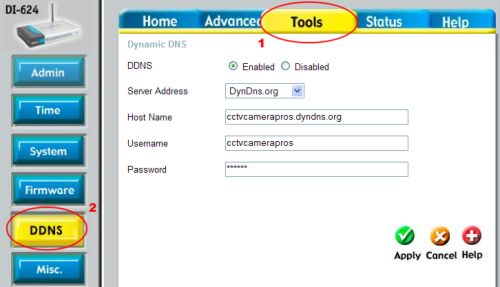 - On the Dymanic DNS page do the following:
- Select the "Enabled" radio button for the DDNS field
- Select DynDns.org from the Server Address dropdown menu
- Enter the complete Host Name that you setup with DynDns.com
- Enter your DynDns.com Username and Password that you setup
- Click the "Apply" button.
- If everything is correct, the page will tell you that your router is restarting.
DDNS is now configured for your router to handle.
When you connect your DVR (or any other device) to a router, the router assigns the DVR an internal network address (IP address). This IP address allows your router to manage the location of your DVR on your network and direct any network traffic to it. Follow the below instructions to connect connect your DVR to your network and locate the IP address of your DVR.
- Connect your DVR to your router. This is done with a standard cat-5 Ethernet cable. Also, connect your DVR to a monitor if you have not already done so. Power the DVR on.
- On your DVR, push the the "MENU" button (reference the below image to help locate buttons). Then, click on the right arrow button on the DVR next to the "D-ZOOM" label until the LINK menu is highlighted on the screen. On the screen select the first option in the LINK menu which is NETWORK and push the "STATUS" button on the DVR. The screen will display the IP address that your DVR is connected to and the port that it is listening on. Note these two values. You will need them for the next phase of these instructions.
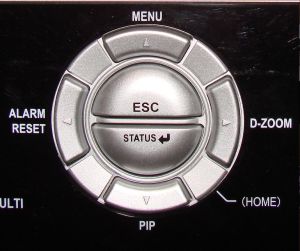 - Click the "ESC" button on the DVR twice to exit the NETWORK menu. Then, select "SAVE AND EXIT" on the screen and click on the "STATUS" button on the DVR to exit.
The purpose of this section is to configure a virtual server which allows internet access to your DVR. Remember the IP address that your router assigns to your DVR is an internal IP address (LAN). In order you to access your DVR from the internet, you need to tell your router to route requests on a certain port to your DVR.
- Open the routers control panel again by going to the IP address http://192.168.0.1/ in a web browser. You will be prompt for a password. If you did not setup a password on your router, enter admin for the username and leave the password blank.
- After you are logged into your router, 1) click on the "Advanced" tab, then 2) click on the "Virtual Service" button. This will display the Virtual Server screen as seen below:
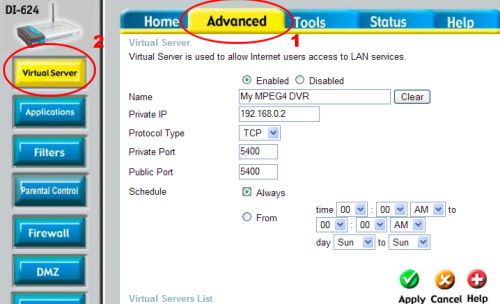 - On the Virtual Server screen:
- Click on the "Enabled" radio button
- Choose a Name for this service. This can be anything that you choose.
- Enter the Private IP address of your DVR that you noted previously.
- Select TCP for the Protocal Type
- Enter 5400 for both the Pivate Port and Public Port
- Select "Always" for Schedule
- Click on the "Apply" button
- On success, the screen will display a settings saved screen
The virtual service to acess your DVR is now setup.
- From your computer, download and install the latest DVR software from here: MPEG-4 Series DVR Viewer Software. The download is in zipped format. Using Windows XP, double-click on the .zip file after it downloads, then double click on the setup.exe program to install.
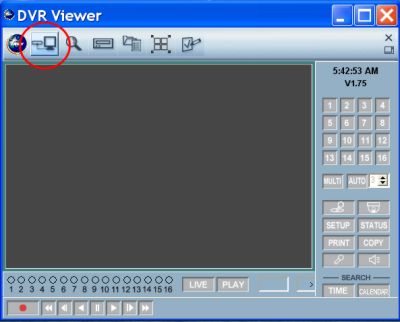
- After installation is complete, double-click on the DVR viewer icon on your windows desktop. Reference the below image to help locate the DVR viewer icon.
 - You will be prompt for the userid and password to access. Leave the password blank and click "OK". The DVR viewer should then open.
- Click on the DVR List button as seen below:
You will be prompt for a password which again you can leave blank and click "OK". - The DVR list will open as seen below.
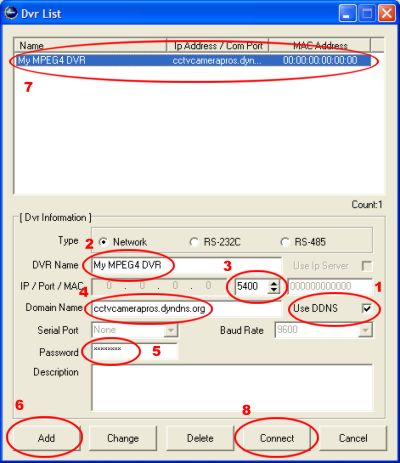
Follow these steps to add your DVR to the list: - Check the "Use DDNS" checkbox
- Enter a name for your DVR. This can be anything you choose.
- Select port 5400 (or choose the port that you noted earleri from your DVR)
- Enter the Host Name that you setup with DynDNS.com in the Domain Name field
- Enter the password for your DVR. Default is "11111111" (8 ones)
- Click on the "Add" button
- The DVR should now appear in the DVR list. Click to select the DVR if it is not already highlighted.
- Click on the "Connect" button
- You will be prompt for a password to connect to the DVR. The default password is "11111111" (8 ones). Enter the password and click "OK".
If everything was successful you will be connected to the DVR.
|


