|
How to Trigger Video Surveillance Recording on your DVR using Burglar Alarm Devices
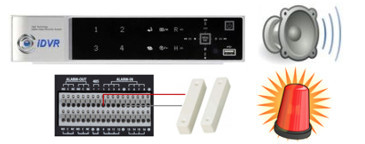
iDVR-E and iDVR-RT16 video surveillance DVRs have burglar alarm input ports on the back of the unit that allow security installers to integrate the DVR with external devices such as burglar alarm devices. The DVR can be setup to trigger video recording based on input from devices such devices as PIR motion sensors, magnetic door contacts, window glass break sensors, water sensors and smoke detectors. When an alarm door sensor is opened, for example, the DVR can be setup to take one of more actions. These may include video recording and sounding a siren.
This article shows how to set alarm triggered recording for iDVR recorders from CCTV Camera Pros, however, the concepts covered in this article can be applied to most video surveillance DVRs that support external alarm devices.
Wiring Alarm Inputs to the DVR
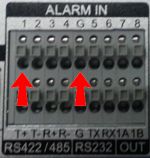
1. Connect the alarm input device that you will be using to one of the alarm in ports on the IO terminal block on the back of your iDVR-E. The inputs are labeled 1 - 8 or 1- 16 depending on the model of DVR you have. The ports labeled "G" are a shared ground port, which means that you can connect the ground to more than one device. (Shown Below)
Motion Sensor Wiring to DVR
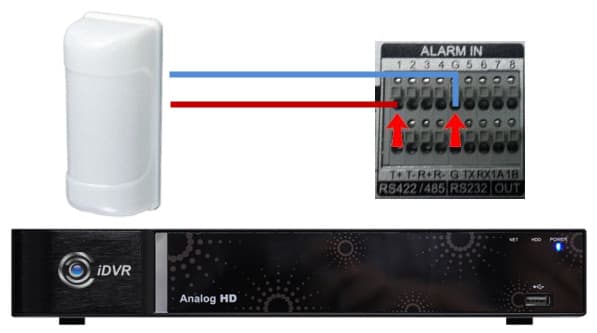
The above image shows how to wire a PIR motion sensor to the DVR. That is an outdoor motion detector that has been tested with iDVR-Es. You can
learn more about it here.
Alarm Triggered Recording Setup
The instructions below explain how to setup alarm recording on the iDVR-E4, iDVR,E8, iDVR-E16, and iDVR-RT16 models.
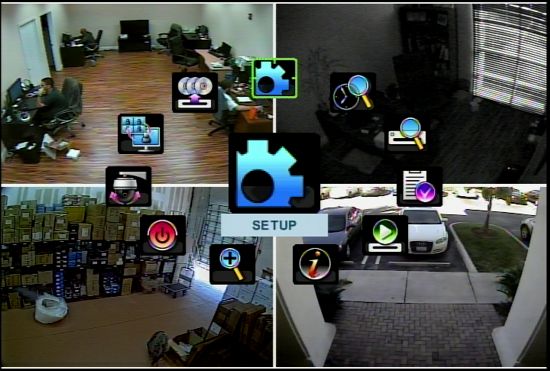
1. On the iDVR remote press the
Menu button. Then select Setup. (Shown Below)
2. You will be prompt to enter in the DVR password ("000000" - Six Zeros is the default).

3. Once logged in, select
Device. Then under the alarm tab set the alarm input to either N.C (Normally Closed) or N.O (Normally Open) depending on the type of device you are using and the type of event you will use as the trigger. In this example setup, we are using a set of door alarm sensors so we will set our input to normally closed. Then, press the Save button at the bottom of the screen to return to the previous menu. (Shown Below)
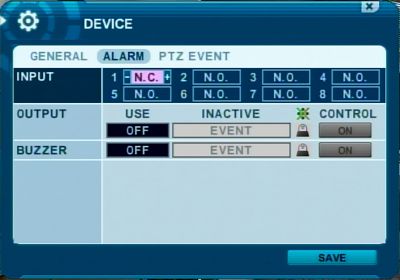
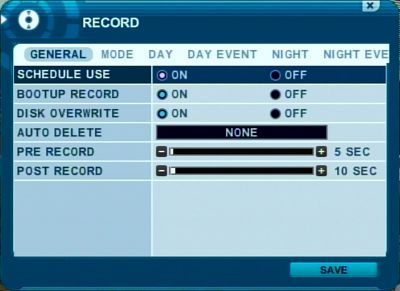
4. Now, select the
Record menu. On the Record menu select the General tab and set Schedule Use to ON. Then, select the desired Pre Record and Post Record times. (Shown Below)
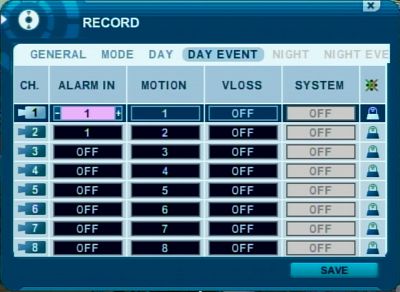
5. Next, select the
Day Event tab. Under the Alarm In section, select which cameras that you want the alarm to trigger recording on. Below we have cameras 1 & 2 set to be triggered by alarm input 1. (Shown Below)
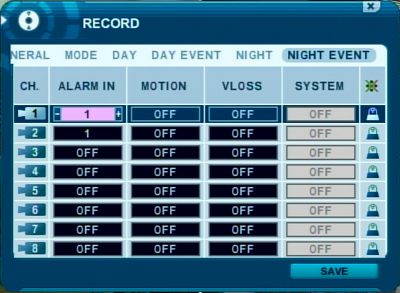
6. Next, select the
Night Event tab and do the same as in step 5 if you wish to have it active at night. (Shown Below)
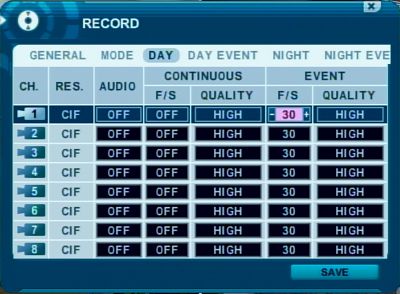
7. Now under the
Day tab select the F/S (Frames per Second) for the camera channels with the alarm setup under the Event section. Then set the Continuous F/S to OFF unless you wish to record both continuously and based on alarm. Repeat under the Night tab if needed. Press the Save button at the bottom of the screen.
8. Last, turn on the DVR recording by pressing the record button on the DVR's remote control. Your DVR is now be set to record when an alarm is triggered from the external device you configured.
 About the Author About the Author
These setup instructions were written by
Mike Haldas. Mike is the co-founder and managing partner of CCTV Camera Pros. Please send questions to [email protected].
|
|


