|
Static LAN IP Address DLink Routers
Although the setup instructions on this page are for DLink routers, the concepts described using IP address reservation / static LAN IP address assignments for surveillance DVRs, IP cameras, and other IP security equipment is applicable to all network routers. DHCP reservation is especially important to use when setting up port forwarding to CCTV DVRs and network IP cameras for remote viewing access. Almost all modern network routers support DHCP reservation. Please check the manual for your router.
DCHP Overview
Dynamic Host Configuration Protocol (DHCP) is a protocol used by routers such as Dlink to distribute internal IP addresses to devices such as IP cameras, surveillance DVRs, and computers that are connected to the network that they manage. Normally, your Dlink router manages a pool of IP addresses, for example from 192.0.168.100 to 192.0.168.199. When you connect a surveillance DVR to your Dlink router using an ethernet cable, the router assigns the DVR the next available IP address in the pool.
The Problem - Dynamic LAN IP Addresses Change
If you unplug your DVR or IP camera (or if there is a power outage), there is no guarantee that the router will assign the same IP address to the surveillance DVR or IP camera. This is problem because you previously setup port forwarding to your DVR based on the IP address that was assigned to it.
The Solution - Assign a Static IP Address, IP Reservation
Your Dlink router can be configured to reserve and always assign a certain IP address to your DVR. This is known as a static IP address. Follow the below instructions to reserve static IP address for your surveillance DVR.
- Open your D-Link router's control panel by going to the IP address http://192.168.0.1/
in a web browser. You will be prompt for a password. If you did not
setup a password on your router, the
dlink default password is blank. Enter admin for the username and leave
the password blank
- Afteryou are logged into your router, 1) click on the "Home" tab, then
2) click on the "DHCP" button. This will display the DHCP server screen as seen below:

- On the DHCP Server screen, use the screen shot below as a reference and:
- Locate the IP address of your DVR (you
most likely previsouly noted this from a different set of
instructions. If not, you can also identify your DVR by looking at the
MAC address. In this example, our DVR is the one with the IP address ending in .104
- Choose the MAC address of your DVR from the DHCP client dropdown box and press the Clone button. This will populate the MAC Address and DHCP Client fields.
- Select the enabled radio button
- Choose a name for your DVR. This can be anything that you choose and is only used by you to indentify your DVR on the network while in the D-Link control panel.
- Press the Apply button.

- After your router restarts and your screen refreshes, the static IP settings you made will be saved in the Status DHCP Client List as seen below.
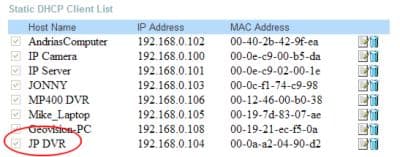
That IP address is now permanently reserved for your IP camera or network DVR unless you remove that setting.
|


