Geovision Video Backup by Time Frame Geovision surveillance systems are able to backup / archive surveillance video to writable CD, DVDs, external drives, and just about any type of storage device recognized by your Geovision system. The video backup system allows you to also include the Geovision video log viewer software on the CD or DVD you are exporting to so that you can view the videos on any Windows Vista or XP computer without needing to install any software. Please follow the below instructions to backup video from your Geovision system. These instructions cover how to backup video by selecting a specific time frame that you want to archive. If you are trying to backup specific motion detected or recording events, please refer to these instructions: Geovision video backup by event. Geovision surveillance systems are able to backup / archive surveillance video to writable CD, DVDs, external drives, and just about any type of storage device recognized by your Geovision system. The video backup system allows you to also include the Geovision video log viewer software on the CD or DVD you are exporting to so that you can view the videos on any Windows Vista or XP computer without needing to install any software. Please follow the below instructions to backup video from your Geovision system. These instructions cover how to backup video by selecting a specific time frame that you want to archive. If you are trying to backup specific motion detected or recording events, please refer to these instructions: Geovision video backup by event.
Geovision Backup / Archive Video
- Start your Geovision system.
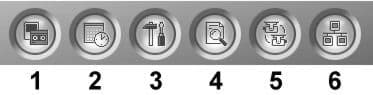
- From the System Menu on your Geovision DVR, select the view log button (#4 below).
- Select Video/Audio Log from the menu.
- On the Video Log screen, click on the backup button in the lower right-hand corner.

- The backup window will open as seen below.

A) Choose to save to hard disk if you are exporting a very large segment of video that will not fit onto a CD or DVD. After the video is exported to that location, you can copy to another location if needed.
B) Choose using CD / DVD if you have a third party CD burning application installed on your Geovision system that you want to use. The systems that CCTV Camera Pros build does not come with third-party burning software by default.
C) Choose CD using OS burning if you want to burn a CD or DVD using the Windows operating system software.
D) Click the Add Timeframe button to open a new window and select the cameras and time frame that you want to export.
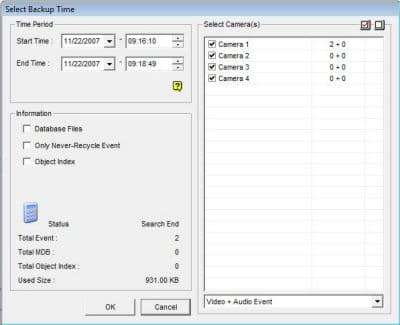
Select the start and end time, the cameras that you want to be included, and if you want Video, Audio, or both exported. You can repeat this step to add multiple time frames to your video export. Each time you select an export time frame and click OK, you will return to the backup screen and you will see a new time frame added to the Time Frame Window.
E) Select the Include Viewlog Player if you would like to also include this.
F) Click OK to begin the backup.
|
|
|


