|
CamGraba Recording Setup
The Zavio CamGraba NVR software is capable of recording in multiple modes, such as Continuous, Motion and Schedule. Users can configure recording schedules to be used every day or have multiple recording schedules for each day of the week. Another feature is motion recording, which only records when motion is detected by the camera. Users are also able to mask out areas that they do not want motion detected, such as a swaying tree. Audio recording is possible as long as the Zavio IP Cameras you are using have a built-in microphone.
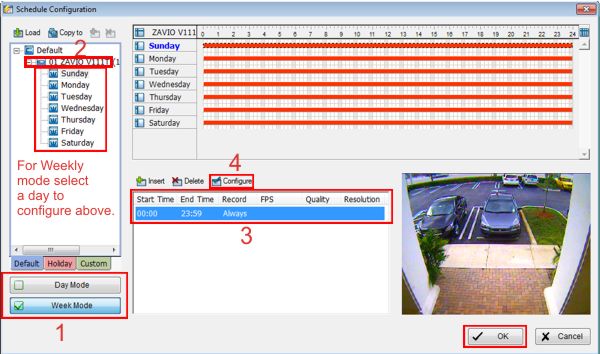
CamGraba Recording Setup1. On the main CamGraba interface, click the Schedule Configuration button. (Shown Below) 
2. Now select a mode. Day mode configures the recording schedule to be the same every day. The Weekly mode allows users to set up a different recording schedule for each day of the week. Then select the camera you wish to configure the recording for. Then select the time frame (Highlighted in Blue Below) and click the Configure button (For weekly recording you will have to select a day from the left column, then click the time frame and Configure button). (Shown Below)
3. Once in the Configure menu, select the Start and End time of the recording schedule you want to enable. Then select the Pre and Post Record time (Pre - How many seconds to record prior to a motion event. Post - How many seconds to record after a motion event takes place). 4. Then if you have audio devices in place, go ahead and enable audio recording. 5. Now select either Always Record (Around the Clock Recording) or Motion Record (Only records when motion is detected). If you selected Motion Recording, choose the Sensitivity level and Frame Interval. Then select the area of the screen you would like the motion detection to be by left-clicking and dragging your mouse across the left video screen.
6. Then select OK to save the settings. (Steps 3 - 6 Shown Below) 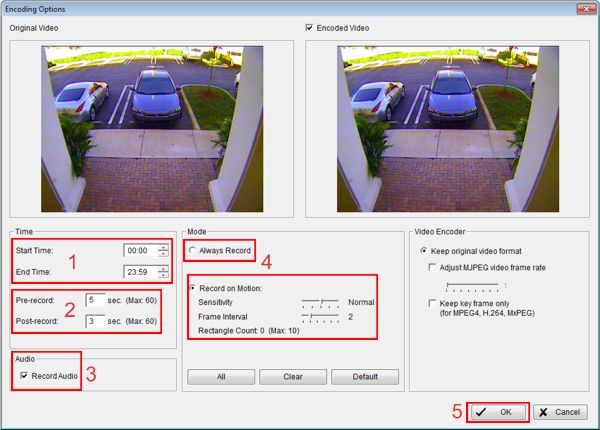
7. Now on the main screen, click the Start Menu all the way to the left. Then select either Start Monitor All (Continuous Recording) or Start Recording Schedule (Enables the schedule you created in the previous steps). (Shown Below) 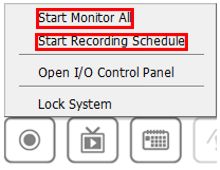
|


