You are here: Home > iDVR-PRO D1 DVR Support > Motion Detection Recording Setup

iDVR Surveillance DVR Motion Detection Record Setup

iDVR Surveillance DVR

The iDVR-E series surveillance DVR supports continuous, motion detection recording, as well as setting up schedules of continuous and scheduled continuous recording for each camera. Motion detection recording eliminates a lot of unnecessary recording since it is only recording when motion is detected via movement captured by the camera. The iDVR-E also logs all motion events which makes it easy to search for and playback surveillance video.


DVR Motion Recording Setup Instruction

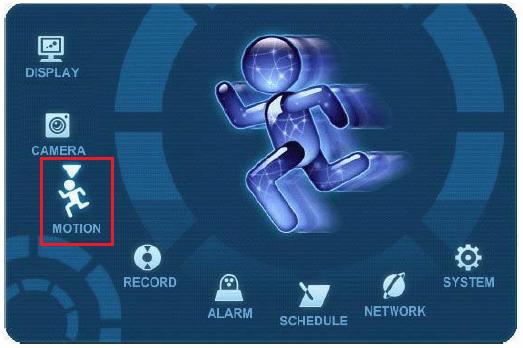
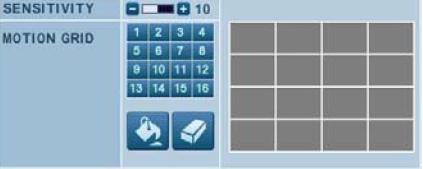
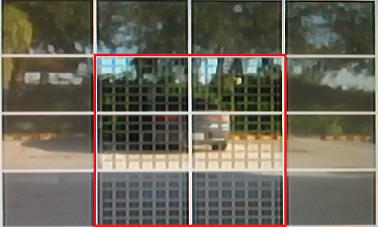
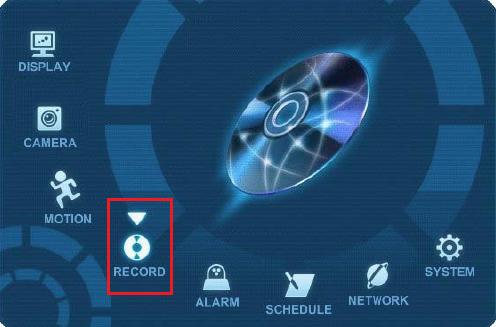
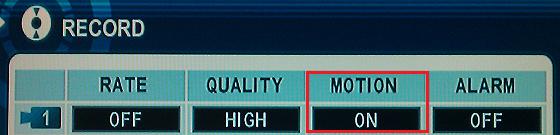
Follow these instructions to configure your iDVR-E for Motion Recording.
  1. Login into the iDVR-E Configuration Menu by pressing the menu button on your IR remote control.
  2. Use the directional buttons to select the "Motion" menu. Once selected press the Enter/Zoom button to select.

  3. Using the directional buttons select the camera you would like to configure.

  4. Use the + or - button on the remote control to adjust the "Record Time". The "Record Time" is how long the DVR will record after motion is detected. [Configurable from 10 ~ 300 seconds]

  5. Adjust the "Sensitivity" and set "Motion Grid".


    4b. Adjust the sensitivity by selecting the camera you would like to adjust and then using the directional buttons to highlight the sensitivity bar. Now you can press the + or - button to change the sensitivity level. [1 is the least sensitive, 20 is the most sensitive.]

    4c. Use the menu to setup and configure the motion zones per camera. An overlay for the camera you are configuring will be displayed in the grid to the right.

    Note: The Paint Can icon selects all zones. The Eraser icon erases all zones. Or if you wanted to select or deselect individual zones you can simply press the number key on your IR remote control. For numbers over 10 use the 10+ key. [eg. If you wanted to configure zone 15 you will press the 10+ key and the number 5 on the remote control]


    The highlighted zones in the middle of the screen represent the active zones. [You should see a small grid within the zone. This means the zone is active.] If any motion activity occurs in this area it will trigger the DVR to record and will be logged in the DVR event log. If activity occurs in the solid grey zones it will be ignored. This helps eliminate false alarms.
  6. Now Save changes by pressing the "Enter" button on the IR remote control.
  7. Go to the "Record" Menu.


  8. Enable Motion per camera/channel you would like motion to be detected. "On" will activate the channel associated. "Off" will deactivate the channel.


    Note: If you want the DVR to record on motion events only you will need to set the "Rate" field to "Off". If you would like to record continuous and motion you can set the "Rate" field to the desired frame rate. Continuous Motion recording will record 24/7 and will log all motion events. If you will be recording continuously you will need to set the "Quality" field as well. "Alarm" can be left "Off" this is for alarm relays and does not apply to this setup.
  9. Now press the "Enter" button to save the settings.
  10. Now log into the "Event" Menu.

  11. Set the Desired Frame Rate and Video Quality per each camera. This only applies to cameras that are set for motion Recording.
  12. Press the "Enter" button on the IR remote control to save the settings.

    You are now done configuring your iDVR-E for Motion Recording. If you have any questions please call CCTV Camera Pros Tech Support Line. 1-(888) 849-2288 x3.