iDVR-E Series Surveillance DVR PTZ Camera Setup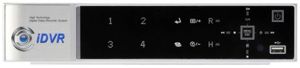 The iDVR-E Series Surveillance DVRs are capable of controlling a PTZ camera via the on-screen interface. Users can also control their PTZ camera on iPhone and Android mobile phones using the CMS Mobile PRO (Available in the App Store) application. In addition to mobile devices, users can also use the iDVR-E's client desktop software to control their PTZ camera from a PC. The iDVR-E Series Surveillance DVRs are capable of controlling a PTZ camera via the on-screen interface. Users can also control their PTZ camera on iPhone and Android mobile phones using the CMS Mobile PRO (Available in the App Store) application. In addition to mobile devices, users can also use the iDVR-E's client desktop software to control their PTZ camera from a PC.
PTZ Camera Setup
The instructions below explain how to set up a PTZ camera on the iDVR-E series surveillance DVR.
1. Connect the PTZ Camera to one of the BNC inputs on the back of the iDVR-E surveillance DVR. Then using RS-485 cable, connect the PTZ's control line to the RS-422 TX + and RS-422 TX - terminals as shown below. Note: The positive and negative terminals must be correctly wired for the PTZ to work. (Example: + to + and - to - ) 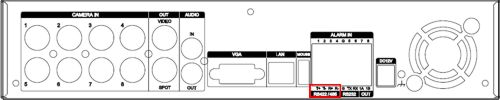
2. Now power the PTZ camera up. You should see the PTZ's information appear on the DVR interface. Here you will need to obtain the Protocol and Baud Rate. (Example: The PTZ-A10X and PTZ-D10X by default use Pelco D 2400 and ID 01 ) 3. Once you have obtained that information, press the Menu button. Then go to the Camera icon and press Enter.
4. Go down to PTZ ID / Model and enter the PTZ's Protocol and Baud Rate using the "+" and "-" buttons. Once you have input the information, press Enter to save and exit the menu. 5. Then put the PTZ camera you wish to control in fullscreen mode.
6. Now using the included IR remote control, press the PTZ button. 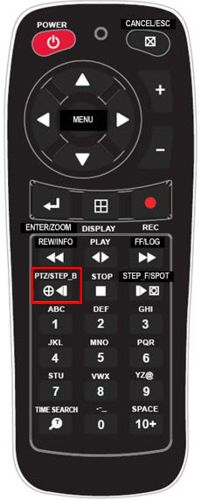
7. The menu below should appear. Here you will be able to control the PTZ camera using the directional, +, -, and enter buttons. 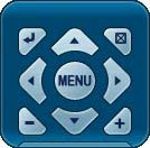
Button Explanation Enter  - Press this button to display the HELP menu (Shown Below). The help menu explains what every button on the IR remote does in PTZ mode. - Press this button to display the HELP menu (Shown Below). The help menu explains what every button on the IR remote does in PTZ mode. 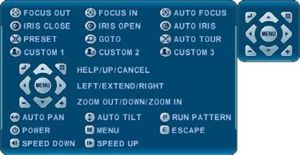
Cancel  - This button exits PTZ mode. - This button exits PTZ mode. Menu  - The PTZ camera control interface will be extended to use all functions. (Shown Below) - The PTZ camera control interface will be extended to use all functions. (Shown Below) 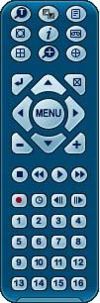
Directional  - Controls the Pan and Tilt functions of the PTZ. - Controls the Pan and Tilt functions of the PTZ. Zoom  - The + and - buttons control the Zoom function of the PTZ. - The + and - buttons control the Zoom function of the PTZ.
iDVR-E CMS ( PC ) - PTZ Control
To control your PTZ through the iDVR-E CMS PC program, please follow the instructions below. 1. Connect the PTZ Camera to one of the BNC inputs on the back of the iDVR-E surveillance DVR. Then using RS-485 cable, connect the PTZ's control line to the RS-422 TX + and RS-422 TX - terminals as shown below. Note: The positive and negative terminals must be correctly wired for the PTZ to work. (Example: + to + and - to - )
2. Now power the PTZ camera up. You should see the PTZ's information appear on the DVR interface. Here you will need to obtain the Protocol and Baud Rate. (Example: The PTZ-A10X and PTZ-D10X by default use Pelco D 2400 and ID 01 ) 3. Once you have obtained that information, press the Menu button. Then go to the Camera icon and press Enter.
4. Go down to PTZ ID / Model and enter the PTZ's Protocol and Baud Rate using the "+" and "-" buttons. Once you have input the information, press Enter to save and exit the menu. 5. Locate the Disk that came with the DVR and insert it into your PC. In the disk menu, double-click and install the CMS Installer. (Shown Below) You can also download it here - iDVR-E CMS 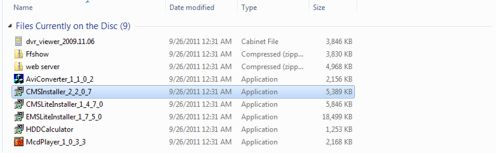
6. Once installed, click on the desktop icon (Shown Below) and log into the program. (Default password is a single zero "0") 
7. Now that your DVR is showing on the CMS Installer, double-click the PTZ to display it in fullscreen mode. 8. Use the PTZ controls on the bottom right of the program (Shown Below) to control the PTZ. 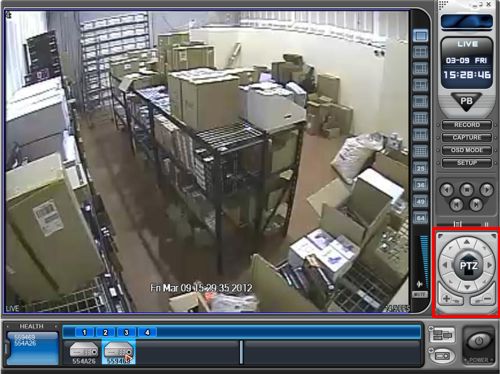
To control your PTZ through the CMS Mobile PRO iPhone application, please follow the instructions below. 1. Connect the PTZ Camera to one of the BNC inputs on the back of the iDVR-E surveillance DVR. Then using RS-485 cable, connect the PTZ's control line to the RS-422 TX + and RS-422 TX - terminals as shown below. Note: The positive and negative terminals must be correctly wired for the PTZ to work. (Example: + to + and - to - )
2. Now power the PTZ camera up. You should see the PTZ's information appear on the DVR interface. Here you will need to obtain the Protocol and Baud Rate. (Example: The PTZ-A10X and PTZ-D10X by default use Pelco D 2400 and ID 01 ) 3. Once you have obtained that information, press the Menu button. Then go to the Camera icon and press Enter.
4. Go down to PTZ ID / Model and enter the PTZ's Protocol and Baud Rate using the "+" and "-" buttons. Once you have input the information, press Enter to save and exit the menu. 5. Now download the CMS Mobile PRO iPhone / iPad application.
6. Once installed, open the application. Now add the DVR by selecting the "+" button on the upper right of the screen. (Shown Below) Then return to the home screen and log into the DVR by pressing it. 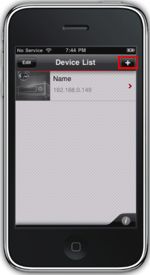 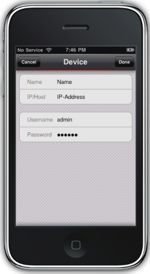
7. Now that your viewing your DVR, select the PTZ you wish to control and select single view mode. Then press the PTZ button to enable the controls. You can control the Pan / Tilt by using the arrow buttons. The Zoom is controlled by the "+" and "-" buttons in the middle. (Shown Below) 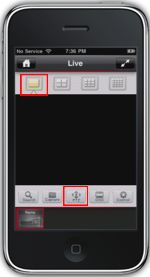 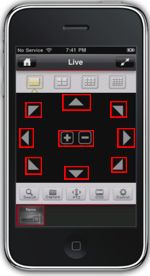
|


