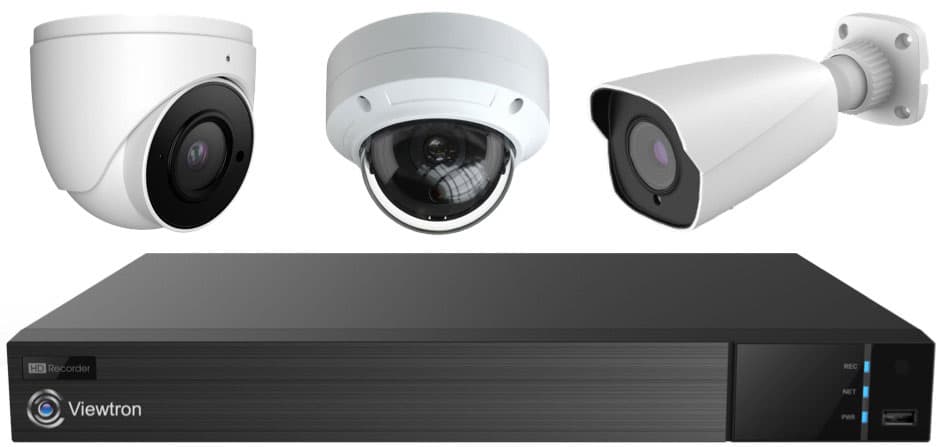
Video Surveillance Recording Setup
Learn how-to setup various record modes on Viewtron security camera DVRs and NVRs.
Watch this video to learn how to setup the various video recording modes on Viewtron security camera systems. The video recording setup shown in this video is applicable to
Viewtron IP camera NVRs and Viewtron hybrid BNC camera DVRs.
DVR Recording Setup
If you prefer images and text, instead of video instructions, please refer to these setup instructions.
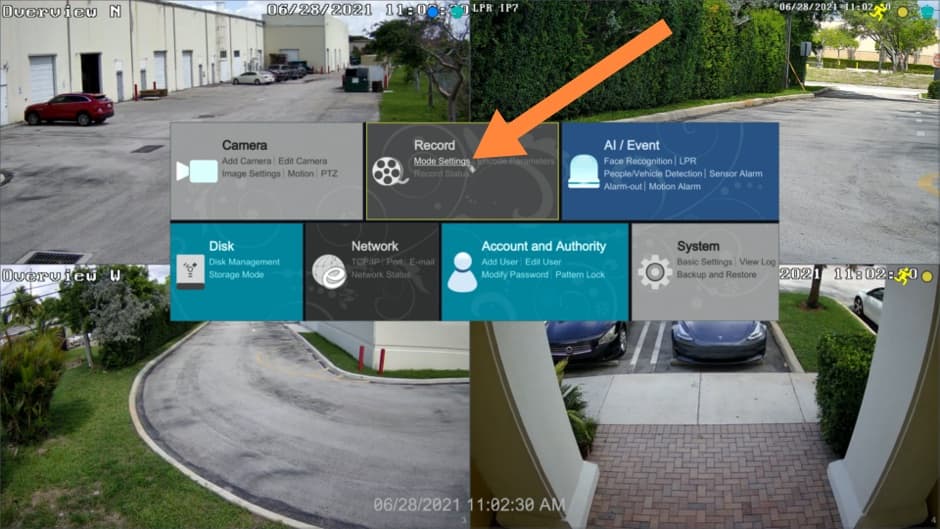
To access the recording setup screen on Viewtron DVRs and NVRs, click on the Mode Settings link from the main menu.
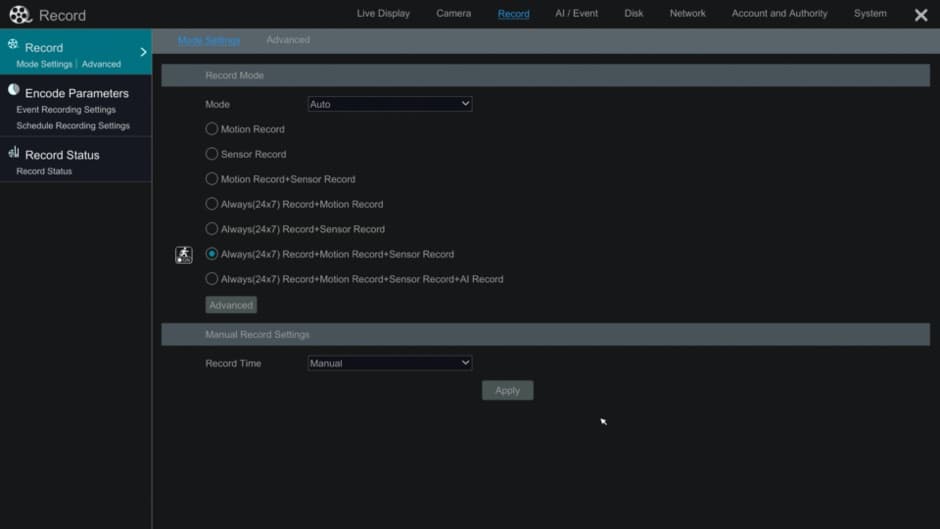
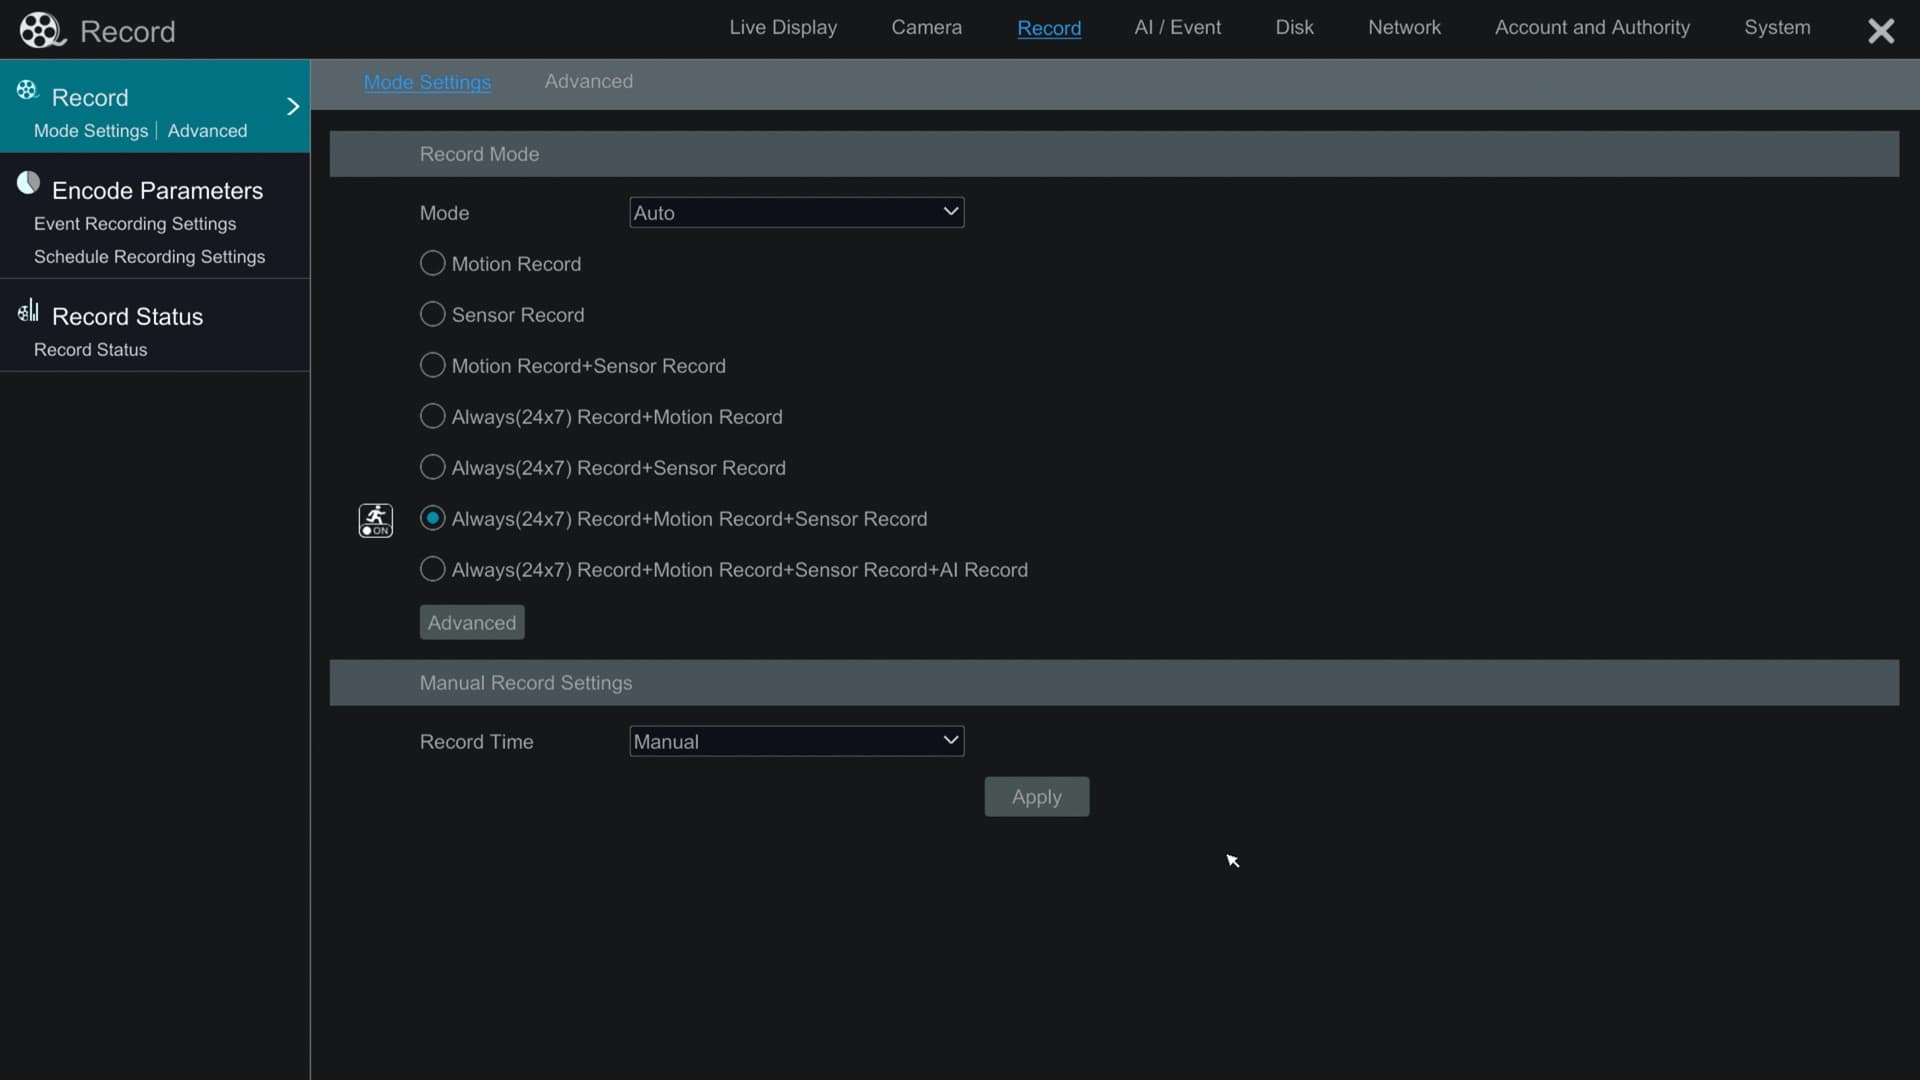
On the record setup screen, the Record Mode is displayed. Viewtron DVRs and NVRs support the following modes: Continuous Recording, Motion Recording, Sensor Recording, POS (point of sale) recording, and AI recording (Viewtron IP camera NVRs ONLY). You may also setup any combination of two or more of these modes by clicking on the Advanced button.
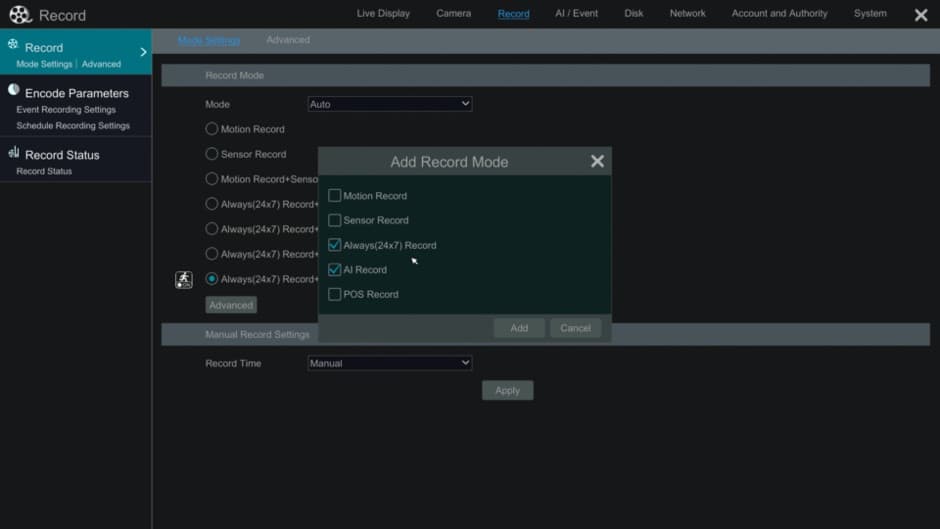
When you click on the Advanced button, you may select all of the recording modes that you want applied.
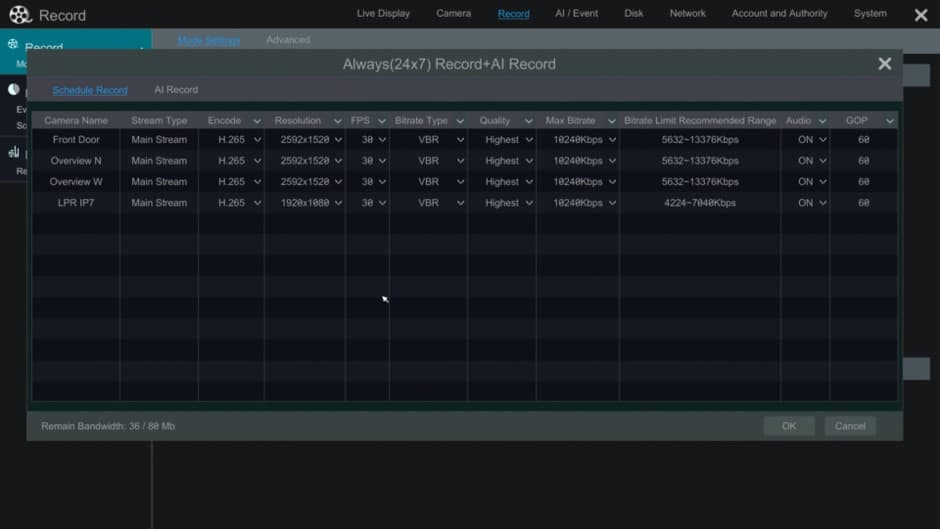
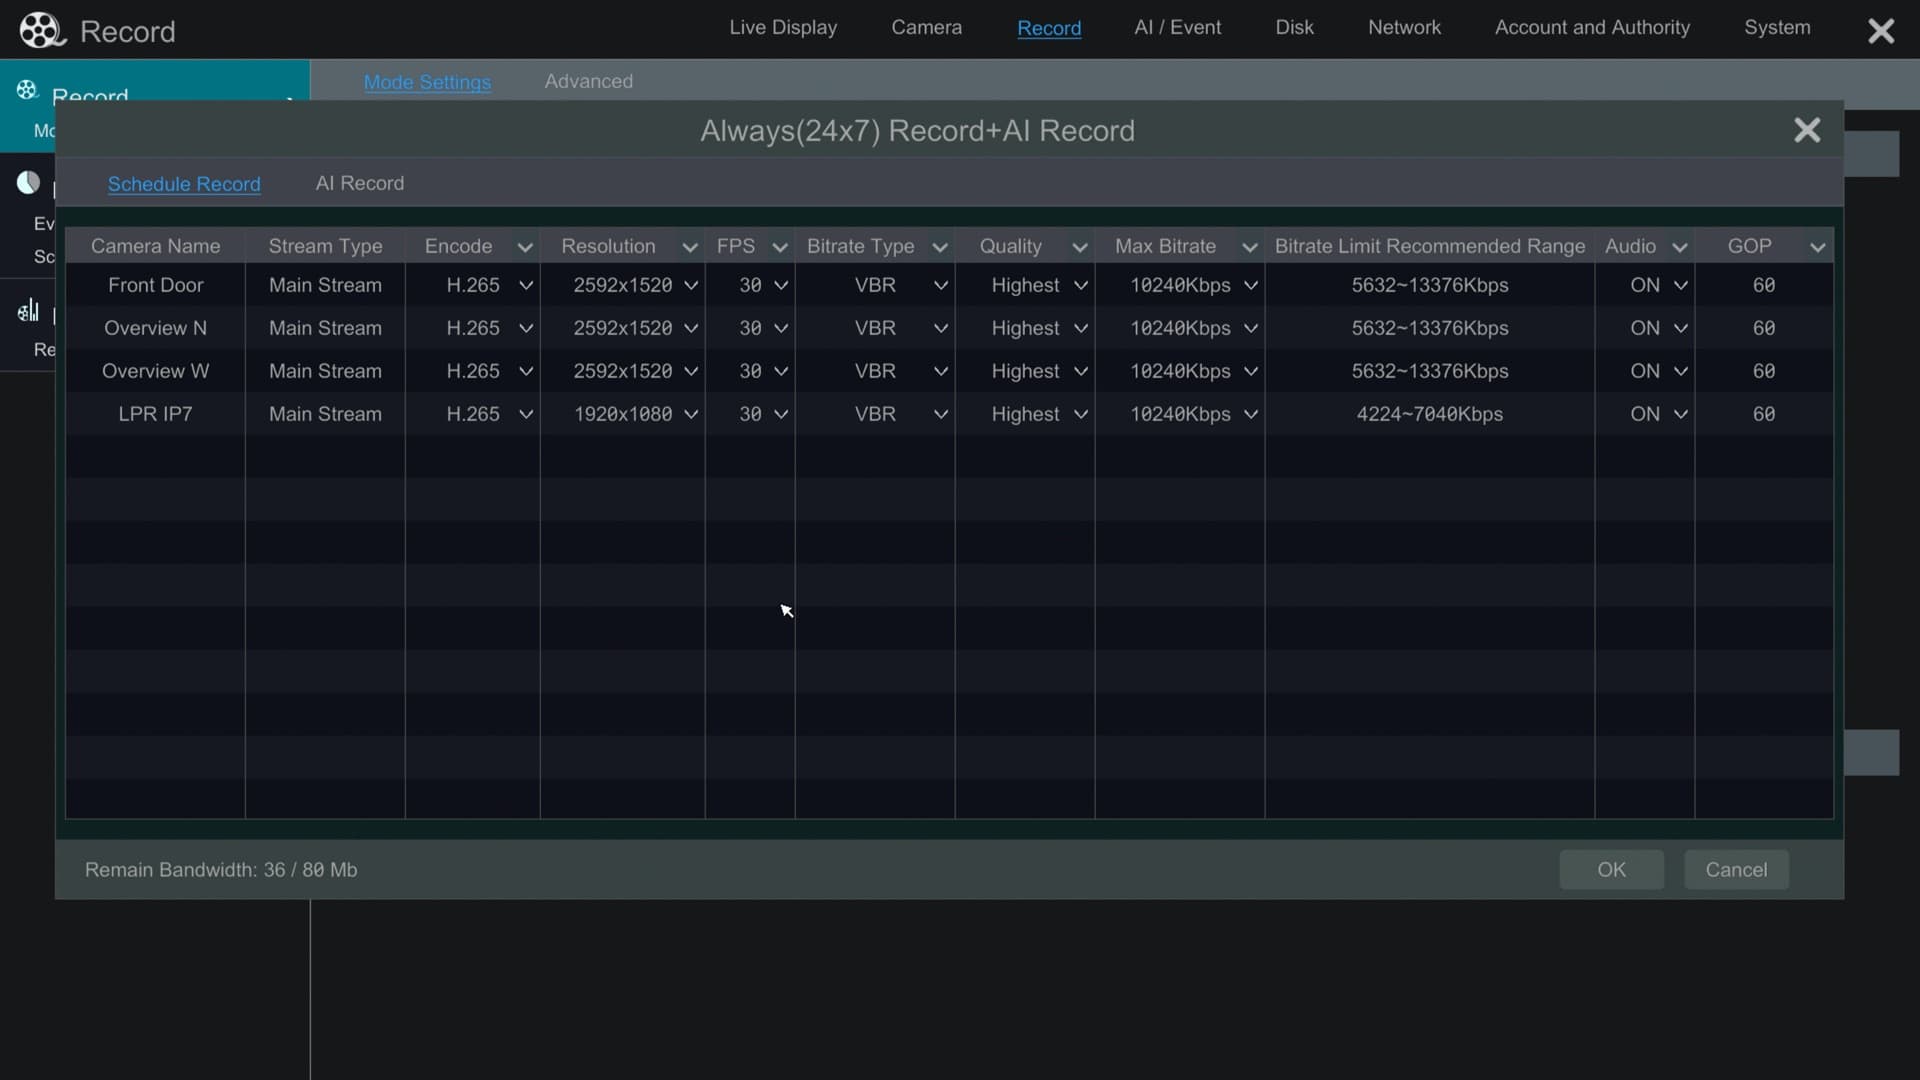
If you change the recording mode, another screen will open which allows you to setup different record settings for continuous schedule recording and each other mode that you are using. For example, at CCTV Camera Pros we use continuous recording (Schedule) + AI recording. Viewtron DVRs and NVRs allow you to setup different record settings for continuous recording vs AI recording (for example). The two types of recording can have different resolution, frame rate (FPS), Bitrate, video quality, and audio on / off settings. This is a useful feature for users that want a lower resolution during continuous recording and higher resolution during AI events or motion detection. At CCTV Camera Pros, we typically recording at the highest resolutions and frame rates always.
Custom Record Settings for Each Camera
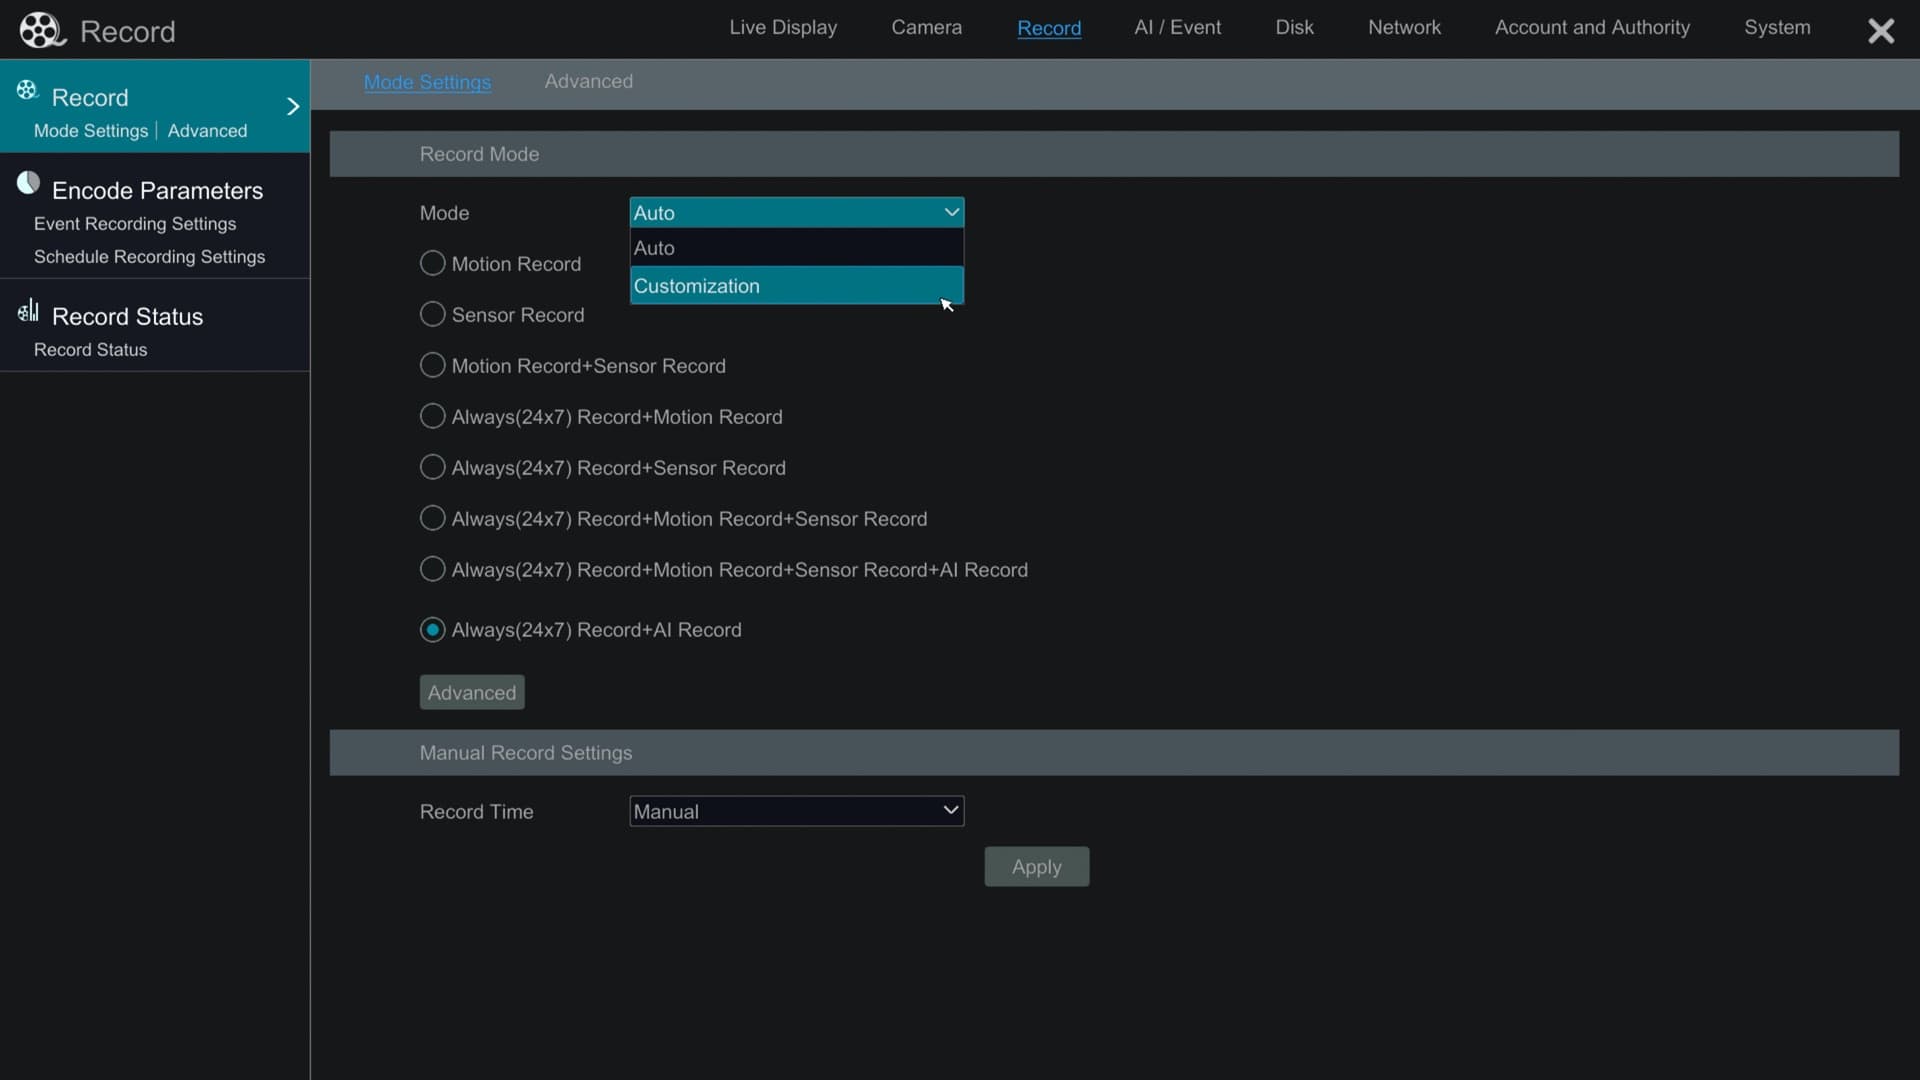
So far, all of the instructions have been based on all cameras using the same record mode. You may also setup each camera to have it's own unique recording mode(s) and schedule.

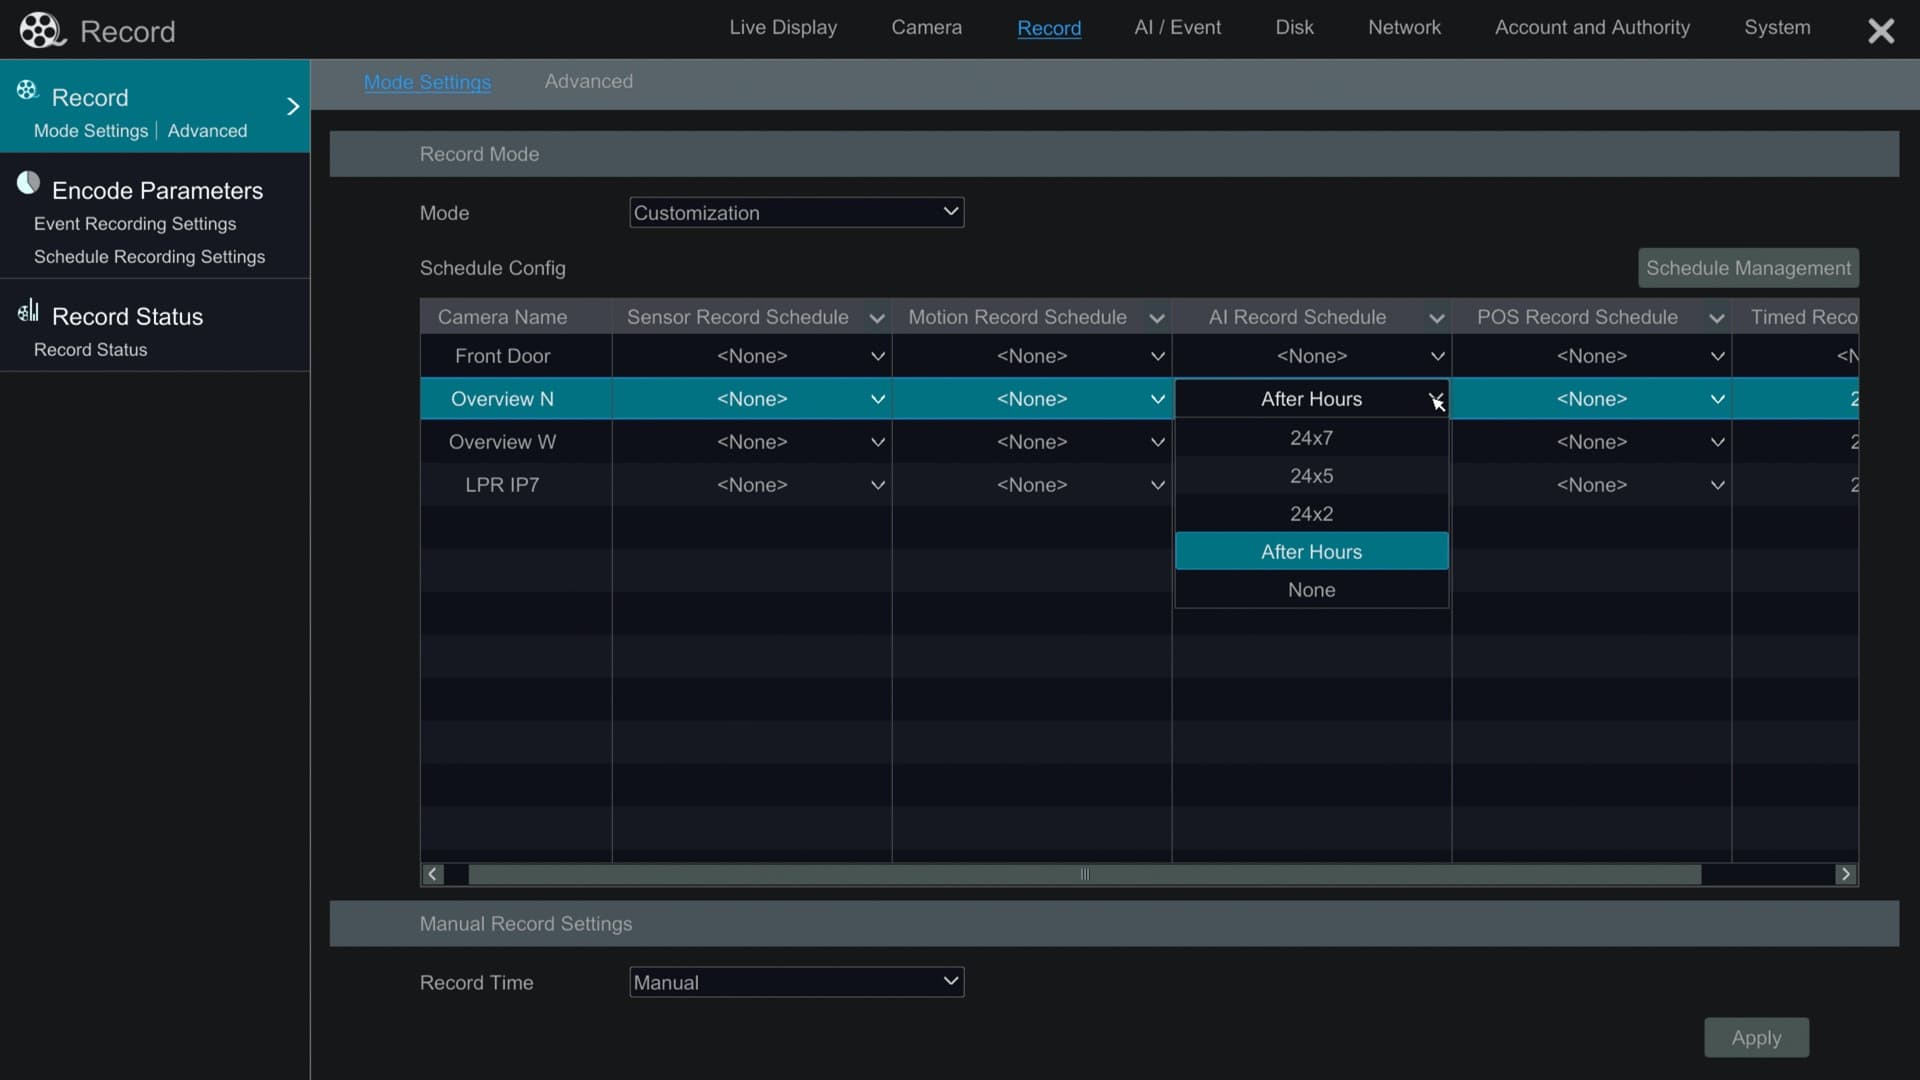
To setup each of your security cameras to have a unique recording mode and schedule, change the Mode from Auto to Customization.

On the Schedule Configuration screen, you can select one of more recording modes for each of your security cameras. For each mode, you can select a schedule from the dropdown. If you want to configure a custom schedule, click on the Schedule Management button.
Manual Video Recording Setup
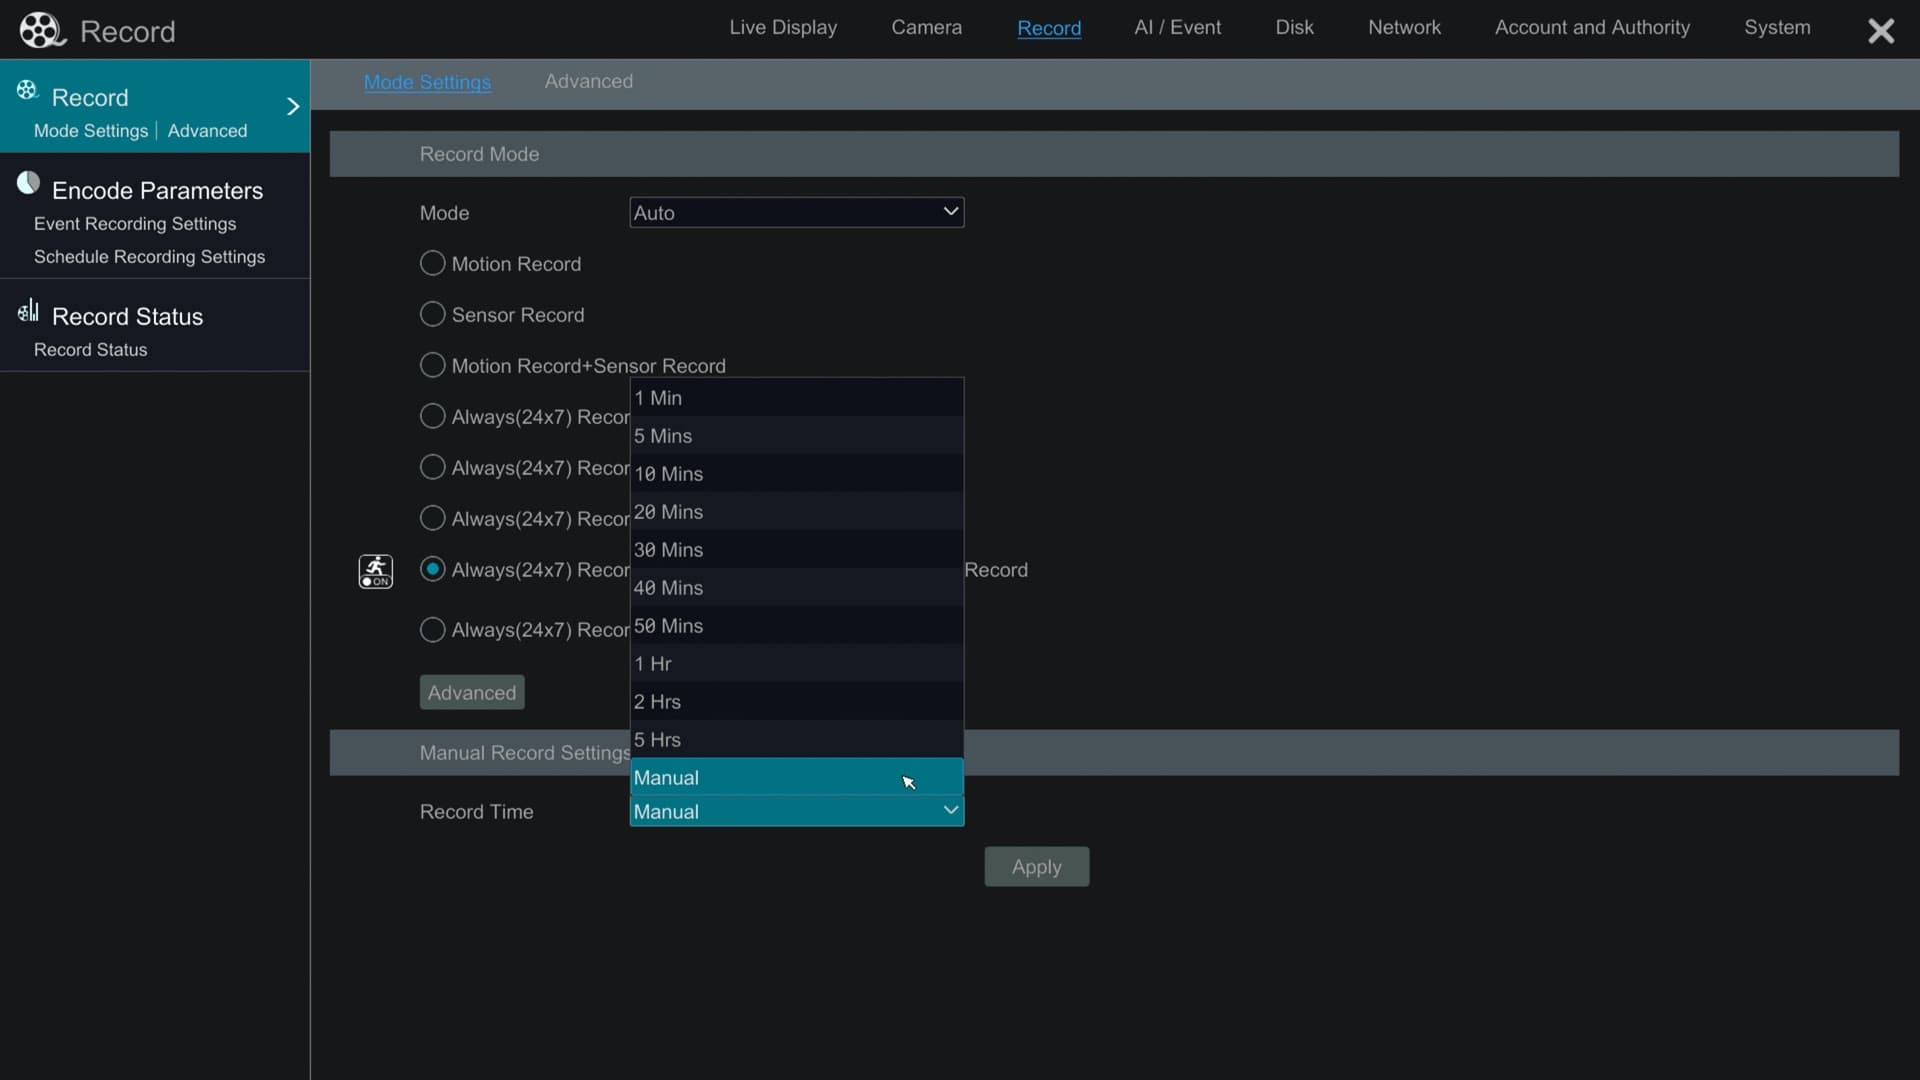
In addition to all of the video recording modes described above, Viewtron DVRs and NVRs also support a manual recording mode. Manual recording allows users to override all of the other recording modes and simply turn recording on manually.
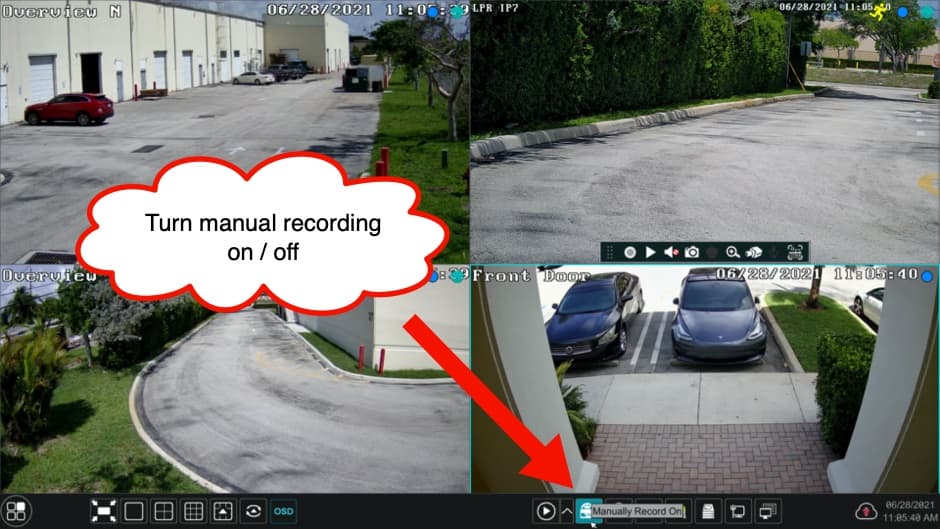
To manually turn video recording on, users can press the manual record button using the mouse. This is seen in the above screenshot.

You may configure how long the DVR will manually record for by selecting the Record Time on the main record mode settings screen. If you choose "Manual", the DVR will manually record until you click on the manual record button again to turn recording off. If you choose a time, the DVR will automatically turn manually recording off according to that time.
More Viewtron Surveillance System Video Demos
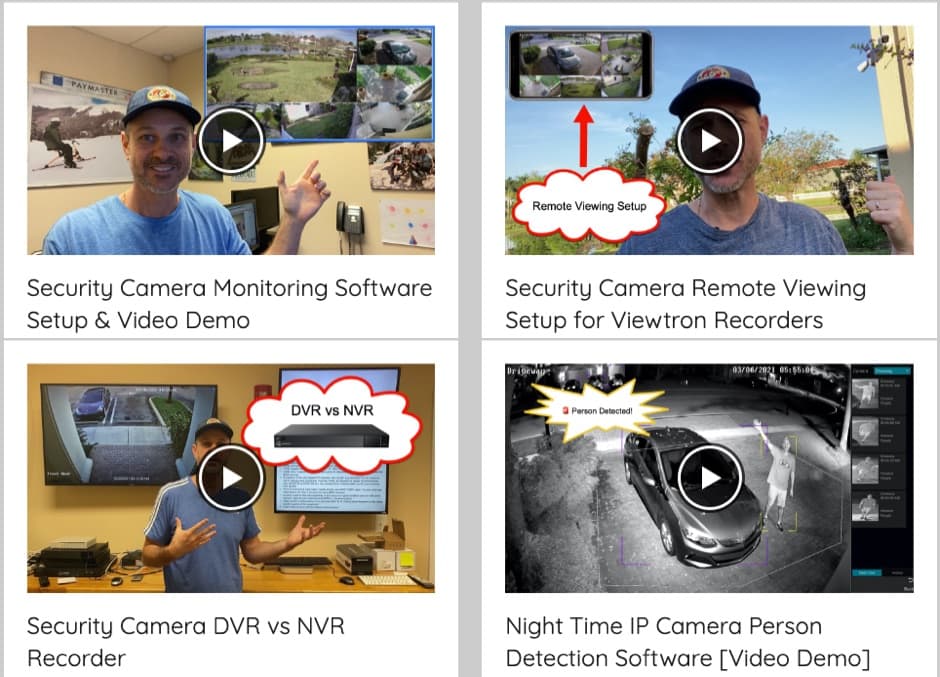
You can view all of our
Viewtron security camera system video demos here.
Learn more about Viewtron Security Camera DVRs / NVRs
Learn more about the latest
Viewtron Hybrid Security Camera DVRs and NVRs for IP cameras with built-in PoE here.
Hybrid DVRs work with Analog CCTV, Network IP, and HD BNC Security Cameras
Users can mix and match different camera technologies. This is perfect for customers that have existing CCTV cameras and want to upgrade to high definition over time. Hybrid iDVR-PROs work with the following security camera types and resolutions.
- 4K BNC Security Cameras
- AHD Cameras (720p, 1080p / 2mp, 3mp, 4mp, 5mp, 4K / 8mp / 4K)
- HD-TVI Cameras (720p, 1080p / 2mp, 3mp, 4mp, 5mp, 4K / 8mp / 4K)
- HD-CVI Cameras (720p, 1080p / 2mp, 3mp, 4mp, 5mp, 4K / 8mp / 4K)
- Network IP Cameras - ONVIF compatible IP cameras up to 4K resolution supported
- Analog CCTV Cameras (all analog resolution supported including CIF, D1, 960H)
Complete Security Camera Systems
Did you know? CCTV Camera Pros can provide a complete surveillance system quote that includes any Viewtron DVR or NVR model? We can include security cameras, cables, connectors, power supplies, and monitors. We can even mix and match IP cameras and HD BNC security cameras because Viewtron DVRs are hybrid. This means that they work with just about any type of security camera. As you have probably already seen on our website, we have 2, 4, 8, and 16 camera surveillance systems in pre-made packages. However, it is not possible for us to package up every combination and quantity of all the different camera models that we carry. So, we can also provide you with a custom quote with as many cameras as you need and a mix of any combination of camera model(s) based on your project requirements. Please
request a quote when you are ready.

CCTV Multiplexers
If you are looking for a camera system only for live video display, you may be interested in a
CCTV video multiplexer, instead of a DVR. Stand-alone video multiplexers are perfect for people that DO NOT need video surveillance recording or remote Internet access to view their security cameras.
Video Transcript
Here is a complete transcript of the above video about how-to setup recording on your Viewtron DVR / NVR.
Hi everyone, Mike from CCTV Camera Pros here. In this video, I'm going to show you how to set up the video surveillance recording schedule on Viewtron security camera DVRs. This is applicable to both the Viewtron NVRs for IP cameras as well as the Viewtron hybrid DVRs for BNC security cameras. Afterwards, I'm going to talk about some of the slight differences between the NVRs and DVRs. The interface is the same but there are some small differences that I want to point out.
Okay, so here's the live security camera display on the Viewtron NVR at our office and to access the recording settings, I'm going to click on the Start button in the lower left and then select Settings and then on this main setting screen I'm going to click record. By default when you get these out of the box, all of the recording is going to be on, the 24 by 7 record, motion recording, sensor recording, and in the case of NVRs, AI recording. The AI recording is only applicable to the Viewtron NVRs, and you could see the different recording modes here, motion, sensor, motion record plus sensor, 24 by 7 record plus motion record, so on and so forth. And when you change those modes, that's applicable to all of the cameras on the system. This is if you want all cameras to be on the same recording mode.
Now if you want to set up different modes for different cameras, then you hit this mode dropdown box and select Customization. What that does now is that breaks up each camera so that you can set up different schedules for each camera. So for example, our license plate recognition camera, I might want that only to record on AI detection. So when a license plate is detected, but timed recording to be off. But this dome camera that we have in our office, I want that different. I want that set up to be on a time schedule 24 by 7 for example and AI maybe. And so you could see there's three default recording schedules, 24 by 7, 24 hours a day during the weekdays and 24 hours a day on weekends. That's what those three are and you could come under here to the schedule management and set up custom time schedules, so you can add one and name it whatever you want. I'm not going to through that, basically you name it and then you can pick and choose all the different times for every day of the week, all custom.
Okay, so back to the record mode. I'm going to switch that back to Auto and I just wanted to mention what I use at the office on our Viewtron NVR is I use Always On 24 by 7 plus AI. All of the cameras that we have here in the office are AI security cameras, so I do 24 by 7 recording plus AI and you'll notice when you switch the modes, it's going to pull up this screen so you can choose the resolution, the frame rate, the quality, and the bit rate, and whether audio is on or off if that's applicable to the cameras you have, and then you can have different settings for the 24 by 7 schedule so for example if I want to save some hard drive space and have the quality lower on the 24 by 7 recording but then when there is an AI event, I want that bumped up to the highest. That's an option that you could do. You could also for example on this schedule recording have audio off on one or more cameras but then when AI is triggered, audio on, and you could change each one of these for both the schedule record and the AI record. I just leave everything on the highest rate because we have plenty of hard drive space on these.
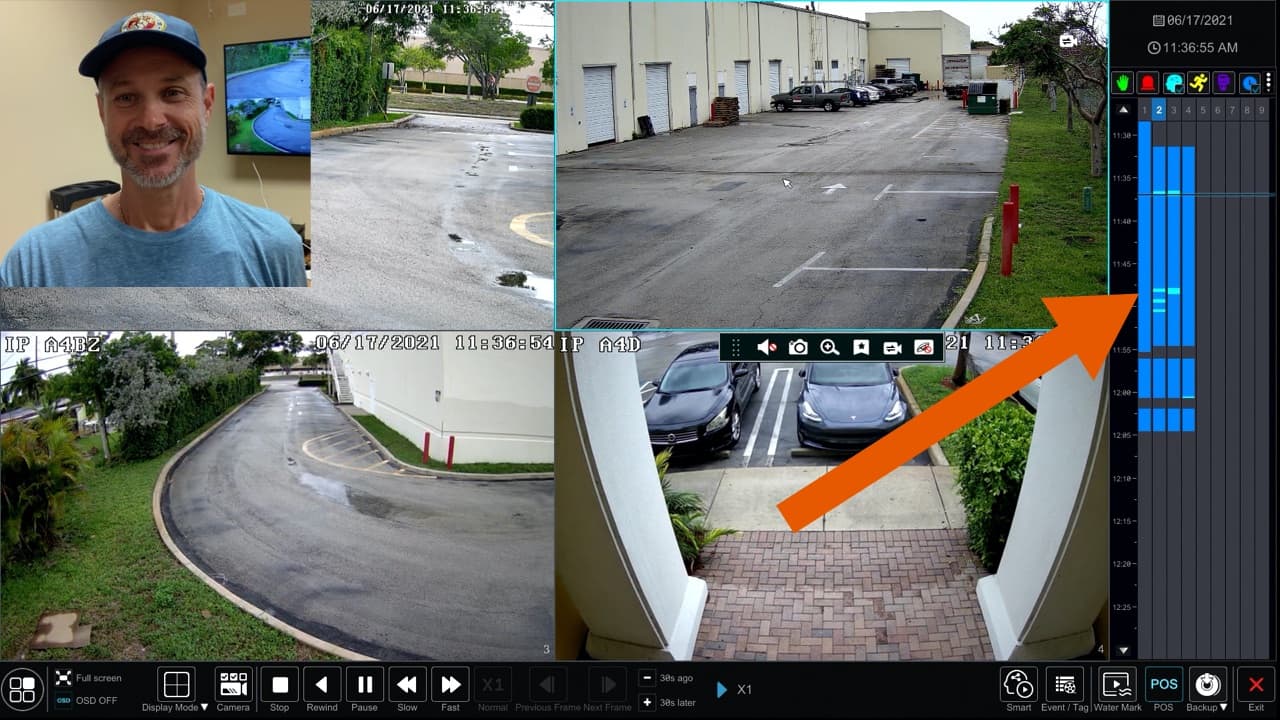
So now I'm going to go back out and show you what playback looks like real quick. so we're back at the live view, and if I want to play back video, recorded video surveillance footage on this system, I can select this Start button again and then select Playback. So that puts the NVR in playback mode, it will look the same on a BNC DVR, and you'll notice it opened up this time scrubber over here so I could jump to different points in time and it's displaying the AI events in light blue. So you can uncheck these different types of recordings, none of these are applicable because again I'm just doing 24 by 7 recording plus AI recording so the light blue and the dark blue, and if I want to jump back to one of these AI events to see what happened, I can just select on the time scrubber that point in time. So we'll go back and see what happened here, and it was a car, this car here going through ... I have a detection zone set up here when vehicles pass through, so that's what happened there.
And then we'll jump to another event, so we'll see what happened up here maybe, right here, and ... It must have been sooner than that. Oh, that big truck went through the same area. So another motion event or AI object detection event in that overview camera. When you're done playing back video, you click on this X in the lower right, and that will bring you back to the live security camera display.
Next, I want to show you the slight difference on the user interface on the Viewtron DVRs. So on the DVRs, when you select the manual mode, the manual settings don't appear on that same screen, you have to click on this record schedule link on the left and then you can individually set the schedules on a per camera basis.
I hope this video has been helpful in showing just how easy it is to set up the video's recording schedule on Viewtron security camera DVRs. The UI on these is extremely easy to use, and if you ever need help, our tech support staff is the best in the industry. If you want to learn more about these Viewtron recorders, the NVRs and the DVRs, we also have a line of BNC cameras and IP cameras, you can visit www.cctvcamerapros.com/viewtron and as always, if you have questions about anything you saw here or anything related to security camera systems, feel free to email me any time. I can be reached directly at [email protected]. Thank you for watching.
|