Time Lapse Video Photography Using IP Security Camera
The following time lapse video was created by capturing still images using a Zavio IP camera. A total of 1546 photos were used by capturing a snapshot every 3 to 5 minutes over the course of 4 days.
Video Playback Instructions
For the best viewing experience, start playing the video, then select the highest video quality setting by clicking on the video settings button.

If you were able to select 720p or 1080p video, you should also select full screen mode to see the video larger. You can break out of full screen mode by clicking on the Esc button on your keyboard.

Video Transcript
The following time lapse video was created by capturing still images using a Zavio IP camera. A total of 1546 photos were used by capturing a snapshot every 3 to 5 minutes over the course of 4 days.
Here is a network diagram that illustrates the setup that I used to capture the photos for the time lapse video.
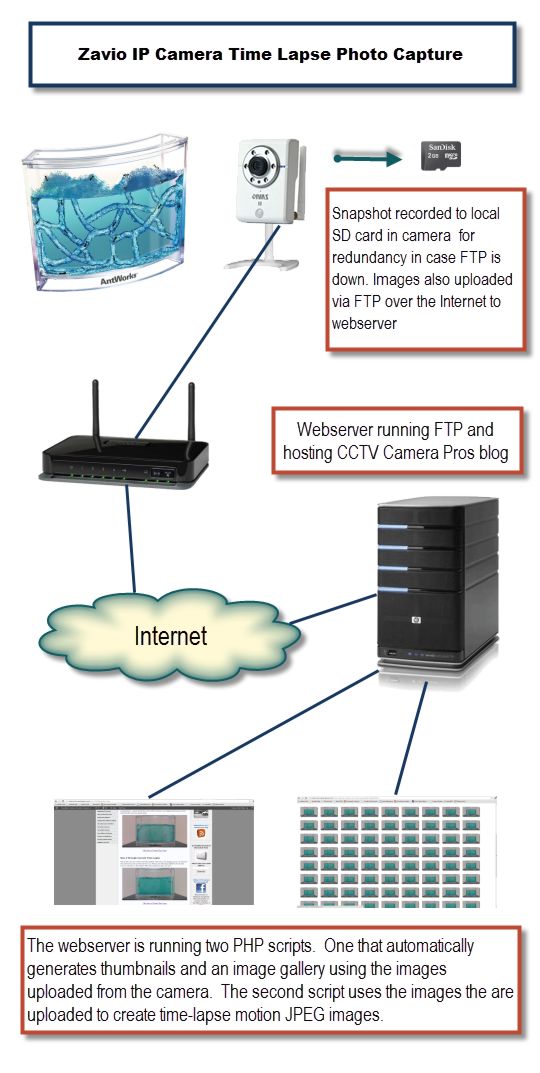
A Zavio F3110 surveillance camera was configured to record a 1280 x 720 resolution photo to the micro SD card inserted into the camera.

The camera is connected to a network router and Internet connection which enables the camera to also upload the photos to our FTP server. This is the same physical server that hosts the CCTV Camera Pros blog. I was running two PHP scripts while the photos were being captured.
One script created an image gallery with thumbnails in real time as the photos where uploaded. The second PHP script generated Javascript to create a motion JPEG animation of all of the photos that were currently uploaded to date.
Unfortunately, when the number of photos got too large, this process would bog down web browsers and I had to disable the auto time lapse script. In future projects, I will attempt to write a script that creates a true motion JPEG stream from the images.
After all of the images were captured, I used Corel Video Studio X4 to create the time lapse that you just saw.
For addtional information about the IP camera and setup process used to create this time lapse video, please visit this page:
http://www.cctvcamerapros.com/Infrared-IP-Camera-p/zavio-f3110.htm
Thank You for watching.
Video Thumbnail
Author and Publisher
This project was managed by Mike Haldas, co-founder and managing partner of CCTV Camera Pros. Questions about this video and how to use network IP cameras to create time-lapse videos can be directed to [email protected].


