PTZ Camera Setup - Outdoor CCTV Camera Pros PTZ-W470A can be configured to work with a stand alone surveillance digital video recorder (DVR), a PTZ controller / keyboard, or a Geovision DVR computer. Following these instructions to configure the PTZ-W470 series PTZ cameras for use with any of the above mentioned controller / keyboard applications. The instructions should be used as a much quicker and easier setup guide that the documentation that ships with the camera. CCTV Camera Pros PTZ-W470A can be configured to work with a stand alone surveillance digital video recorder (DVR), a PTZ controller / keyboard, or a Geovision DVR computer. Following these instructions to configure the PTZ-W470 series PTZ cameras for use with any of the above mentioned controller / keyboard applications. The instructions should be used as a much quicker and easier setup guide that the documentation that ships with the camera.
PTZ Camera Setup & Configuration
-
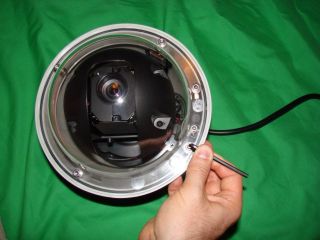
In order to gain access to the PTZ dip switches to configure the camera's setting, you must remove the camera from the housing. The first step is to remove the dome cover of the camera using the allen wrench that came with the camera as seen below.
-
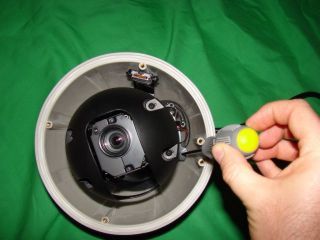
Next, remove the screws that hold the actual PTZ camera inplace in the housing using a phillips head screw driver. Please be careful when removing it, as the camera will still be attached to the base of the housing after you remove the screws. Using a long phillips screw driver, remove the screws that attach the camera to the housing as seem below.
-
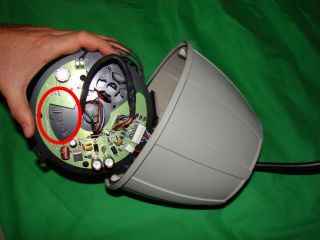
Carefully remove the camera from the housing. BE AWARE, the camera will still be attached to the housing with wires that will not be removed. Once you have the camera outside of the housing, you will see the DIP switches on the top side of the camera as seen below.
The DIP switches will look like this close up. Notice that there are 3 difference setting areas: SW1, SW2, SW3.
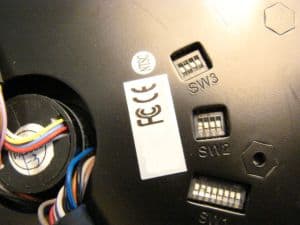
- The SW1 settings are used to configure the ID of your PTZ camera. Assuming that this is the first PTZ that you want your controller to operate, set this camera's ID to 001. Do this by setting switch #1 to the On position and the rest of the switches should be set to Off. If you are setting up more than one PTZ camera on a single system or controller, each camera must have a unique ID so that the controller knows which one you are wanting to comtrol.
- The SW2 settings are used to set the protocol that your camera wil use. Set the protocal to PELCO by setting switch #1 to On and the rest of the switches to Off.
- The SW3 settings are used to set the baud rate that your PTZ camera will use. Set the baud rate to 9600 by setting all switches to the Off position.
-
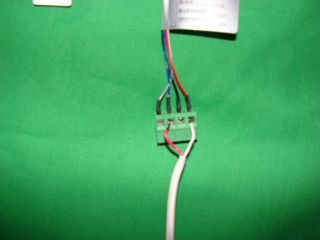
Attach wire to the RS 485 +/- positive and negative terminals of your camera as seen below. Cat-5 or a standard power wire such as doorbell wire can be used for this. Doorbell wire is used below. *Note: Make sure that your wire makes contact with the metal part of the inside of the terminal. A common mistake is to clamp the plastic part of the wire.
-
It is best to test out your camera communication before going through the trouble of mounting your camera and running all of your cable. Once your communication has been tested to your PTZ camera, you should then run your wires and mount the camera
-
Put the camera back in the housing by following the reverse order of how you took it out. Mount the camera back into the housing using a long phillips head screw driver. You may want to use a magnetized screw drive because it is a real pain if you drop the screws into the bottom of the housing.
-
Next, re-attach the dome cover using the allen wrench screws.
CCTV Camera Pros hopes that your installation goes smoothly, but in case it does not, please email or call us for help @ 888-849-2288
|


