|
Nuuo Solo NVR Recording Setup
The instructions featured in this article explain how setup recording on a NUUO NVR Solo network video recorder using the Internet Explorer web browser interface. Users can setup the recording based on continuous recording, motion recording or schedule recording. When set to Continuous Recording, the NVR records around the clock. Motion Recording only records when motion is detected and it can be set to continuous or to a schedule. Schedule Recording allows the user to set the exact time span in which the unit will record. The examples in this article were done using an NS-1080 NUUO Solo Network Video Recorder.
Nuuo Solo NVR Recording Setup
Please follow the instructions below to setup recording on your NUUO NVR Solo using the Internet Explorer web browser interface. First login to your NUUO NVR Solo through a Internet Explorer web browser and then proceed below.
Motion Recording Setup
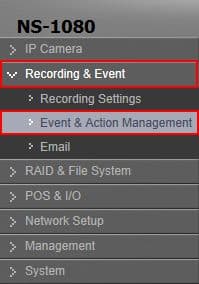
- On the left column of the NVR Solo, click Recording & Event, followed by Event & Action Management. (Shown Below)
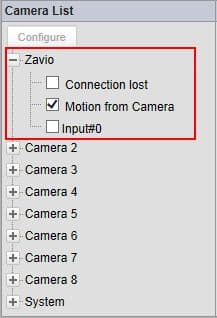
- Now in the Event & Action Management tab, locate the Camera List. Under the Camera List, click and enable Motion from Camera on each camera that you wish. (Shown Below) Please Note: Motion will also have to be enable in the cameras web interface.
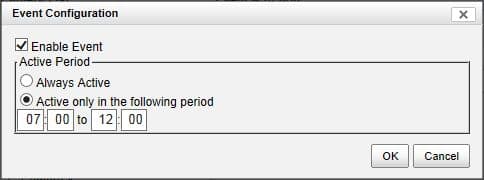
- Then click Configure under Camera List. Click Enable Event, then select whether it will be Always Active or Active for a set time. Then click the OK button to save the settings. (Shown Below)
- Now follow either the Continuous or Schedule Recording instructions below to complete the setup.
Continuous Recording Setup
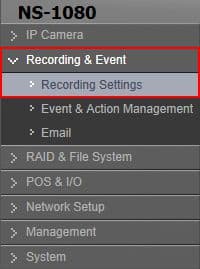
- On the left column, click Recording & Event, followed by Recording Settings. (Shown Below)
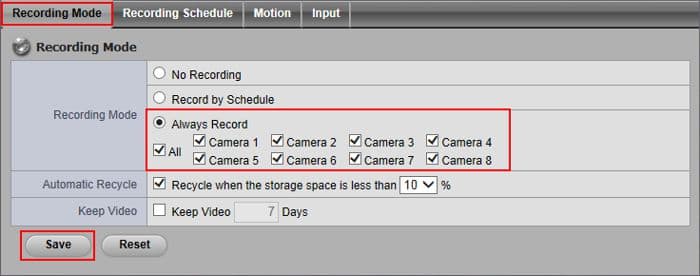
- Then under the Recording Mode tab, click Always Record and select which cameras will follow that setting. Click Save to enable the setting. (Shown Below)
Schedule Recording
- On the left column, click Recording & Event, followed by Recording Settings. (Shown Below)
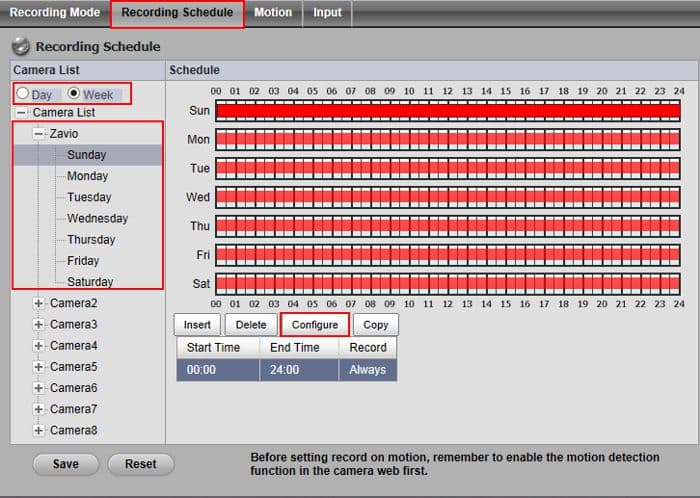
- Now under the Recording Schedule tab, select either Day mode for the same schedule everyday or Week mode for a different schedule for each day of the week. Then select a camera from the left column, followed by a day and click the Configure button towards the bottom. (Shown Below)
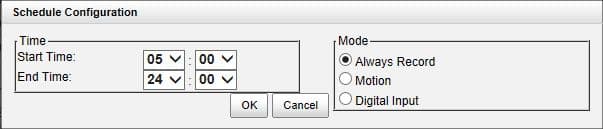
- On the Schedule Configuration menu, set the Start and End time of your desired schedule. Then select either Always Record (Continuous recording from start to end time), Motion (Only records when motion is triggered between the start and end time) or Digital Input (Only records when triggered by an alarm or other device connected to the NVR during the scheduled time). Then click the OK button to save the settings. (Shown Below)
- Repeat the steps above for as many cameras as you need. Click the Save button under Recording Schedule once you have configured all of your cameras.
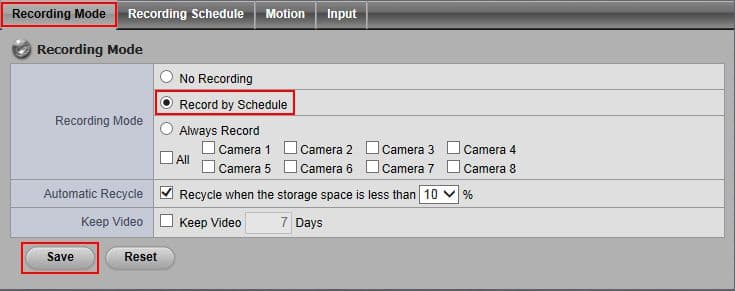
- Now under the Recording Mode tab, select Record by Schedule and click Save to enable the setting. (Shown Below)
|


