LPR Camera System Installation Guide
After many hours of license plate recognition testing at CCTV Camera Pros, we have documented the following LPR camera installation and setup guide. The guide includes hardware installation best practices for the Viewtron
LPR-IP7 camera and LPR-IP4 camera. It also includes the recommended software settings for the ANPR software (automatic number plate recognition) that can be configured on the Viewtron IP camera NVR (network video recorder) that CCTV Camera Pros recommends to use with license plate capture cameras.
Please note that although this guide was written to document Viewtron LPR camera systems specifically, most of the recommendations contained in the guide are best practices for any license plate capture system. Here are the topics discussed in this guide. We also created this
installation video for customers to watch.
Watch this video to see Mike discuss all the the best practices that he recommends when it comes to installing a
Viewtron LPR camera system.
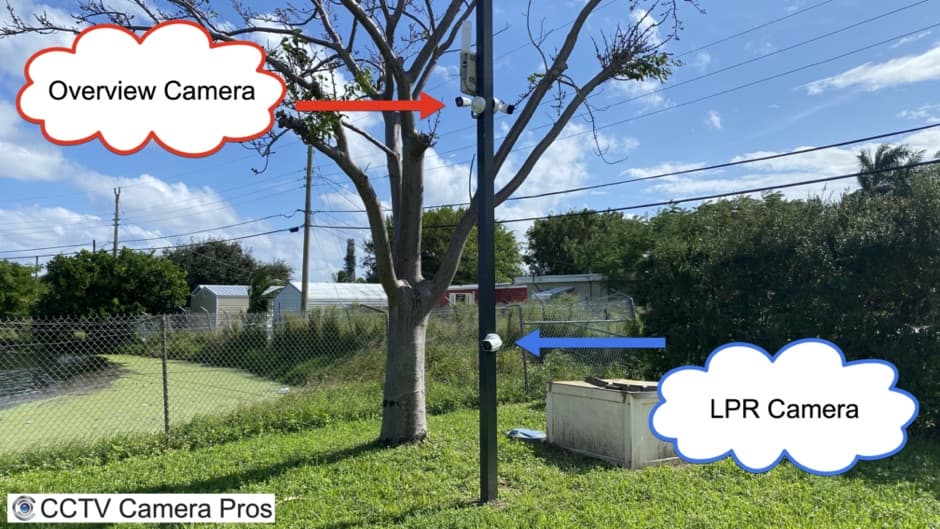
CCTV Camera Pros always recommends that installers pair an LPR camera with an overview camera. The reason is that LPR cameras are specifically designed to capture license plates on moving vehicles, and they are really good at doing that. However, they are not designed to capture a wide area overview of the area under surveillance. The LPR camera is focused on a narrow region of view where plates will be crossing. The overview camera captures a wider area and overview of the vehicles. CCTV Camera Pros uses two overview cameras with the LPR camera that we have installed at our warehouse.
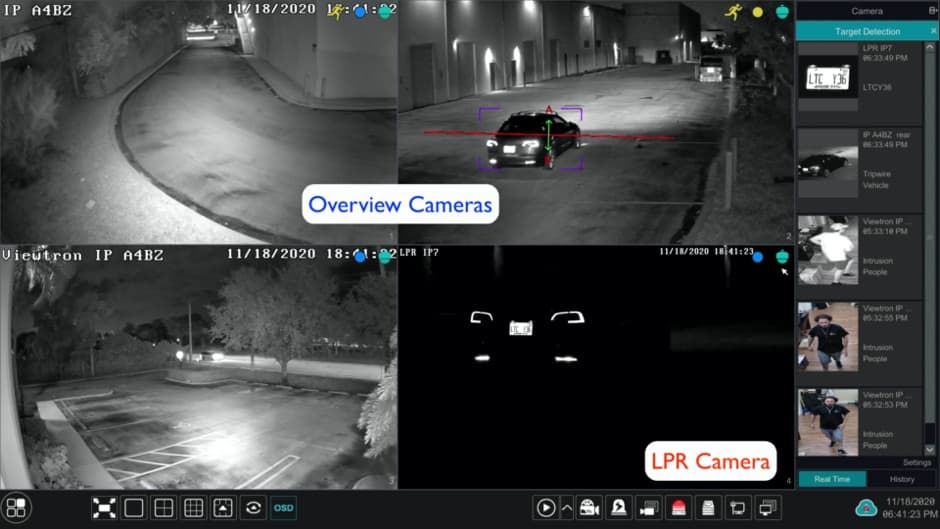
The above screenshot was taken from the live camera view on a Viewtron DVR. The top two cameras are the overview cameras used in conjunction with the LPR camera (lower left). You can see a night that the LPR camera just captures the cars license plate and tail lights, which the overview cameras capture the entire vehicle and surrounding area.
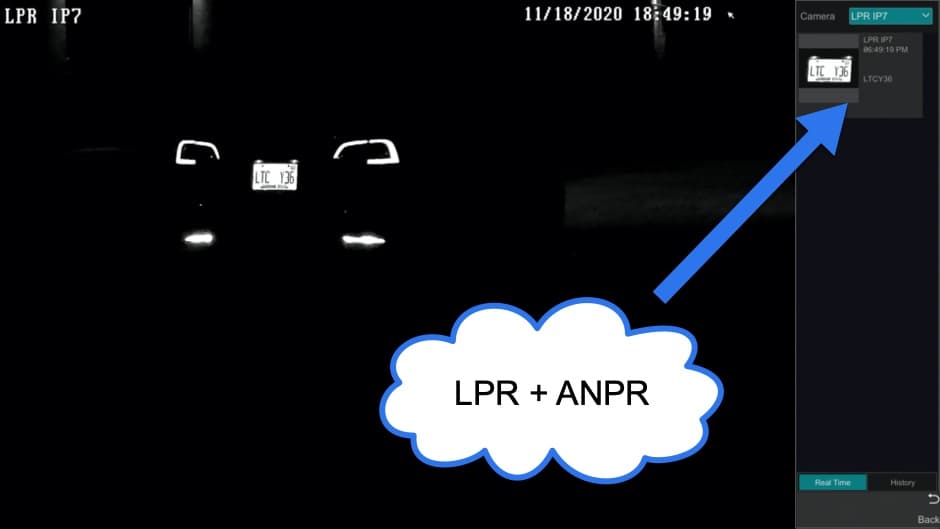
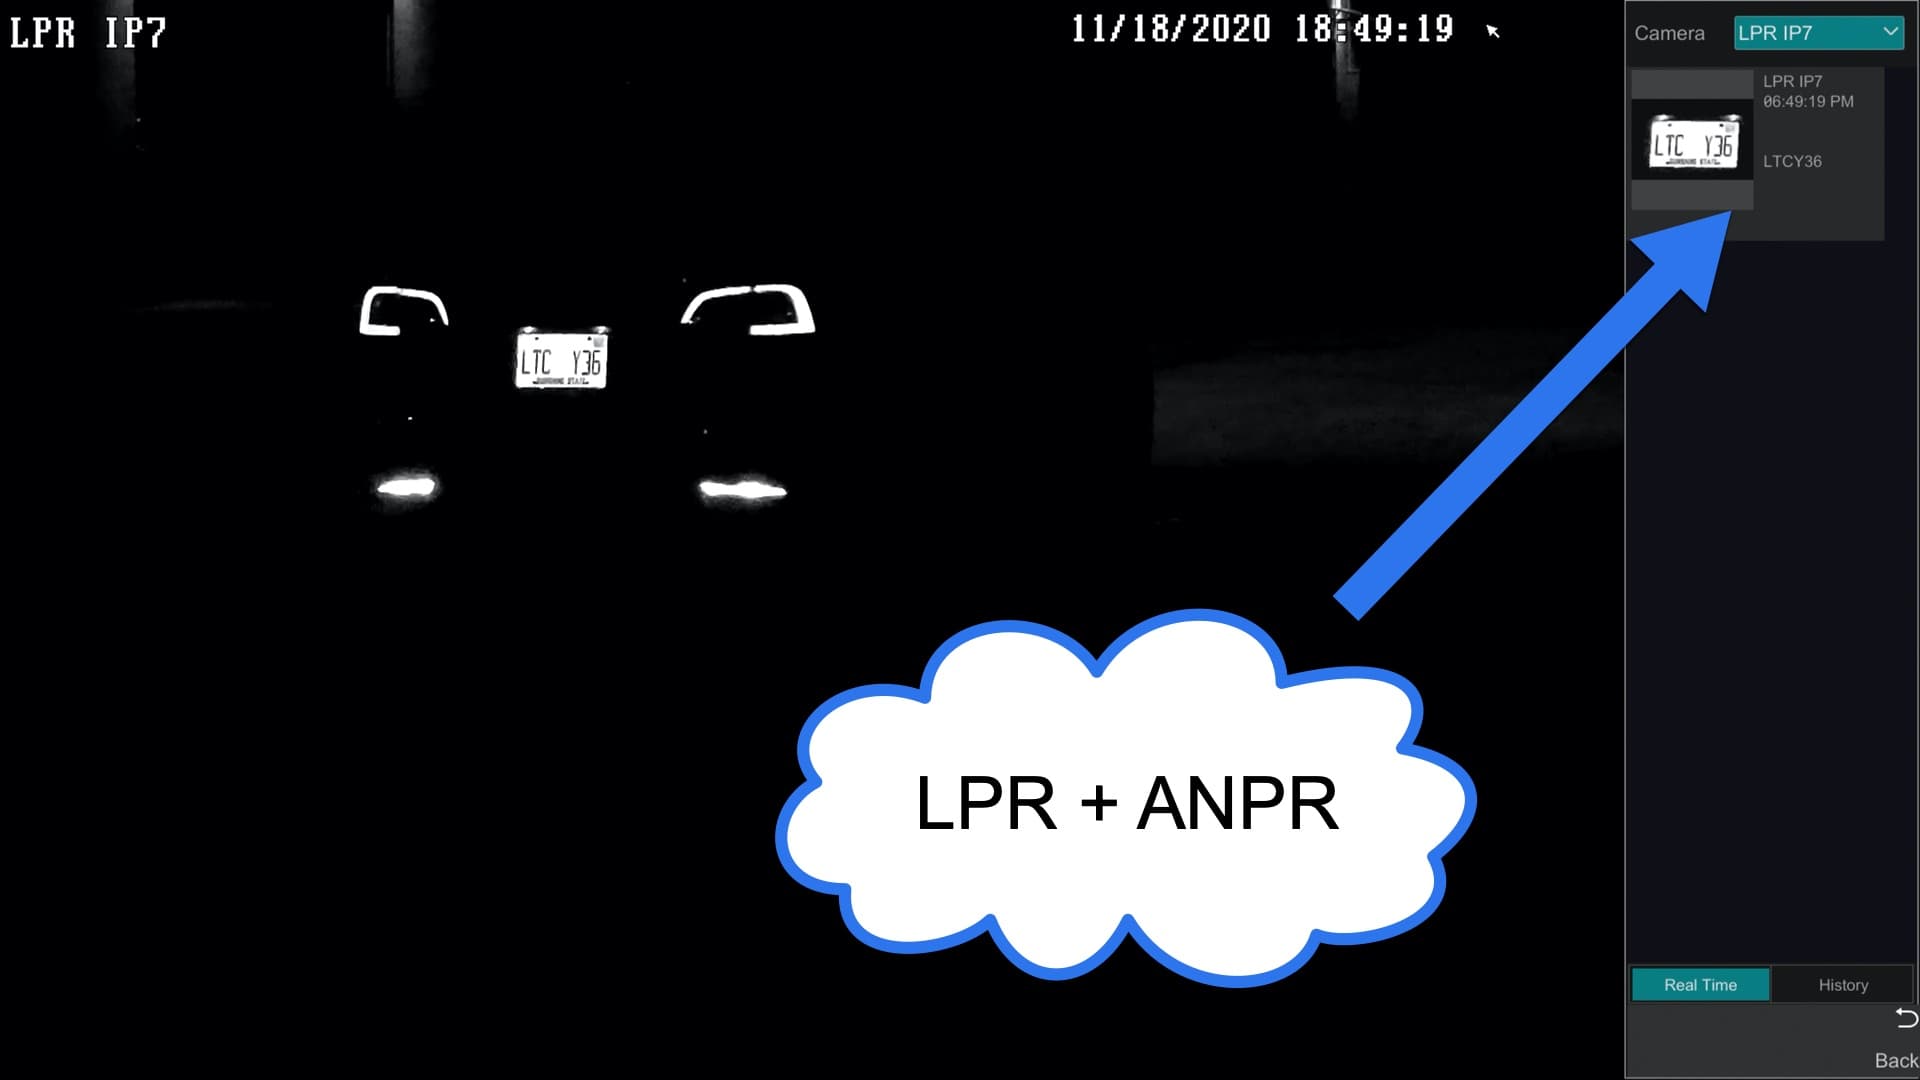
This is the full screen live view of the LPR camera only. You can see in the upper left hand corner that the ANPR software on the NVR correctly identifies all characters on the license plate successfully.
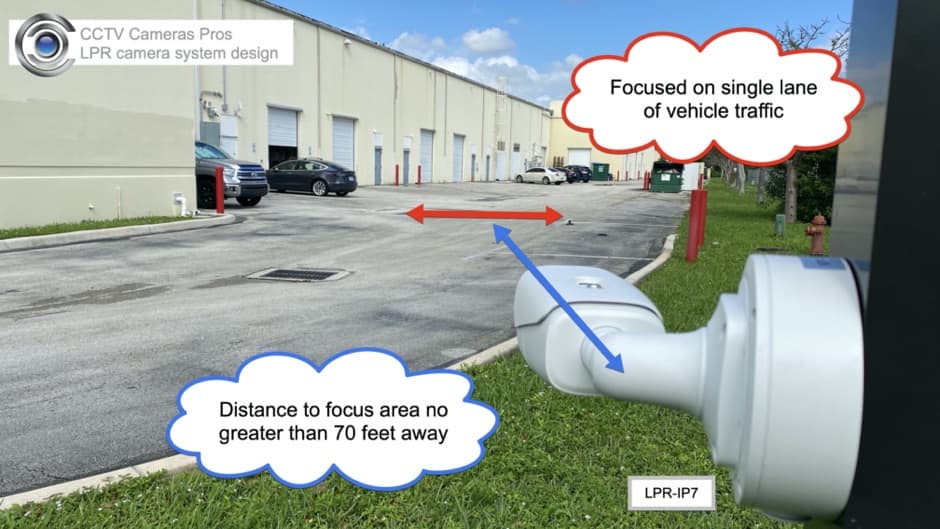
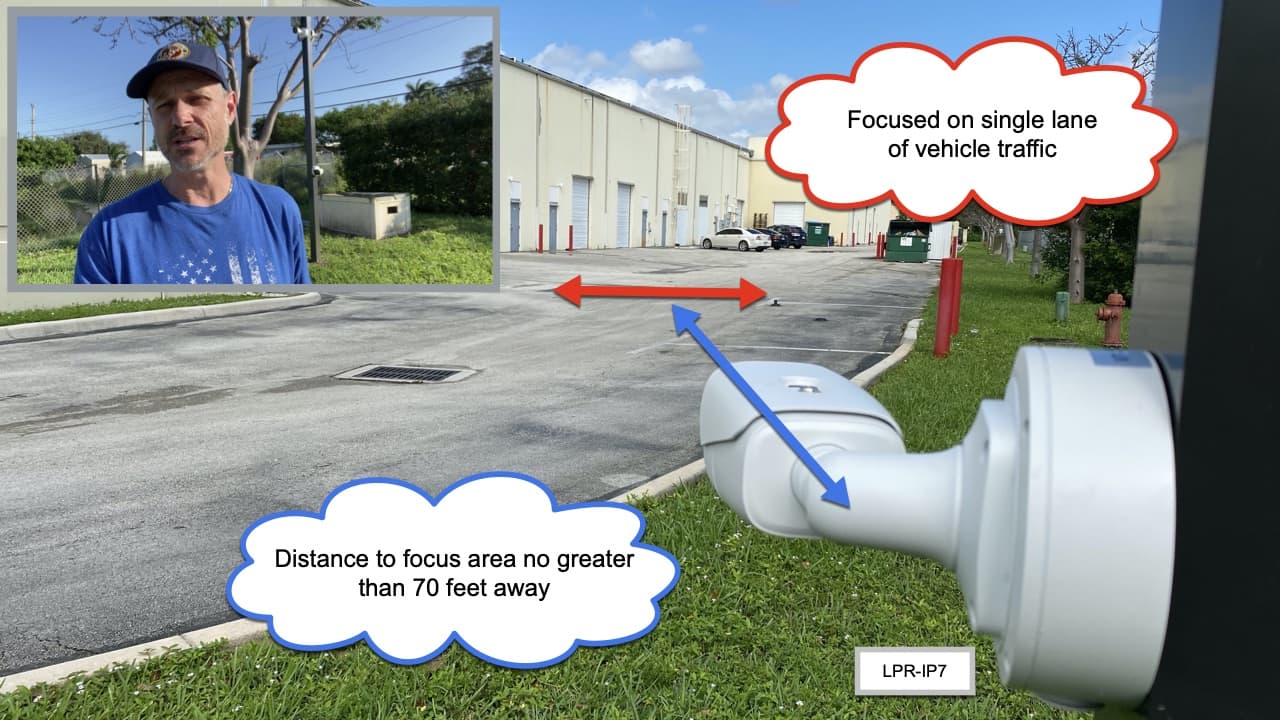
LPR cameras should be focused on a single lane of traffic (about 15 feet wide). The LPR-IP7 in the above image is installed on a pole behind CCTV Camera Pros warehouse. The LPR-IP7 has a 7-22mm motorized zoom lens. In our installation, the license plate surveillance zone is 70 feet from where the camera is installed. With the 7-22mm lens adjusted at the most narrow / zoomed in angle, the LPR-IP7 is capable of capturing license plates at a distance of 70 feet. The
Viewtron LPR-IP4 has an 8 to 32mm lens which can accommodate automatic license plate recognition up to 90 feet away.
Installation Angle is Very Important!
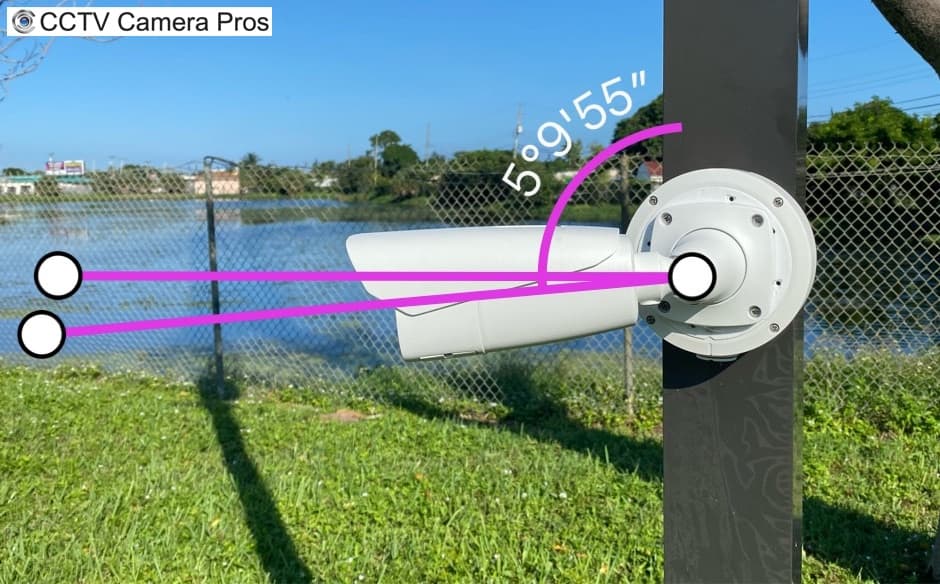
The importance of having as minimal of an angle as possible when it comes to positioning LPR cameras can not be stressed enough. The angle at which LPR cameras are installed should be as level as possible to license plates. Our LPR-IP7 is installed with a 5 degree downward pitch. CCTV Cameras Pros recommends that vertical pitch of LPR camera are no more than 30 degrees. The less of an angle, the better.
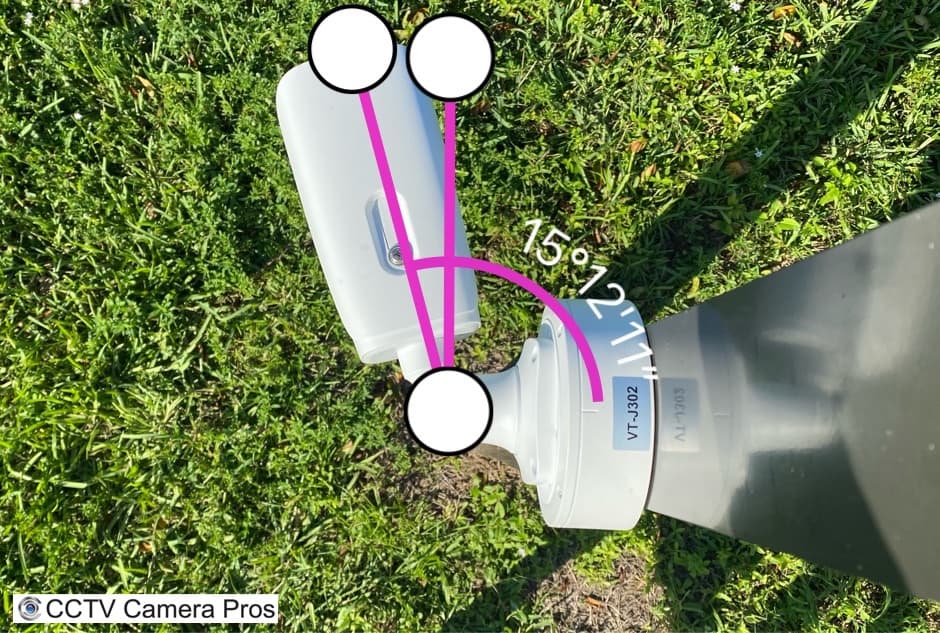
The recommendation for the horizontal angle is even more strict. CCTV Camera Pros recommends a horizontal angle of no more than 15 degrees. 15 degrees is about where our camera sits.
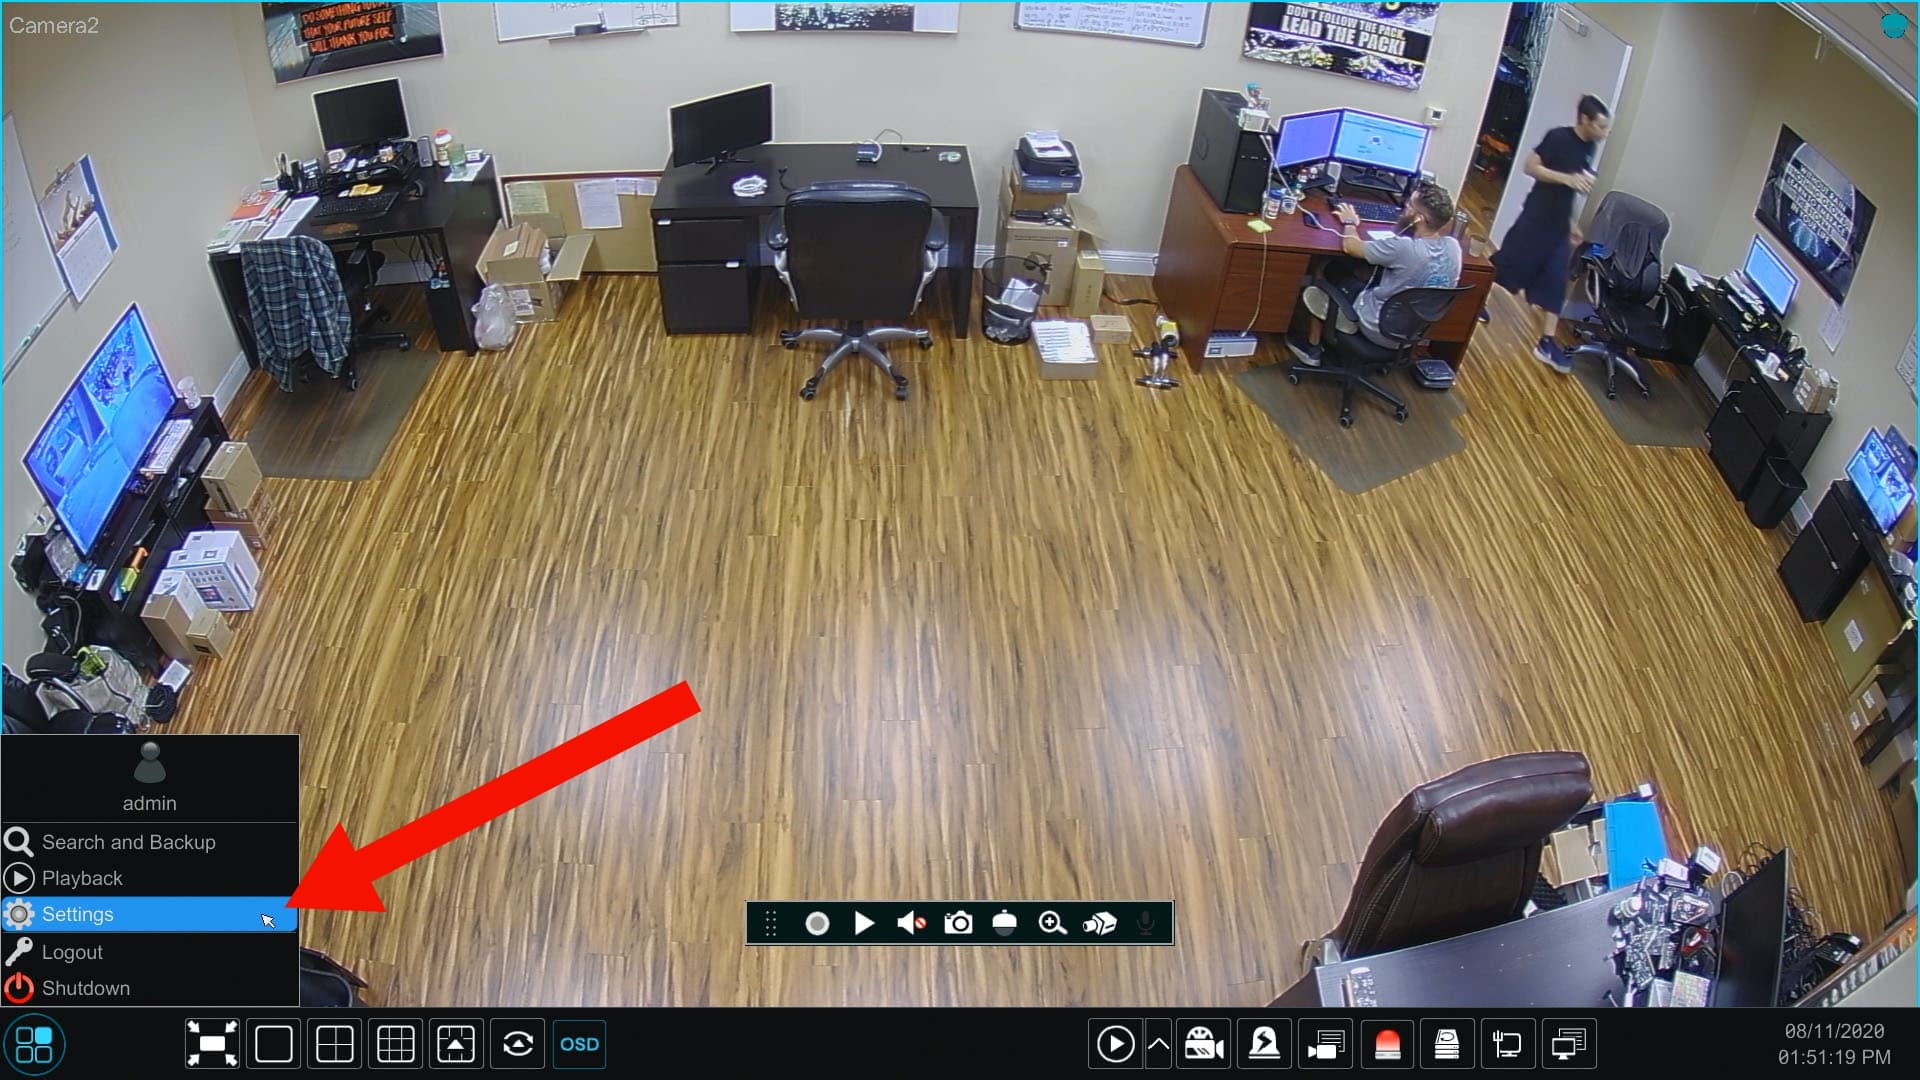
To setup the ANPR / LPR software on the Viewtron NVR,
we highly recommend temporarily parking a car in the license plate detection area so that you can use a real license plate size and location as a reference. You can see how we did this in the below screenshot.
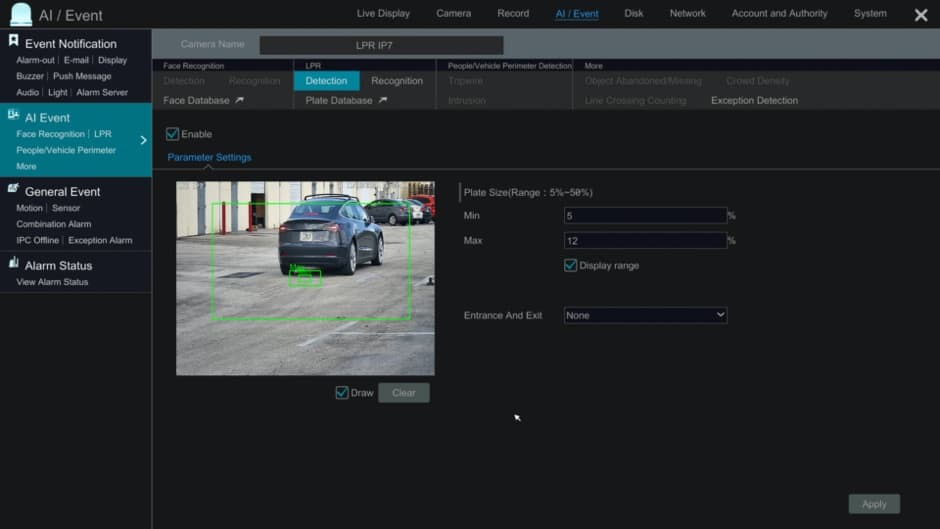
This is the LPR software setup screen on the Viewtron NVR. Follow these steps to configure the LPR detection.
- Using the NVR's mouse, select Settings. Then, AI / Event. Then, LPR.
- Select your LPR camera from the Camera Name field.
- Check the Enable checkbox to enable the license plate detection function.
- Check the Draw checkbox. Then using the mouse click and drag to draw the LPR detection zone. The plate detection zone should be a no wider that a single lane of traffic (approximately 15 feet wide). You can see our detection zone in the above screenshot. It is the large green rectangle.
- Check the Display range checkbox. This enables visual representations of the minimum and maximum size that plates are expected to be when crossing the detection zone. Adjust the Min to be slightly smaller than your reference plate (from your parked vehicle). Adjust the Max settings to be slightly larger than your license plate. The more accurate the size range, the more accurate the ANPR software will be.
- Press the Apply button when done.
LPR Zone, Plate Size
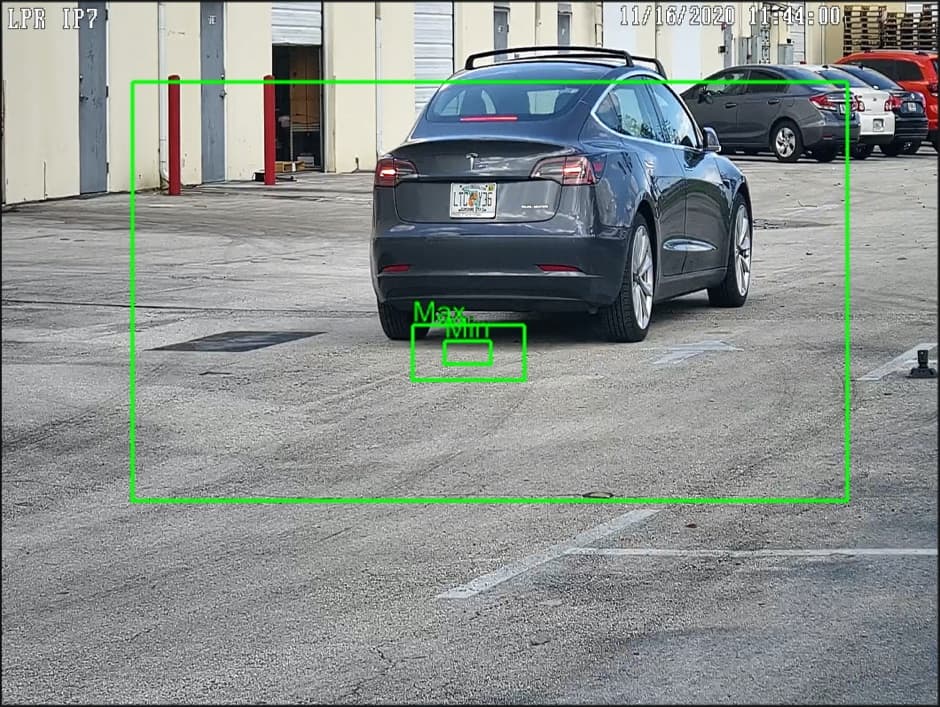
Here is a close-up of the LPR detection zone and plate size references. Our max may be a little too big, but it is working very well so far, so we have kept in this way.
UPDATED 11-8-2021: in most cases, customers no longer need to make the adjustments described in this section because CCTV Camera Pros sets the firmware of all LPR cameras to these settings before we ship the product. The LPR-IP7 and LPR-IP4 are network IP cameras that can be logged into via a web browser. There are additional settings available directly on the camera. CCTV Camera Pros tries to ship the LPR-IP7 with the best factory default settings, however, the default settings may not work for all customers. There are also situations that come up where cameras need to be reset and settings could be lost. For these reasons, we have documented how to login to the LPR-IP7 and adjust the cameras settings.
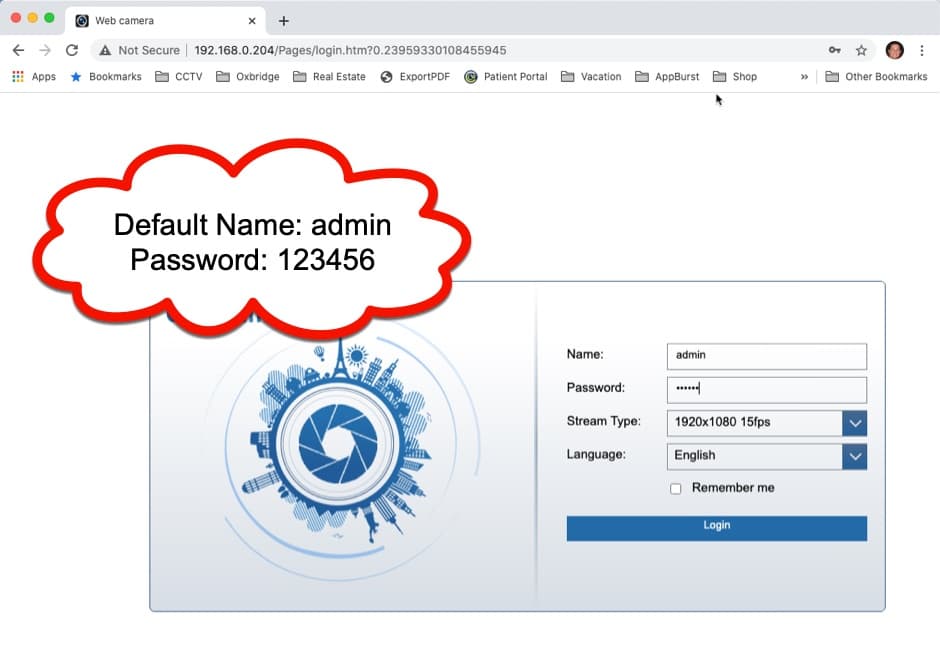
First, login to your LPR camera using a web browser. Please note that in order to display live video of your camera, you need to use Internet Explorer. However, you can access the camera settings screen from Chrome, Safari, and other web browsers. Understand that you will not be able to see a live video feed of your camera, but the settings adjustments will work as expected.
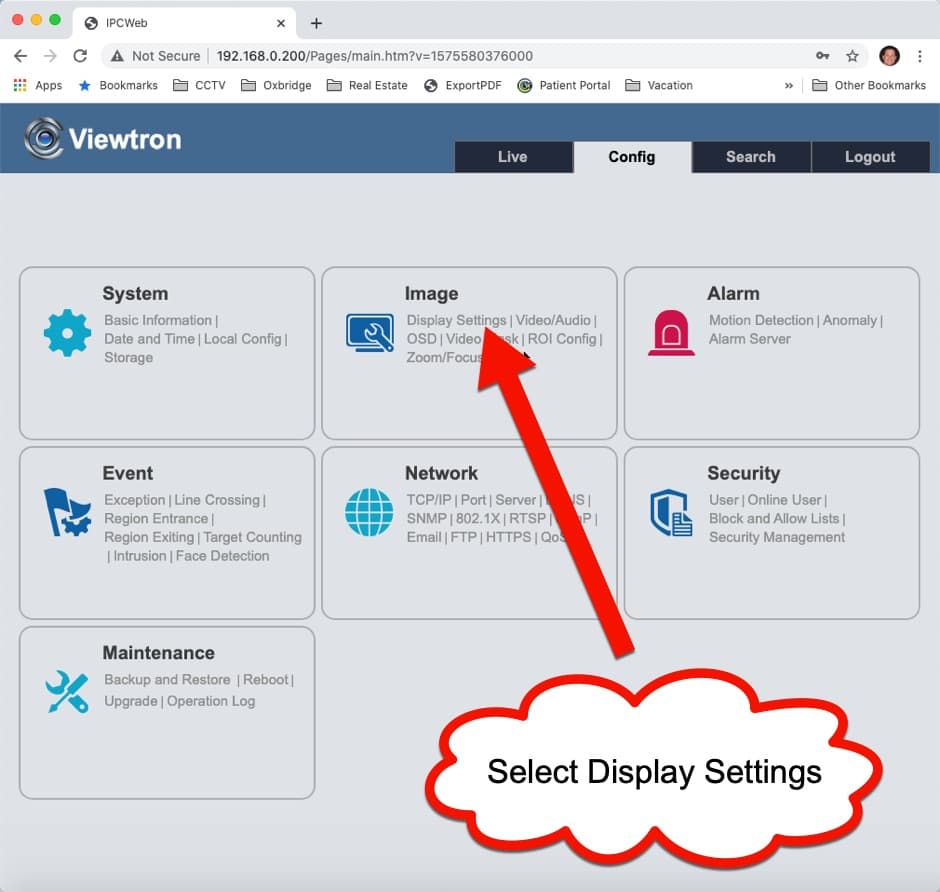
Next, click on the Display Settings link.
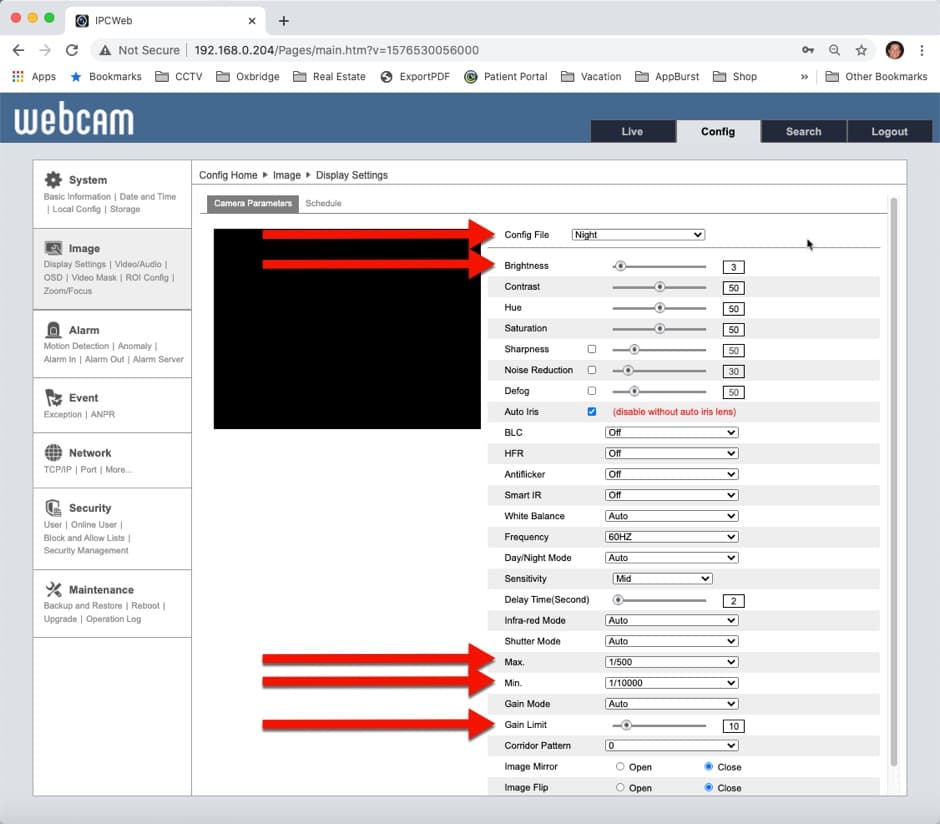
Here are the night time settings that we have found to be most successful.
- On the display settings page, select Night from the Config File dropdown.
- Set Brightness to 3.
- Set Shutter Max to 1/500.
- Set Shutter Min to 1/10000.
- Set Gain Limit to 10.
Here are some notes based on our testing.
- Brightness: It can be kept around value 25 in day mode, and in night mode its suggested to be lower value to see the license plate clearly.
- Max. Shutter speed: 1/500~1/1000; if the vehicle speed is lower than 40KM/H, it can be extended appropriately, but no more than 1/100;
- Min. Shutter speed: 1/10,000;
- Exposure mode: Auto
- Gain Mode: Auto
- Gain limit: recommended not to exceed value 20
- It Is also recommended to switch between day mode and night mode by schedule; On the night mode schedule make sure you force the camera into B/W with IRs on. And switch two sets of parameters through schedule.
Typical Day Settings: Brightness=25; Shutter Max=1/500; Shutter Min=1/100000; Gain=10
Typical Night Settings: Brightness=5; Shutter Max=1/500; Shutter Min=1/100000; Gain=10
Please note that these were the best settings that we experienced based on the installation location at CCTV Camera Pros warehouse. You may need to tweak these settings for your specific environment. These are the fields that we recommend adjusting.
All of the above recommendations should be used for the best automatic license plate recognition results. However, in our testing, we have found that Viewtron LPR cameras are capable of capturing license plates at greater distances and angles that what we recommend for ALPR. Here are some definition to help understand the difference between license plate capture and automatic license plate recognition.
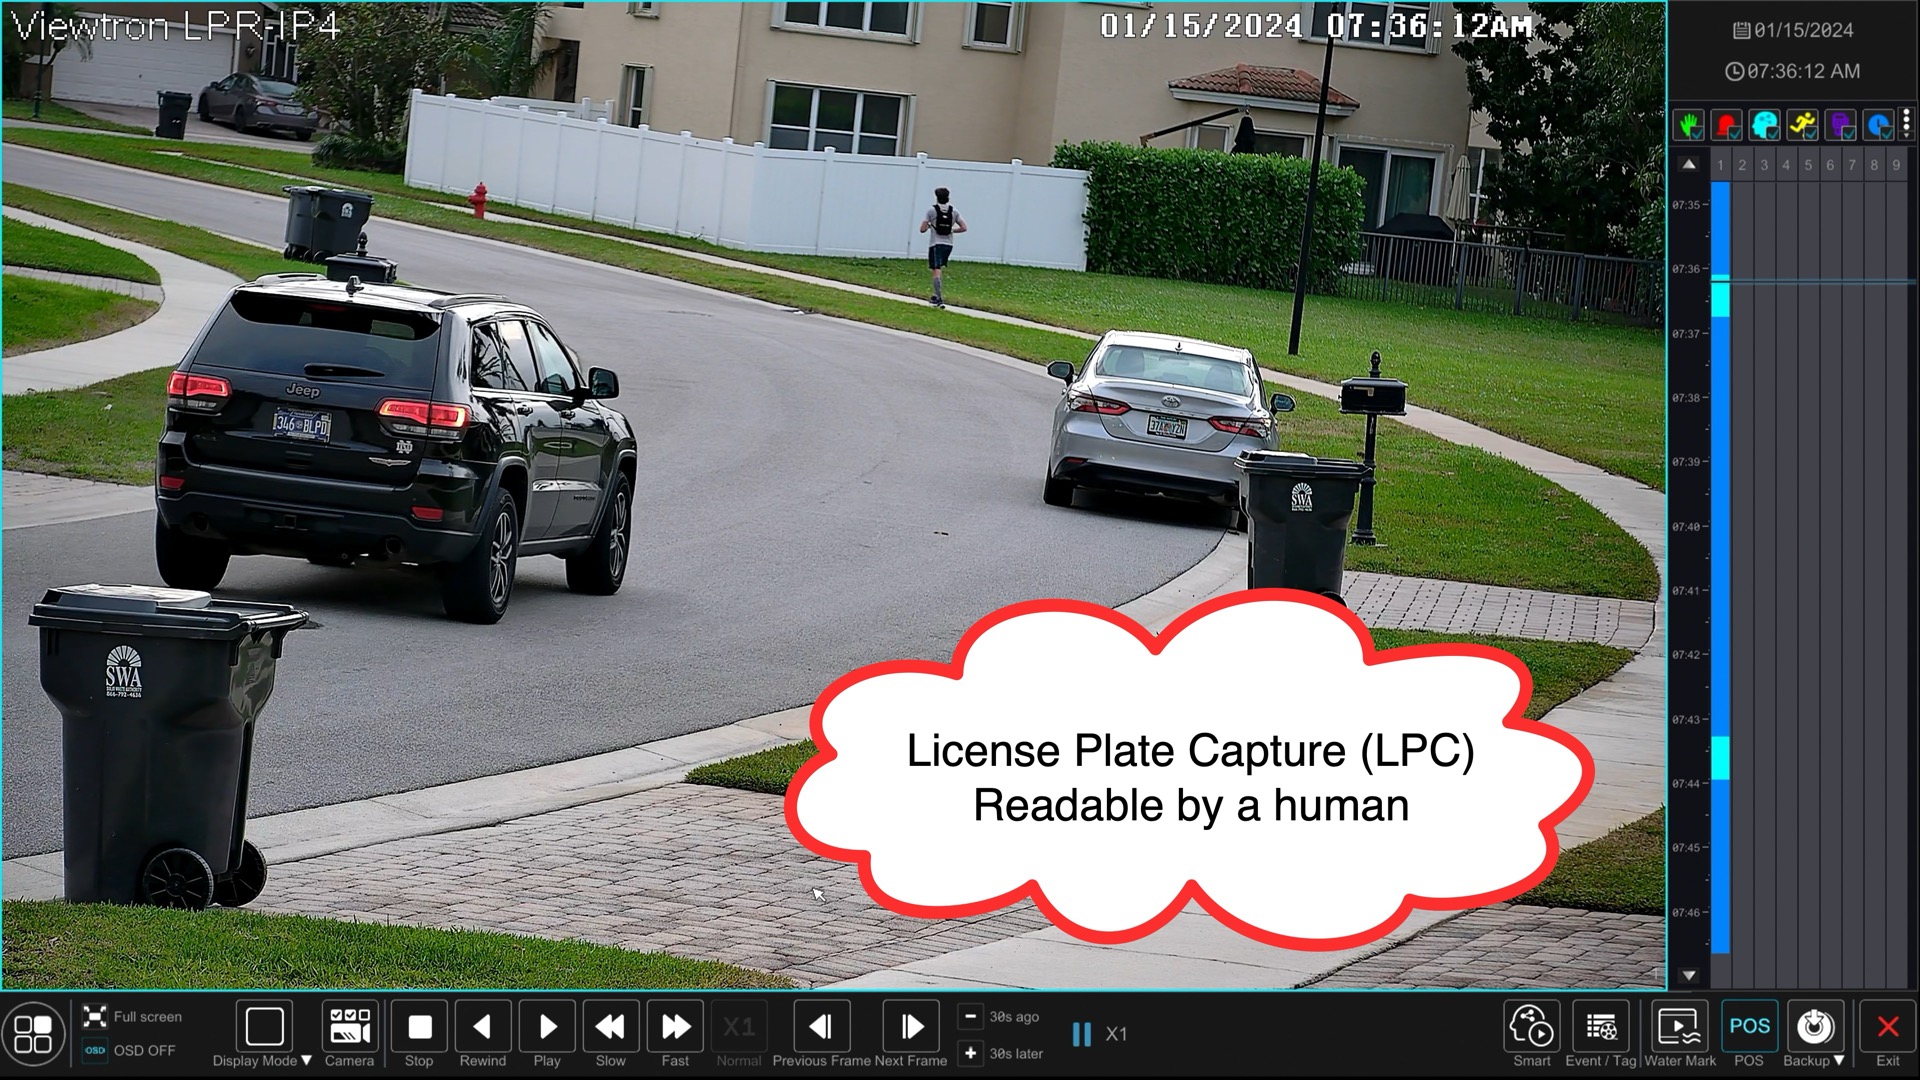
- License Plate Capture Camera (LPC) - A license plate capture camera is specialized security camera that is capable of capturing video surveillance footage of license plates on moving vehicles where the recording is clear enough for a human to identify the plate numbers and letters.
- Automatic License Plate Recognition Camera (ALPR) - An automatic license plate recognition camera is specialized security camera that is capable if capturing surveillance video footage of license plates on moving vehicles and also has ALPR software built into it that can identify the existence of a license plate and automatically recognize the numbers and letters on the plate. ALPR cameras are also known as LPR cameras.
Viewtron LPR cameras are capable of both ALPR and LPC. These are network IP cameras that connect to a Viewtron NVR via CAT5E or CAT6 cable. CCTV Camera Pros also has a CCTV license plate capture camera that connects to a DVR over coax cable. The Viewtron IP based LPRs are our TOP Pick. However, we carry the CCTV LPR camera for customers that MUST use existing coax cable. You can find all of our
license plate capture cameras on this page.
Please watch these videos to see some the license plate capture testing that Mike performed using the Viewtron LPR-IP4 camera installed at his house.
License Plate Capture at Max Distance and Angle
Watch this video to see the how well the Viewtron LPR-IP4 is capable of outstanding license plate capture when installed on a house that is almost adjacent to the street. Mike also shows how easy it is to find LPC events on the video playback timeline when you use the LPR camera in conjunction with an AI security camera. The AI security camera is configured to detect cars that pass in front of Mike's house.
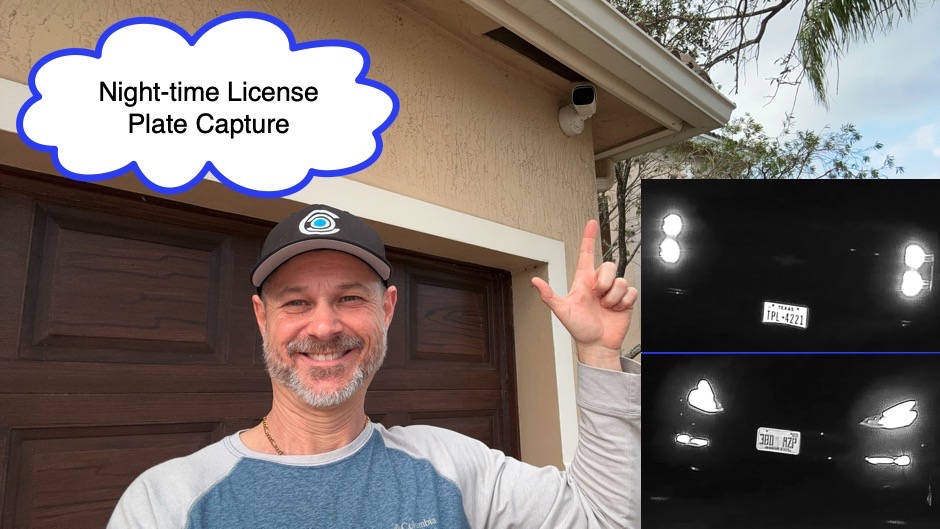
Night-time License Plate Capture
Watch this video to see the how well the Viewtron LPR-IP4 performs night time license plate capture using the camera's IR night vision mode. Mike also explains how he is using a second Viewtron AI security camera installed on the front of his house to bookmark all of the license plate capture events.
Additional License Plate Recognition Resources
Learn more about Viewtron Security Camera DVRs / NVRs
Learn more about the latest
Viewtron Hybrid Security Camera DVRs and NVRs for IP cameras with built-in PoE here.
Works with Analog CCTV, Network IP, and HD BNC Security Cameras
Users can mix and match different camera technologies. This is perfect for customers that have existing CCTV cameras and want to upgrade to high definition over time. Hybrid iDVR-PROs work with the following security camera types and resolutions.
4K security cameras
- AHD Cameras (720p, 1080p / 2mp, 3mp, 4mp, 5mp, 4K / 8mp / 4K)
- HD-TVI Cameras (720p, 1080p / 2mp, 3mp, 4mp, 5mp, 4K / 8mp / 4K)
- HD-CVI Cameras (720p, 1080p / 2mp, 3mp, 4mp, 5mp, 4K / 8mp / 4K)
- Network IP Cameras - ONVIF compatible IP cameras up to 4K resolution supported
- Analog CCTV Cameras (all analog resolution supported including CIF, D1, 960H)
Complete Security Camera Systems
These complete security camera systems are compatible with POS systems for text overlay.
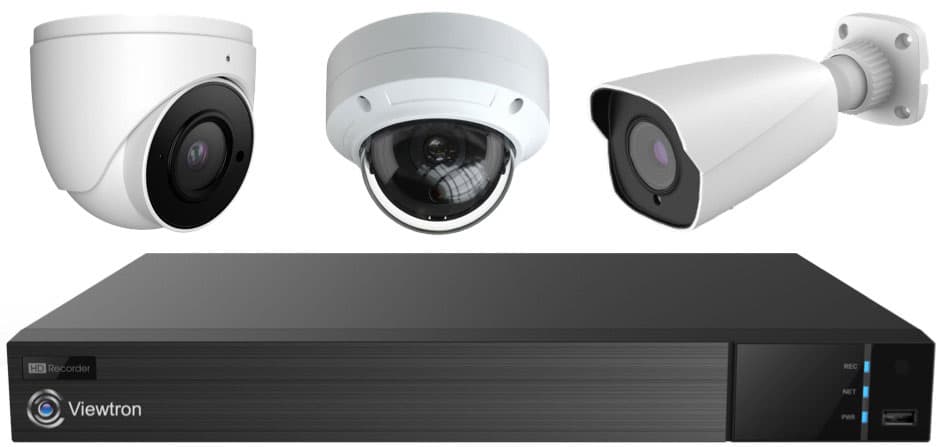
CCTV Camera Pros can also provide a custom surveillance system quote that includes any Viewtron DVR or NVR model. We can include security cameras, cables, connectors, power supplies, and monitors. We can even mix and match IP cameras and HD BNC security cameras because Viewtron DVRs are hybrid. This means that they work with just about any type of security camera. As you have probably already seen on our website, we have 2, 4, 8, and 16 camera surveillance systems in pre-made packages. However, it is not possible for us to package up every combination and quantity of all the different camera models that we carry. So, we can also provide you with a custom quote with as many cameras as you need and a mix of any combination of camera model(s) based on your project requirements. Please
request a quote when you are ready.

|