Geovision PTZ Camera Setup & Controls 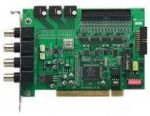 Geovision cards can be used to control PTZ cameras. These setup instructions cover how to set up our PTZ-92E001 security camera to be controlled by one of our Geovision DVRs using a GV-NET card. The GV-NET card allows you to run an RS-485 wire into your Geovision computer. RS-485 is a communication protocol for PTZ cameras. If you are using PTZ camera other than the one that we have documented in this article, you can still follow the general steps of these instructions but the protocol and baud rate that you configure may be different depending on the type of PTZ camera that you are using and the baud settings that are supported by your particular PTZ camera. Geovision cards can be used to control PTZ cameras. These setup instructions cover how to set up our PTZ-92E001 security camera to be controlled by one of our Geovision DVRs using a GV-NET card. The GV-NET card allows you to run an RS-485 wire into your Geovision computer. RS-485 is a communication protocol for PTZ cameras. If you are using PTZ camera other than the one that we have documented in this article, you can still follow the general steps of these instructions but the protocol and baud rate that you configure may be different depending on the type of PTZ camera that you are using and the baud settings that are supported by your particular PTZ camera.
PTZ Camera SetupFirst, follow these instructions to setup the PTZ camera. This link will open up a new browser window so that you can easily resume instructions on this page after the camera is configured.
PTZ Camera Setup
Geovision GV-NET Card InstallationThese instructions assume that you are setting up camera ID #1 or that you are only using one PTZ camera in your system. If you are setting up more than one camera, the ID that you configure may not be 001 as described below. The Geovision GV-NET card is easy to install on your computer. Although the card will occupy a slot space inside of your PC, the card does not actually slide into any PCI, PCI-express, or another type of port. - Open up your computer's case and position the GV-NET card into one of the open slots. The only part that actually connects to the electronics of your computer is the GV-NETs power supply. A power cable is provided with the GV-NET card and attaches to a 4 pin connection as seen below:
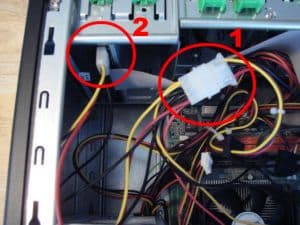
The other end of the power cable will require that you unplug the power cable from your hard drive and 1) plug one shared power end into the hard drive power cable that you just unplugged and 2) the other end into your hard drive. Basically, you are sharing the computer power cable now between your existing hard drive and the newly installed GV-NET card, as seen below.
- You can now close your computers cover and connect the GV-NET card to your PCs external COM port. A cable is provided with the GV-NET card for this as seen below.
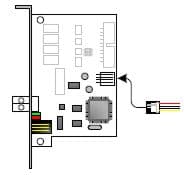
The one end of the COM cable connected to the back of the GV-NET card as seen below and noted by "a".

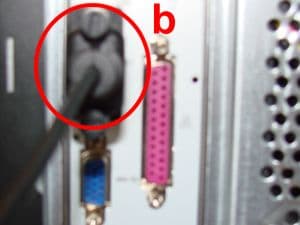
The other end (the one that looks like a computer monitor input) connects to your PCs COM input as seen below and noted "b".
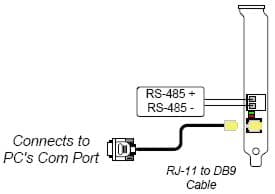
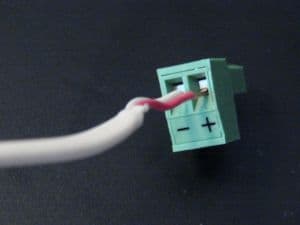
- Connect the other end of the RS 485 wire (one end should already be connected to your PTZ camera) to the RS-485 +/- inputs on the back of your GV-NET card. The small plastic green housing of the RS-485 inputs on the GV-NET card can be removed to more easily let you install and screw down your wiring. You can see this below.
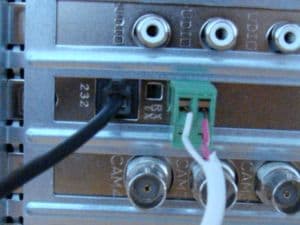
- Insert the RS-485 connector back into the GV-NET card if you removed it to install the wiring. The card will look similar to below when done.
This concludes the GV-NET card install and you can now configure the Geovision software.
Geovision PTZ Camera ConfigurationIf you have not already done so, boot your Geovision computer and open the Geovision system. To configure your PTZ camera to be controlled by Geovision follow these steps.
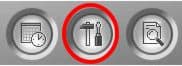
- Click on the configure button on your Geovision system (seen below) and select System Configure.
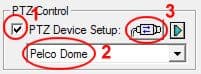
- Under the General Settings tab, there is a PTZ Control section. 1) Check the PTZ device setup checkbox, 2) Select Pelco Dome, 3) Click on the connect button as seen below.
- When you click on the connect button, the below window opens to configure the PTZ camera protocol and baud rate. Set the Com port to COM1, Baud Rate to 9600, PT Speed to 1, select Protocol - P, and check the Activate checkbox as seen below. Then click OK.
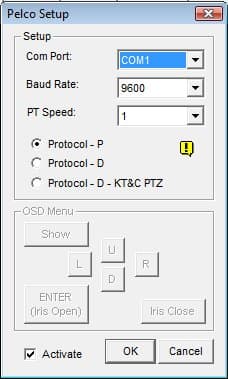
When you click OK, you may see the following baud rate warning on the screen. You can ignore this message and click OK.

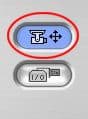
- On the main Geovision system screen, you should now see a button to gain control of your PTZ camera(s). Click on the button as seen below.
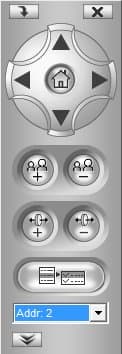
- This will open the PTZ controls on your Geovision system. Select the address of your PTZ camera that you earlier set up on your camera from the drop-down box.
You should now be able to control your PTZ camera using Geovision.
|


