Zavio F7210 IP Camera Wireless USB Adapter & Network Setup
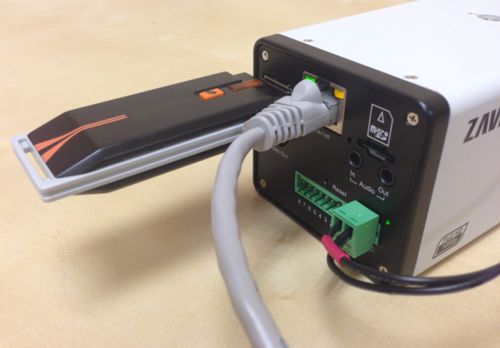
The Zavio F7210 IP camera has a USB port that supports a wireless USB adapter. This adapter enables the F7210 to connect to an IP network over WIFI. Follow the below instructions to setup the add-on wireless dongle that CCTV Camera Pros supplies. - Start by connecting your F7210 camera to your network with an Ethernet cable, such as CAT5.
- Insert the wireless adapter before supplying power to the camera.
- Connect a camera to a power source using the power adapter that was included.
- After your CAT-5 cable and wireless adapter is inserted into the camera, connect the camera to a power source using the power supply that was included.
- Use the "Intelligent IP Installer" program that is included on the CD (which came with your camera) in order to assist you in locating the camera on your network.
 - Your camera will open in Internet Explorer and prompt you for the "login ID" and "password". The default is "admin / admin".Your camera will open in Internet Explorer and prompt you for the login ID and password. The default is admin / admin.
- Once you are logged into your camera, follow the steps which are illustrated in the screenshot below, to configure your camera and connect it to your wireless network.
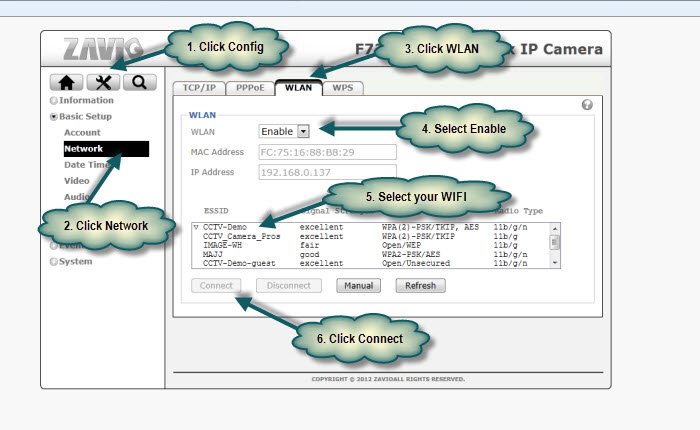 - Upon success, you will see an IP address assigned in the "IP address" field of the above screen.
- You can now disconnect the wired network connection from your camera and the camera should remain connected to your network. Please note that the IP address may be different from the initial one that you accessed from, so you may need to run the Intelligent IP installer again to find the wireless IP address assigned to your camera.
|


