iDVR-PRO Surveillance DVR Recording Setup
The iDVR-PRO8 and iDVR-PRO16 CCTV surveillance DVRs support multiple recording setups such as continuous, motion and alarm. Continuous recording offers full 24/7 around the clock recording. Motion recording enables the iDVR-PRO to only record video if motion is detected on a specific camera maximizing hard drive capacity. Alarm recording incorporates motion detection and sends an email or sounds an alarm attached to the DVR when motion is detected.
Recording Setup Instructions
Follow these instructions to setup recording on the iDVR-PRO. 1. First, select Main Menu on the bottom bar of your screen. 2. Then select Record Setup. 3. Once in the Record Setup menu go down and select Continuous / Motion Recording. 4. Then select Schedule at the top of the screen. 5. First, select the time by using the series of squares on your screen labeled CH 1 - CH 8 (Or CH 1 - CH16). The Blue series of squares at the top of the screen represents the time (Each square equals one hour of time). 6. By default, the DVR is set to continuous recording (All CH squares should be Blue). 7. Use the mouse to select the channel and time you wish to set as well as the type of recording. (Example: To make camera 1 record on motion 24/7 you would first go to CH 1. Then click the first square and drag the mouse all the way to the right. A menu will pop up asking which mode you would like to record in, select Motion and click OK to save the settings). (The same steps apply for Continous and Continuous Motion recording) Motion Recording - Only records video when motion is detected. Continuous - Records video nonstop. Continuous / Motion - Records non stop, but also logs motion events when detected. 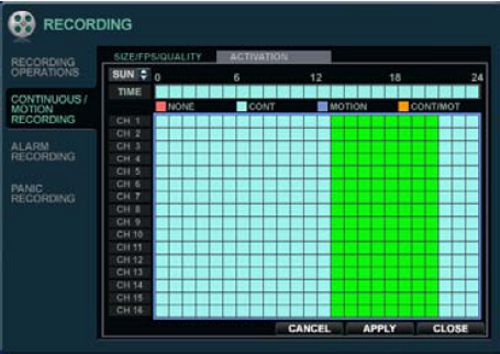
Alarm Recording: iDVR-PRO surveillance DVRs are capable of accepting alarm inputs such as a motion detector, IR sensors or door sensors. These devices can be connected to the DVR and be set to trigger alarms. The alarm signal received can then be configured to send emails, start recording, bookmark the event or sound a buzzer. The example below taken from our support forum illustrates how to set up a door sensor on the iDVR-PRO. 1. Connect wires from the door alarm sensors to the iDVR-PRO as labeled in this diagram. (We are using pairs from a Cat-5e cable to do our wiring while testing this.) 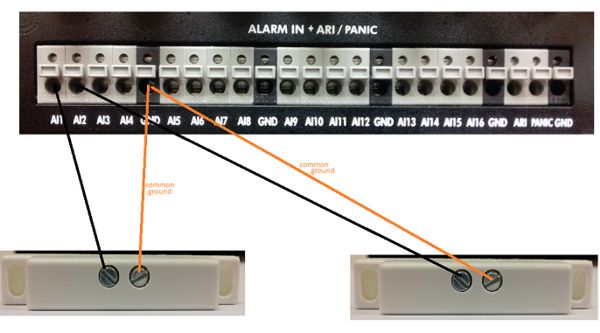
Notice the interior circuit on a typical door or window sensor. 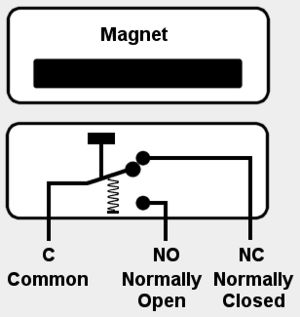
2. Configure the iDVR-PRO to start recording video when an alarm is triggered form the door sensor. 3. First, select Main Menu on the bottom bar of your screen. 4. Then select System Setup. 5. Once in the System Setup menu go down and select Event Sensor.
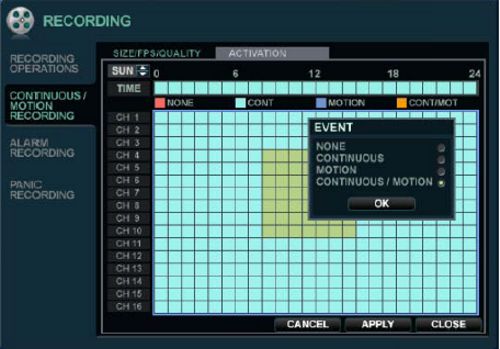
6. After you are in the Event Sensor menu select Alarm Input.
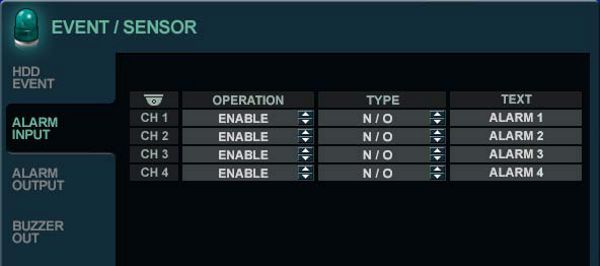
7. In this menu, you will choose which cameras you want to enable the alarm recording on. 8. Select whether the sensor is normally open N/O or normally closed N/C. 9. Now return to the main menu and go to Record Setup. 10. Once in Record Setup select Alarm Recording. 11. Then go to Schedule and select the time and cameras you wish to set alarm recording for.
|


