PTZ Camera Control Setup for JP Surveillance DVRs
 CCTV Camera Pros JP surveillance DVRs can be used to control PTZ cameras using the wireless remote control that the DVR comes with or directly from the controls on the DVR unit. JP surveillance DVRs support the following PTZ camera types/protocols: Pelco D, Pelco P, SCC-641, HMC-250, HID-2404, DSC-230-S, DRX-502A, Accudome, VIDO AU-Gxx, Yoko, On-D. These setup instructions cover how to setup our PTZ-92E001 security camera to be controlled by a JP series stand-alone surveillance DVR. If you are using a different type of PTZ camera, you can follow the general steps of these instructions but the protocol and baud rate that you configure may be different depending on the type of PTZ camera that you are using. CCTV Camera Pros JP surveillance DVRs can be used to control PTZ cameras using the wireless remote control that the DVR comes with or directly from the controls on the DVR unit. JP surveillance DVRs support the following PTZ camera types/protocols: Pelco D, Pelco P, SCC-641, HMC-250, HID-2404, DSC-230-S, DRX-502A, Accudome, VIDO AU-Gxx, Yoko, On-D. These setup instructions cover how to setup our PTZ-92E001 security camera to be controlled by a JP series stand-alone surveillance DVR. If you are using a different type of PTZ camera, you can follow the general steps of these instructions but the protocol and baud rate that you configure may be different depending on the type of PTZ camera that you are using.
PTZ Camera SetupFirst, follow these instructions to setup the PTZ camera. This link will open up a new browser window so that you can easily resume instructions on this page after the camera in configured.
PTZ Camera Setup
Surveillance DVR SetupThese instructions assume that you are setting up camera ID #1 or that you are only using one PTZ camera in your system. If you are setting up more than one camera, the ID that you configure may not be 001 as described below.
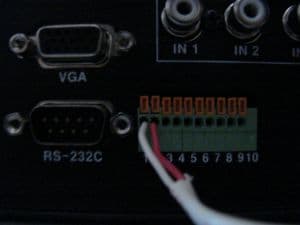
- Connect the other end of the RS 485 wire to the RS-485 +/- inputs on the back of the DVR. The wires should insert pretty easily into the inputs by pushing them firmly into place. If you are using cat-5 or some other very flexible wire, use a small screw drive to open up the input by pressing on the release buttons just above the wire inputs. The wires should seat firmly into place as seen below. *Note: position 1 is (-) negative and position 2 is (+) positive.
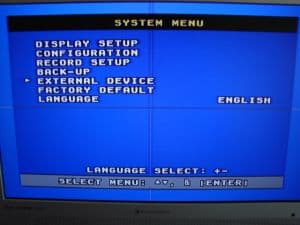
- Boot up your DVR and load the systems menu. From DVRs System Menu, select External Device and press enter.
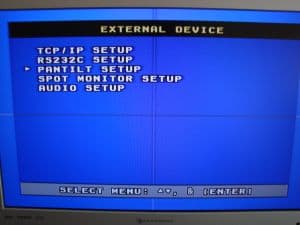
- On the External Device screen, select PTZ Setup.
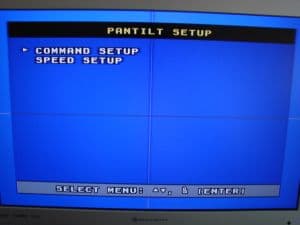
- On the PanTilt Setup Screen, select Command Setup.
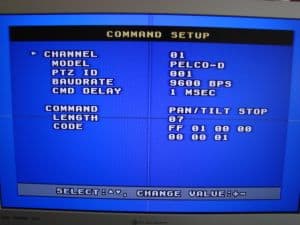
- On the PTZ Command Setup Screen configure the settings as follows:
A) Model: PELCO-D
B) PTZ ID: 001
C) BAUDRATE: 9600 BPS
- Press the menu button until you exit out of the DVRs setup screens.
- If you have not already done so, connect the video output of the PTZ camera to one of the DVRs inputs and power.
- Power the camera on by pluging into a power supply source. The camera will initialize.
- When the camera is done initializing, select the DVRs channel number that your PTZ camara is connected to by pushing that number on the DVR or remote. This will bring your PTZ camera into full screen view.
- Push the PTZ button on the DVR or the remote. Use the up and down arrows on the remote or DVR to control the tilt of the camera. Use the left and right arrows to control left and right pan. Other controls are enabled by selecting the control using the Menu and Next buttons on the DVR or remote, then pressing the Enter button.
- You can exit PTZ control mode by pressing the PTZ button again on the DVR or remote.
|
|
|


