iDVR-PRO Surveillance DVR Audio Surveillance Recording, Monitoring, and Playback
The iDVR-PRO8 and iDVR-PRO16 CCTV surveillance DVRs support audio surveillance recording, live monitoring, and recording audio playback. The iDVR PRO CCTV DVRs support up to four channels of audio. The video / audio recording can then be backed up to a DVD, USB thumb-drive, or backed up over a network connection to a PC in the event a user needs to. The iDVR-PRO comes with its own video / audio player as well as the codec to play it using Windows Media Player.
Audio Surveillance Recording, Monitoring, and Playback Instructions
To set up audio recording on the iDVR-PRO please follow the instructions below.
Recording
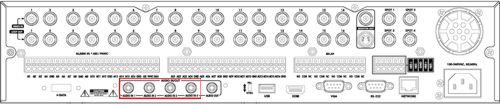
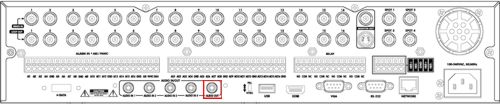
1. Connect microphones to the audio inputs on the back of the iDVR-PRO.
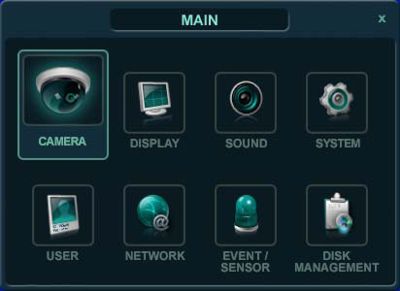
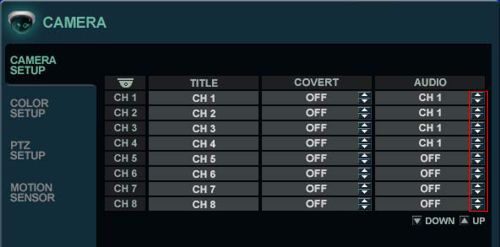
2. Then go to the Main menu inside System Setup and select Camera.
3. Once inside the Camera Setup menu, select which channels you would like to record audio by using the selection arrows under Audio. (Off indicates that there is no audio on the specified channel)
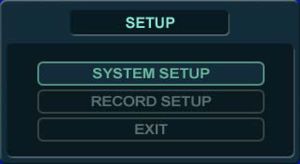
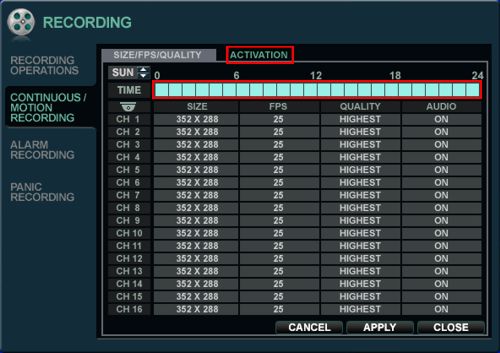
4. Now go to the Setup Menu and select Record Setup.
5. Once in the Record Setup menu select the Continuous / Motion Recording sub-menu.
6. Go to the Search (or Activation) tab and highlight the times you wish to have an audio recording by left-clicking and dragging your mouse across the timeline.
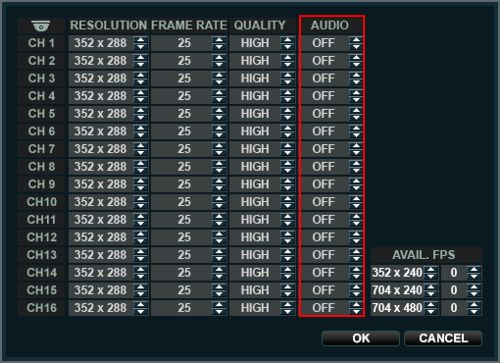
7. Once you have done that the menu below will appear. Here you can turn on audio recording for specific cameras. Your DVR should now be ready to record audio.
Monitoring
1. Make sure an audio device is connected to the Audio Output on the back of the DVR.
2. Go to the Main menu and select Sound.
3. Once in the Sound menu go into the Audio sub-menu.
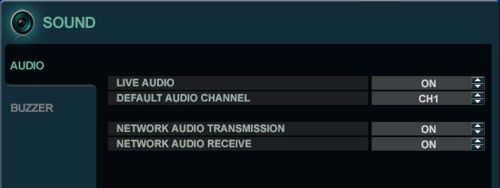
NOTE: NETWORK AUDIO TX : When set to ON, live and playback audio is transmitted to a remote PC connection.
NETWORK AUDIO RX : When set to ON, allows a remote PC connection to send audio back to the DVR.
4. Now make sure Live Audio is ON. The Default Audio Channel will be the one you will hear when monitoring.
5. You should now be hearing audio when on the live camera screen.
Playback
1. Start by going into the Search menu on the bottom menu bar. (You can also use the Search button on the front of the DVR or on the included remote control.

2. Once in the search menu select the date and time you wish to view.
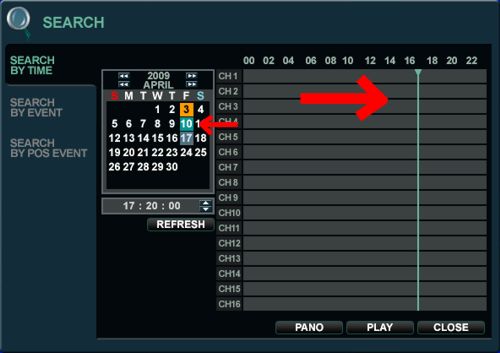
3. After you have selected the desired date and time, click on the Play button at the bottom of the menu.
4. You will now see your video playback on the screen. To hear audio of a specific channel double-click it to bring it to full-screen mode. You will now hear the audio of that camera.
|
|
|


