How to Connect 2 Piece BNC Crimp-on Connectors to RG59 Siamese Coax Cable
This video shows how to connect 2 piece BNC crimp-on connectors to RG59 Siamese coax cable that is used in CCTV camera system installations. The method taught in this video is used by professional security installers around the world.
Video Playback Instructions
For the best viewing experience, start playing the video, then select the highest video quality setting by clicking on the video settings button.
If you were able to select 720p or 1080p video, you should also select full screen mode to see the video larger. You can break out of full screen mode by clicking on the Esc button on your keyboard.
If you would like to be notified when CCTV Camera Pros creates new videos like the one on this web page, please subscribe to our YouTube channel.
Video Transcript
This video demonstrates how to attach a two piece BNC crimp-on connector to RG59 coax cable for use in a CCTV camera installation.
First step is to slide the barrel piece of the connector onto the RG59. You must slide the small end of the barrel on first.
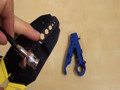
Next, I will use the cable stripper to remove the plastic jacket of the RG59.
I am only using one of the blades in the TL-22. The other is completely disangaged.
I insert the coax cable into the tool, so that it is about flush with the end or just slightly sticking out.
Then I give it 4 or five spins around the cable.
I have the blade on the cutter adjusted just right so that none of the copper sheilding under the jacket is cut.
Using pliers, I remove the plastic jacket.
You can see that all of the copper braiding is intact.
Next I peel the copper back so that non is left touching the white insulator.
Next, I will use this other cutter that is built into the TL-22 to trim the white insulation and expose the center core of the coax.
I make sure that none of the copper braiding is touching the cable core.
You want the length of the exposed core of the cable to be about the same length as the part of the connector that it will slide into.
I am going to trim this one just a bit.
Then, I slide the BNC connector onto the coax core.
You want the bottom of the connector to be snug against the insulation of the cable.
Then push the copper braiding over the shaft of the connector.
Then, I slide the sleave over the copper braiding and onto the shaft of the connector. The copper sheilding is used to properly ground the connection and it also ensures that the crimp is secure.
Last, I place the shaft of the connector into the largest setting of the TL-70 crimp tool and crimp down all the way.
Optionally, you can use the second largest setting to also crimp the smaller part of the connector sleave.
This makes the connector nice and secure to the cable.
If the braided copper is exposed more than you like, you can trim it using wire cutters or a razor blade.
There we have a nice secure BNC connector on our cable.
CCTV Camera Pros supplies all of the materials used in this video.
For more information and pricing, please visit www.cctvcamerapros.com/BNC-crimp
Thank You for watching.
Video Thumbnail
Author and Publisher
This video was produced by Mike Haldas, co-founder and managing partner of CCTV Camera Pros. Questions about this video can be directed to [email protected].
Be First to know of our deals and promotions. Sign up for our mailing list: