IP Camera Mobile App Digital Output Sensor Controls
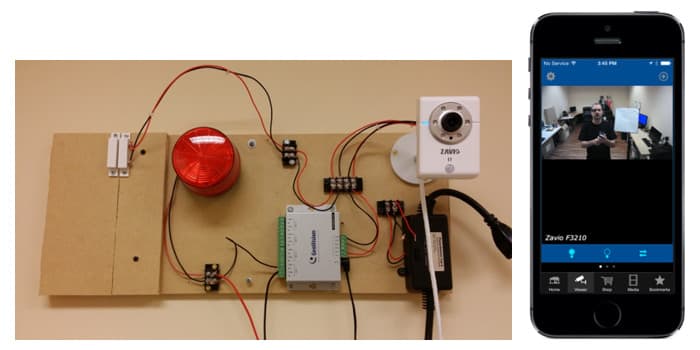
Zavio IP cameras are integrated with the iCamViewer mobile app for iOS and Android. On April 2, 2014, CCTV Camera Pros added digital output controls for Zavio cameras to the iCamViewer app so that output sensors connected to Zavio IP cameras could be controlled remotely over the internet using iPhone, iPad, and Android mobile devices. This page contains a demo video and step-by-step instructions on how to digital output controls through the iCamViewer app for Zavio IP cameras. In these instructions, we will use a 12v DC strobe light and a light connected to a 120VAC power source to demonstrate.
Watch the below video to see Mike control lights from the iCamViewer app.
Surveillance Equipment
The following surveillance equipment was used for this project.
- Zavio F3210 IP camera
- Geovision GV-Relay Switch Device
- Alarm siren / strobe light
- PowerSwitch Tail II DC actuated power cord for controlling power to 120vac devices
- 18 AWG 2 Conductor Unsheilded Power Wire
Note: In addition to the F3210, this page show all Zavio IP cameras with digital IO ports that can be used with the iCamViewer app to control alarm outputs.
Please note that although the demonstration video uses iCamViewer app for iOS, there is also an Android version of iCamViewer available here.
Alarm / Digital Output Wiring
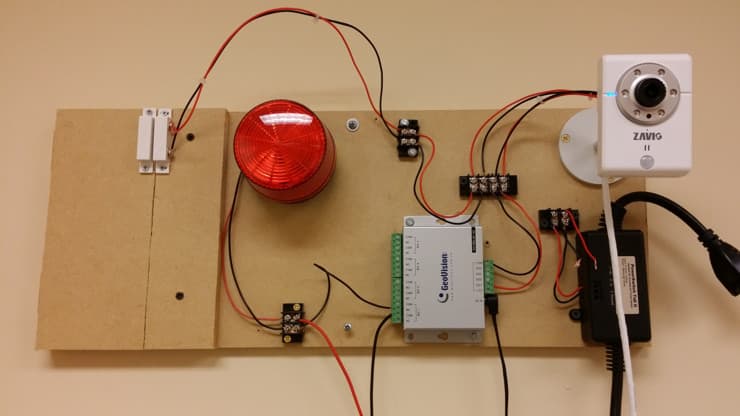
Here is a picture of our digital input /output alarm integration panel that we use for testing. The alarm output of the IP camera is connected to a Geovision GV-relay box which acts as a low voltage relay. When the GV-relay receives a signal from the Zavio camera, it closes the circuit (output) that is connected to the strobe light. The relay output is wired as NO (normally closed) so that no power is sent to the strobe light until activated. When the circuit closes as a result of the alarm, the strobe light receives power and turns on.
In the demo video, we also re-wire the digital output of the camera to the PowerSwitch Tail II device which is connected in-line with a standard 120 vac wall outlet. When the PowerSwitch Tail receives the 5v signal that the camera's digital output sends, the PowerSwitch Tail actuates the 120 vac power source that it is connected in-line with and turns 120 vac power lamp on.
Please note that the magnetic door sensor on the left of the board has nothing to do alarm output setup. We use that window / door contact sensor in other projects like this one: IP Camera Email Alert Triggered by Magnetic Door Sensor.
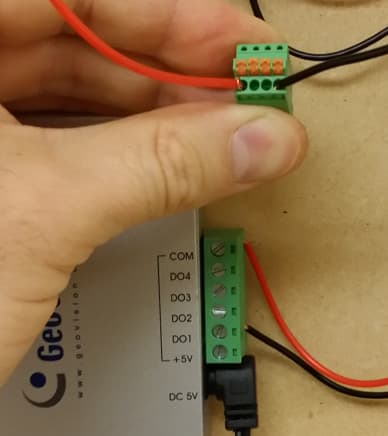
IP Camera Digital Output Wiring to GV-Relay
We tested two different output devices for this project. The first was the 12V DC red strobe light that you see on the above test panel. This is a typical strobe light used in burglar alarm system. A GV-Relay was used to actuate the 12V DC power supply of the strobe light. Here is how we wired the digital output of the IP camera to the digital input of the GV-Relay switch. The DIDO plug of the IP camera can be removed to make it easier during installation. We removed it in the below image so that you can see the positions of the + and - digital out ports. The two outer powers are used for digital output. We connected them to the DO1 and COM power on the GV-Relay.
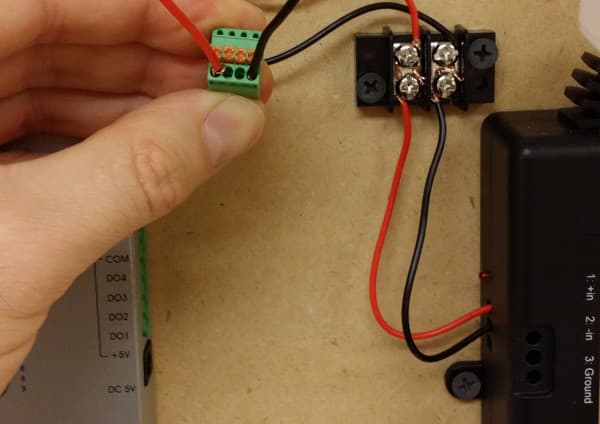
IP Camera Digital Output Wiring to PowerSwitch Tail 2
When we set up the digital output of the camera with the PowerSwitch Tail II device, we connected the digital out ports to the + and - digital in on the PowerSwitch Tail II as seen below. When we first set this up, it did not work. We fixed it by reversing the powers on the PowerSwitch Tail.
Zavio Camera Digital IO Setup
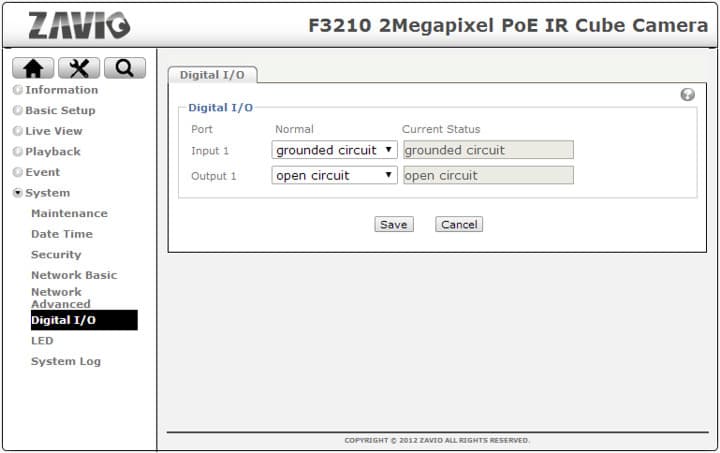
The iCamViewer app is able to send on, off, and pulse signals to the digital output ports of Zavio IP cameras. We must configure the normal state of the digital output port to be open so that by default the lights connected to our replay are off by default.
To set the digital output port on your Zavio IP camera, follow these steps.
- Select System > Digital I/O from the menu.
- Set Output 1 to open circuit.
- Press Save when done.
iCamViewer Mobile App Setup
If you have not done so already, please download the iCamViewer app for iOS or Android. The apps are available to download for free from the Apple App Store and the Google Play store of Android.
To connect the iCamViewer app to your IP camera, please follow the setup instructions that are in the app. When you get to the step where you need to add your camera configuration in the app, be sure to select "Zavio: for the vendor and "Camera + IO Controls" for the model. This is currently the only camera model that will enable the digital output controls in the app and it works with Zavio IP cameras that have digital IO ports.
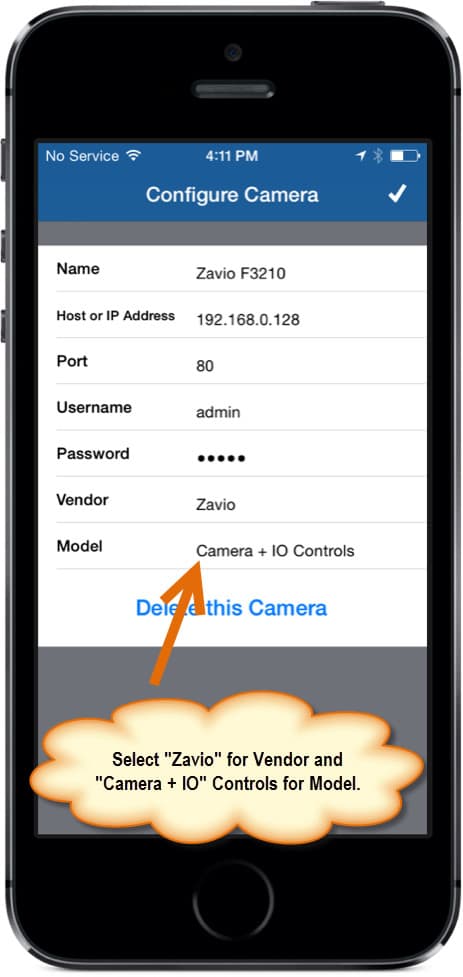
The setup is complete. You should now be able to control the digital output of any compatible Zavio IP camera with the iCamViewer app.
 About the Author About the Author
This article and setup instructions were written by Mike Haldas. Mike is the co-founder and managing partner of CCTV Camera Pros. Please send any questions related to this project or anything in general related to security systems to mike@cctvcamerapros.net.
|
|
|
|


 About the Author
