iDVR-E Series Surveillance DVR Recording Setup
 The iDVR-E Series Surveillance DVR's can be fully configured to record in multiple modes such as Continuous, Alarm and Schedule recording. Continuous recording does as the name indicates, it records non stop around the clock. Alarm recording only records video if an attached alarm device is triggered, it can be configured to record for a specific amount of time after being triggered. Schedule recording is designed to record based on a calendar like a schedule set by the user. The instructions below explain how to set up all of these recording modes and features. The iDVR-E Series Surveillance DVR's can be fully configured to record in multiple modes such as Continuous, Alarm and Schedule recording. Continuous recording does as the name indicates, it records non stop around the clock. Alarm recording only records video if an attached alarm device is triggered, it can be configured to record for a specific amount of time after being triggered. Schedule recording is designed to record based on a calendar like a schedule set by the user. The instructions below explain how to set up all of these recording modes and features.
Continuous Recording (Normal Recording)
The iDVR-E comes preset to record continuously, therefore immediate recording is possible after the DVR is installed and recording buttons are pressed. However camera settings are not pre-configured, please follow the instructions below to configure these settings. Note: Recording must be turned off to configure settings.
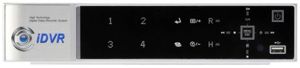
1. Press the menu button on the front panel of the iDVR-E or on the included IR remote control.
2. Then use the directional arrow buttons to select the Record menu. Press the enter button to display the Record menu.
3. Use the directional buttons to select the camera you wish to configure.
4. Now use the "+ / -" buttons to change the value of each setting.
5. Press the Enter button the save all changes and exit the menu.
6. To start Continuous Recording press the Record button. You should see the red recording LED light up on the front panel and recording begins.
Schedule Recording Instructions
The iDVR-E is capable of being set to record based on a schedule. The instructions below explain how that is done. Note: Recording must be turned off to configure settings.
1. Press the Menu button on the front panel of the iDVR-E or the included IR remote control.
2. Then use the directional arrows buttons to select the Schedule menu and press Enter to display it.
3. Use the Left / Right buttons to select a tab menu.
4. Now use the Down button to select the day you wish to configure. It is broken down into eight categories - All, Sun, Mon, Tues, Wed, Thurs, Fri and Sat. All is for every day of the week. Daily schedule has priority to All.
5. Press the Enter button on the day you wish to configure. A detailed menu will appear for the selected day. Enter the beginning and end time, then select the Record mode.
- Begin - The time the recording starts.
- End - The time recording is set to end. The end time cannot be set before or the same as the starting time.
- Mode - Up to 4 different modes can be pre-determined for the scheduled recording.
6. To activate Schedule recording after the desired settings are input, press the Schedule button. The schedule indicator will illuminate. Note: If there are no schedules configured, the DVR Will Not record.
7. When the scheduled recording time is complete, the REC indicator light will go off and the DVR will stop recording.
8. If you wish to stop recording while scheduled, press the Schedule button, then the Schedule indicator goes off and Schedule Recording Mode is terminated.
Alarm / Motion Recording
Alarm recording is set to record when an attached alarm device is triggered. Motion recording is set to record when motion is detected. Note: Recording must be turned off to configure settings.
1. First press the Menu button on the front panel of the DVR or on the included IR remote control.
2. Then using the directional arrow buttons select Device and press Enter to display the menu. The menu is displayed in two sub-menus General and Alarm.
In the General menu, users can select the post record time, enable audio record, enable or disable key tone and key sensitivity.
- Post Record Time - Determines the duration in which the DVR continues to record after the Alarm is triggered.
- Audio Record - Enable or Disable audio device usage. Note: An audio device must be attached to the DVR for audio to record.
- Key Tone - By default, the DVR emits a beep every time a button is pressed. Set the Key Tone to Off to disable that feature.
- Key Sensitivity - The sensitivity of the touch buttons on the front panel of the iDVR-E can be adjusted in this setting.
In the Alarm menu, users can configure the camera being recording, alarm buzzer, alarm out and the camera input.
- Record Camera - All - The DVR starts to record all Alarm "ON" channels when the alarm signal is triggered. 1:1 - The DVR starts to record only to the channel in which the alarm is triggered.
- Alarm Buzzer - ON: The buzzer sounds if an alarm is triggered. The buzzer will sound for the duration of the record time. Note: The buzzer must be configured under the Alarm Input tab and be turned to either "N.O" (Normally Open) or "N.C" (Normally Closed).
- Alarm Out 1 - Users can configure which relay will be triggered when an alarm is activated on each channel. Users will select from five options: Video Loss, Motion, Alarm All, Each Alarm and HDD Fail. Then enable or disable the recording in the box all the way to the right in the Alarm Out 1 menu.
- Input - Users can change the input type of the alarm (Either "N.O" or "N.C").
3. Now save the desired changes and exit the menu by pressing the Enter button. Exit the menu without saving the changes by pressing the Cancel button.
4. Press the menu button and select the Record tab. Once in the record menu, you will enable which cameras you would like Alarm or Motion recording set to by using the "+" and "-" buttons.
5. Press Enter to save the changes and exit the menu.
6. Then press the Record button to enable recording.
|


