|
iOS Push Notification Alerts from iDVR CCTV Surveillance DVRs
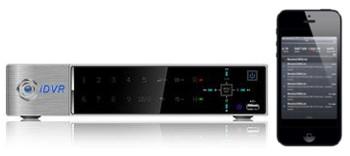 iDVR-E and iDVR-RT16 video surveillance DVRs have the ability to send push notification alerts to iOS mobile devices including iPhone, iPad, and iPod touch. The Mobile CMS application for iOS (also available on Android) can be configured to receive push alerts from a DVR based on the following types of alarms: camera motion detection, external alarm inputs, camera video loss detected. The following system events on the DVR can also trigger push notifications: hard drive failure, recording disabled, temperature warning, fan failure, voltage drop, network loss (reports after network connectivity resumes), hard drive full, and admin password change. The below instructions explain how to setup the push notifications using the MobileCMS Pro app for iOS. Please note that push notification setup works the same for the MobileCMS Lite app. iDVR-E and iDVR-RT16 video surveillance DVRs have the ability to send push notification alerts to iOS mobile devices including iPhone, iPad, and iPod touch. The Mobile CMS application for iOS (also available on Android) can be configured to receive push alerts from a DVR based on the following types of alarms: camera motion detection, external alarm inputs, camera video loss detected. The following system events on the DVR can also trigger push notifications: hard drive failure, recording disabled, temperature warning, fan failure, voltage drop, network loss (reports after network connectivity resumes), hard drive full, and admin password change. The below instructions explain how to setup the push notifications using the MobileCMS Pro app for iOS. Please note that push notification setup works the same for the MobileCMS Lite app.
Before starting the below setup, you must configure port forwarding on your router in order to access your DVR from remotely over the Internet. Click here for
port forwarding setup instructions. In addition, you should ask your Internet service provider if you have a static or dynamic IP address for your Internet connection. If you have a dynamic IP address, you should also Dynamic DNS Setup for CCTV DVR.
iPhone Push Notification Setup
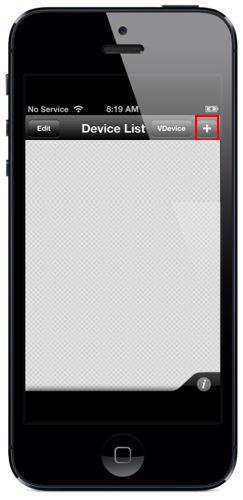
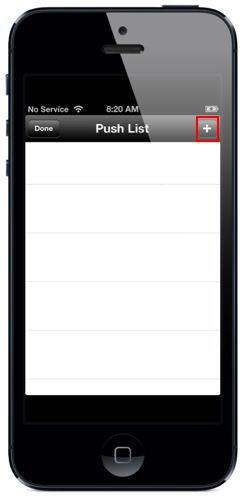
- If you have already configured your DVR in the device list in the MobileCMS app, you can skip to step 3 in these instructions. Otherwise, please open the app and press the "+" in the upper right hand corner to add your DVR to the device list. (Shown Below)
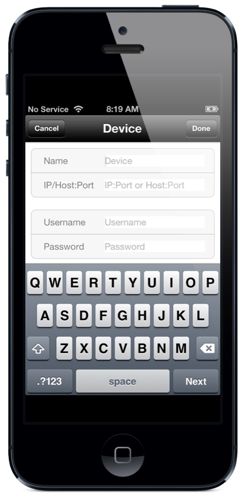
- Next, enter the following fields in the device setup screen.
Name: (This can be any value that you choose to help you identify your DVR)
IP / Host: Port: (This will either be your IP address or DynDNS hostname. E.G 159.44.22.109:7000 or myDVR.DynDNS.org:7000)
Username: (Default it admin)
Password (Default is 000000)
Then tap on the Done button in the upper right.
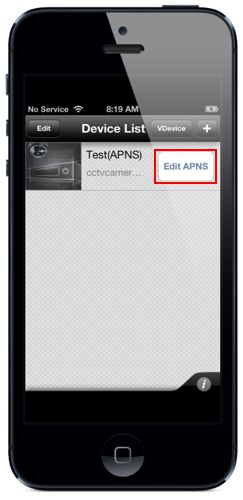
- After your DVR is added, press the Edit APNS button to the right. (Shown Below).
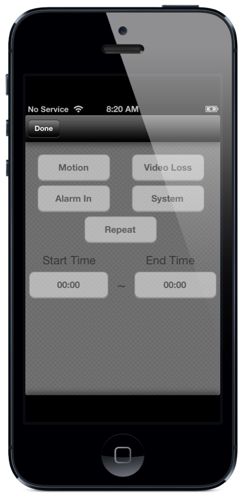
- The next step is to create the push list. Press the "+" in the upper right. (Shown Below)
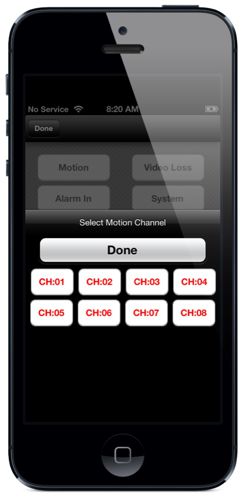
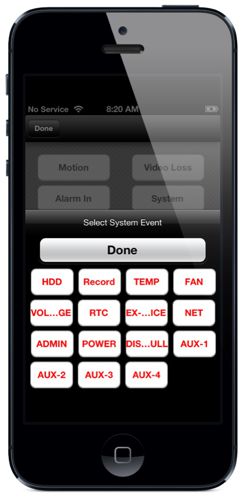
- Next, select the triggers for the push notification. When you select either Motion, Video Loss or Alarm In, the menu below and to the right will appear. Here you will select the channels that you wish to activate these settings on (Note: Red means that the channel is active). Our demonstration below has Motion activated on all eight channels. When the System menu is selected, options such as HDD failure, Temperature or Fan failure are available. Once you have selected the system events that you want, press Done. (Shown Below)
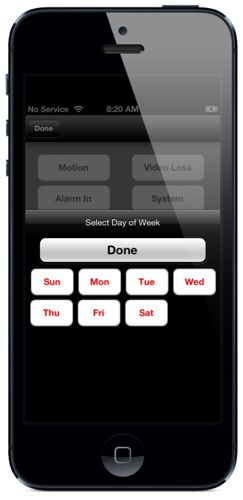
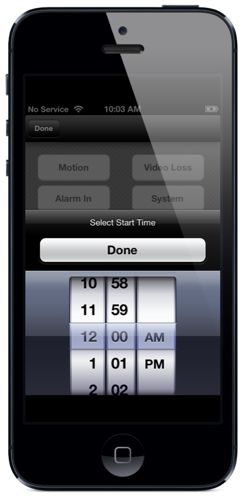
- In this next step we will setup the Days and Time that the push notifications will be active. On the left is the Day of the Week setup, simply select the days you want and press Done. On the right is the Start Time setup, enter the time you wish for notifications to start and press Done (Repeat for End Time). (Shown Below)
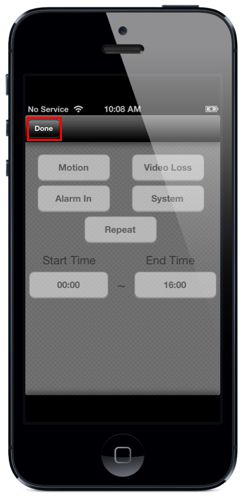
- Now press the Done button in the upper left to complete the push notification setup.
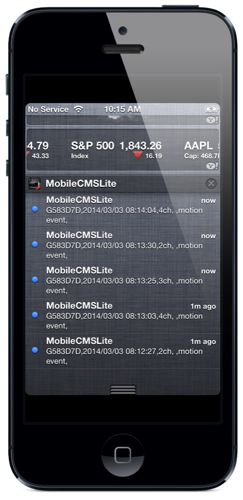
- You will now start to receive push notifications based on the settings that you configured. You can see what the push messages look like in the iOS message center below.
 About the Author About the Author
These setup instructions were written by
Mike Haldas. Mike is the co-founder and managing partner of CCTV Camera Pros. Please send questions to mike@cctvcamerapros.net.
|
|


