Surveillance DVR Hard Drive Installation
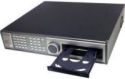 |
CCTV Camera Pros provides the following instructions for our JP Surveillance DVRs incase you need to install or replace a hard disk drive. Please follow the below instructions to install a new hard drive into your surveillance DVR. Please note that you should first contact CCTV Camera Pros if you believe that your hard drive is not working properly before you open up your DVRs case. It does not happen often but from time to time hard disk drives do go bad like any other electronic component.
|
bookmark this page for future reference
We also provide instructions below on adding a second hard drive to you surveillance DVR.
Hard Drive Replacement InstallationPlease follow these instructions to replace the hard drive in your JP surveilance DVR.
-
Using
a
small
phillips
head
screw
driver,
remove
the
8
screws
that
hold
the
top
cover
in
place
on
the
DVR.
There
are
4
screws
on
the
top
of
the
unit
and
2
screws
on
each
side.
After
you
remove
the
screws,
the
cover
of
the
DVR
should
easily
slid
off.
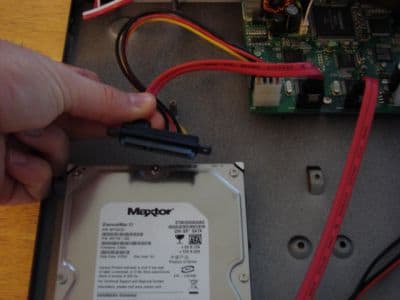
- Unplug
the
power
and
SATA
cable
from
the
back
of
the
hard
drive as seen below:
- Unscrew
the
hard
drive
from
the
DVR
by
turning
the
DVR
on
its
side.
There
are
normally
4
screws
holding
the
hard
drive
to
the
bottom of the DVR
case.
When
you
get
to
the
last
screw,
be
sure
to
hold
the
hard
drive
so
that
it
does
not
drop.
- Attach
the
new
hard
drive
to
your
DVR
using
the
same
screws
that
you
removed
the
old
drive
with
in
step
3.
- Attach
the
power
and
SATA
cable
to
the
back
of
the
new
hard
drive.
- Install
the
DVRs
cover
back
into
place.
- Re-attach
your
DVRs
power
supply
and
monitor.
- Boot
up
your
DVR
and
allow
the
DVR
to
fully
initialize.
- When
complete
login
to
your
DVR
by
pressing
the
menu
button
on
the
DVR
or
the
remote
control
and
enter
your
password.
The
default
password
is
blank
(just
press
OK).
- Select
Configuration
from
the
System
menu.
- Select
HDD
Management
from
the
Configuration
menu.
- Select
HDD
Setup
from
the
HDD
Management
menu.
- Your
DVR
should
be
displaying
"Change
HDD"
next
to
the
HDD
Status.
Select
HDD
Clear
and
press
Enter
or
OK.
- Enter
your
password
when
prompt.
- If
successful,
you
will
be
brought
back
to
the
HDD
Setup
screen
and
the
HDD
Status
will
now
say
"Empty".
- Press
the
Menu
button
on
your
DVR
several
times
until
you
exit
completely
out
of
the
menu
system
and
see
your
security
cameras.
- Test
that
your
DVR
can
properly
record
by
pushing
the
record
button
on
your
DVR
or
remote
control.
Let
the
DVR
record
for
at
least
10
seconds.
- Press
Stop
on
the
DVR
to
stop
recording.
- Press
the
Search
button
on
your
DVR
or
remote.
- Select
Search
Bar
from
the
Search
menu.
- Press
Enter
on
the
Search
Bar
screen.
- Your
DVR
should
begin
playing
the
test
video
footage
that
it
just
recorded.
CCTV Camera Pros JP surveillance DVRs support up to two hard drives. Each drive can be up to 750 GB in size. Follow the below instructions to install a 2nd HDD into your DVR.
-
Using
a
small
phillips
head
screw
driver,
remove
the
8
screws
that
hold
the
top
cover
in
place
on
the
DVR.
There
are
4
screws
on
the
top
of
the
unit
and
2
screws
on
each
side.
After
you
remove
the
screws,
the
cover
of
the
DVR
should
easily
slid
off.
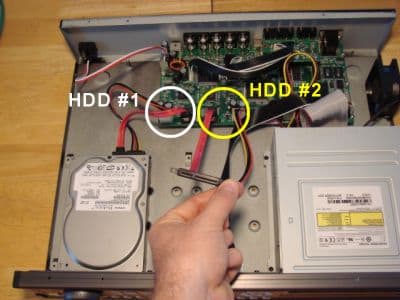
- Mount the second hard drive in the 2nd bay / port of your DVR. You will find an extra SATA HDD connector already attached to the second port of the DVR. Please see the image below.
- After you attach your HDD to the DVR case, attach the SATA cable to the hard drive. When you are done, you can put the cover back on your DVR and secure it with the screws.
- Re-attach the power of your DVR, the BNC connections to your cameras, and the monitor.
- Boot
up
your
DVR
and
allow
the
DVR
to
fully
initialize.
- When
complete
login
to
your
DVR
by
pressing
the
menu
button
on
the
DVR
or
the
remote
control
and
enter
your
password.
The
default
password
is
blank
(just
press
OK).
- Select
Configuration
from
the
System
menu.
- Select
HDD
Management
from
the
Configuration
menu.
- Select
HDD
Setup
from
the
HDD
Management
menu.
- Your
DVR
should
be
displaying
"Change
HDD"
next
to
the
HDD
Status.
Select
HDD
Clear
and
press
Enter
or
OK.
- Enter
your
password
when
prompt.
- If
successful,
you
will
be
brought
back
to
the
HDD
Setup
screen
and
the
HDD
Status
will
now
say
"Empty".
- Press
the
Menu
button
to
go
back
to
the
HDD
Management
screen.
- Select
HDD
Information.
You
should
now
see
a
Master-1
and
a
Master
2
Hard
drive
listed
on
the
HDD
Information
screen.
- Press
the
Menu
button
on
your
DVR
several
times
until
you
exit
completely
out
of
the
menu
system
and
see
your
security
cameras.
- Test
that
your
DVR
can
properly
record
by
pushing
the
record
button
on
your
DVR
or
remote
control.
Let
the
DVR
record
for
at
least
10
seconds.
- Press
Stop
on
the
DVR
to
stop
recording.
- Press
the
Search
button
on
your
DVR
or
remote.
- Select
Search
Bar
from
the
Search
menu.
- Press
Enter
on
the
Search
Bar
screen.
- Your
DVR
should
begin
playing
the
test
video
footage
that
it
just
recorded.
|
|
|


