The HDMI-IPKIT is an HDMI over Ethernet / IP extender kit that transmits full 1080p HD video resolution at 60Hz. These kits are sometimes referred to as HDMI to Ethernet converters. The kit includes an HDMI over IP transmitter and receiver. This kit supports one-to-one, one-to-many, and many-to-many HDMI matrix over network applications. This kit supports supports HDMI over Ethernet (when used with a network switch) and direct HDMI over CAT6 connection (with no network switch required).
This HDMI extender system works with CAT5E, CAT6, CAT6a, and CAT7 type network cable. It can transmit 1080p video with audio up to 120 meters / 400 feet with a direct point-to-point CAT6 connection. The highest resolution that is supported is 1920 x 1080 @ 60Hz.
One HDMI transmitter and one receiver is included with this system. Additional receivers are available here. You MUST add additional HDMI receivers if you want to distribute 1 HDMI video source to multiple HDMI display monitors. This system supports up to 100 input transmitters and receivers using the HDMI over Ethernet with network switch type installation.
(2) 5V DC power supplies are included for the transmitter and receiver. IR transmitter and receiver cables are included so that a video source can be controlled with an infrared remote control from the receiver unit(s) location(s).
There are many different
types of video installations that the HDMI-IPKIT can be used in. Although our specialty is security camera applications, this product is not limited to security applications.
Features
- (1) HDMI Transmitter w/ HDMI Loop Output
- (1) HDMI Receiver w/ IR Transmitter
- Supports up to 1080p HD Resolution at 60Hz
- Compliance: HDMI 1.3, HDCP 1.4
- Direct one-to-one CAT6 Connection Supported
- HDMI over Ethernet one to one, one to many, many to many Supported
- Compatible with CAT5, CAT6, CAT6a, CAT7 Network Cable (Ethernet connection)
- Transmission Distance: 120 Meters / 400 Feet over CAT6
- IR Remote Pass Back 20~60Hz (Wireless Remote Support)
- Supports RS-232 over IP Transmission
- (2) 5V DC Power Supplies Included
- Wall Mount Kit Included
Here are some of the ways that this HDMI over Ethernet kit can be used.
This installation diagram shows how to install the HDMI-IPKIT using a direct CAT6 connection for a one-to-one application. This is also known as a peer-to-peer connection.
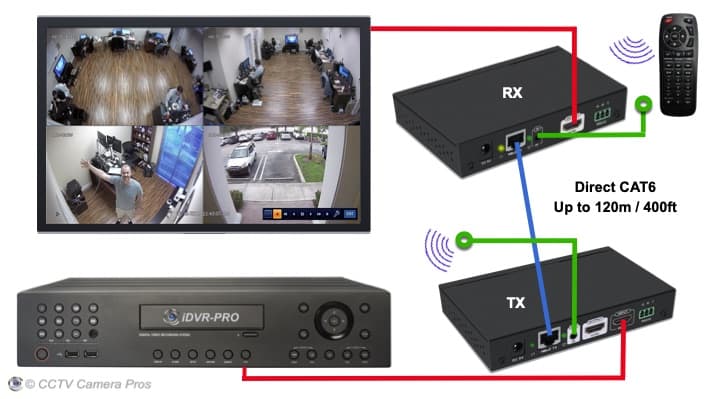
This is how it works.
- The red line at the bottom is a standard HDMI video cable that connects the surveillance DVR HDMI output to the HDMI input on the transmitter (TX).
- The blue line is a CAT6 cable with standard RJ-45 Ethernet connectors on each end. The CAT6 output on the transmitter is connected directly to the RJ-45 input on the receiver.
*Important Installation Note: Direct CAT6 cable distances up to 120 meters / 400 feet should are supported by this system.
- The second red line at the top is a standard HDMI video cable that connects the HDMI output on the back of the receiver to the TV's HDMI video input.
- The green lines with the circles on the end are the IR receiver and IR transmitter. The IR receiver can be used to capture commands from a wireless infrared remote (like ones used to control a DVR or other device on the transmitter end). For example, the iDVR-PRO surveillance DVR that is used in the above illustration includes a wireless remote control. Users can access all functions of the DVR, such as playing back recorded video and changing camera displays, using the remote in a room where the DVR is not located.
- The IR transmitter sends the signal captured from an IR remote to the DVR. Please note that the IR transmitter must have a direct line of sight to the IR remote input port on the DVR.
- NOTE: use of the IR transmitter and receiver is optional.
This installation diagram shows how to install the HDMI-IPKIT with a network switch to transmit HDMI over IP to multiple TV monitors. This is also known as a one-to-many installation because there is one transmitter feeding many receivers. Although only two receivers are used in this example, there is no limit to how many can actually be used.
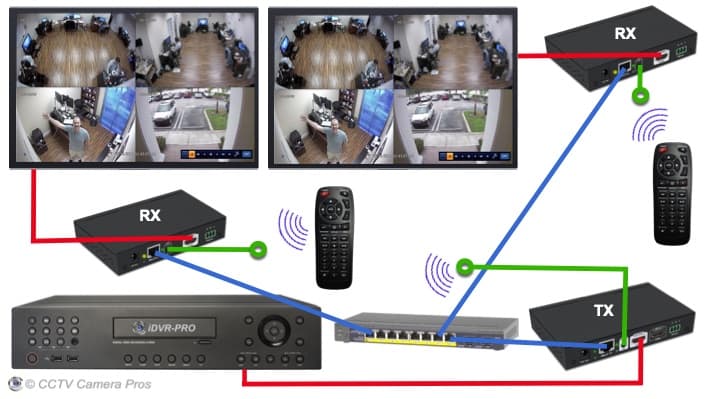
This is how it works.
- The red line at the bottom is a standard HDMI video cable that connects the security camera DVR's HDMI output to the HDMI input of the transmitter (TX).
- The RJ-45 Ethernet port on the TX is connected to one of the ports of the network switch.
- Two HDMI receivers (RX) are connected to the same network switch and both are configured to receive the HDMI video signal from the same transmitter.
- The HDMI output from each receiver is connected to a TV monitor.
- The DVR can be controlled from either TV location because each receiver can transmit commands from the DVRs IR remote control back to the DVR.
This installation diagram shows how to install multiple HDMI-IPKITs to create a many-to-many HDMI over Ethernet network. This is known as a many-to-many installation because there are multiple transmitters feeding and multiple receivers on the same network. This configuration is also known as an HDMI matrix. Please note that although only one receivers is paired with each transmitter in this diagram, you can use multiple receivers for each transmitter in a many-to-many network. Additional receivers available here.
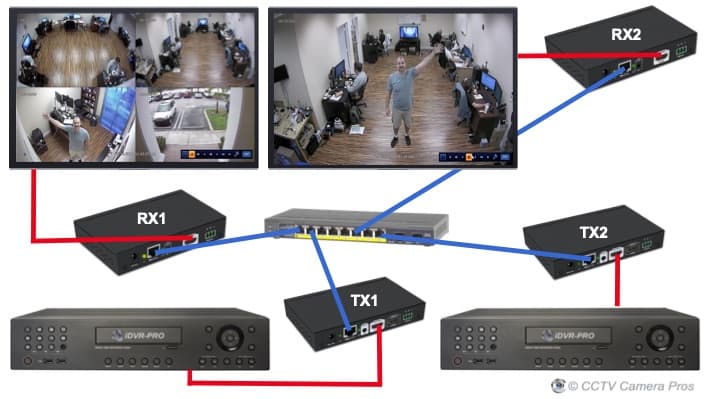
This is how it works.
- There are two security camera DVRs in this installation.
- The HDMI output of each DVR is connected to it's own HDMI transmitter.
- The RJ-45 Ethernet port of the two HDMI transmitters are connected to the same network switch using CAT5 or CAT6 cable.
- Two HDMI receivers are connected to the same network switch,
- One receiver (RX) is paired with each transmitter (TX). Please note that multiple receivers could be paired with each transmitter. There is no limit.
- The HDMI output of each receiver is connected to a TV monitor.
- Please note that IR transmitters do not appear in this installation diagram but they can be used in a many-to-many HDMI network. We did not want this diagram to get too complicated and cluttered.
This installation diagram shows how to install the HDMI-IPKIT with AHD to HDMI converter / decoders to transmit 1080p video from an AHD security camera (HD CCTV) over an IP network using a switch.
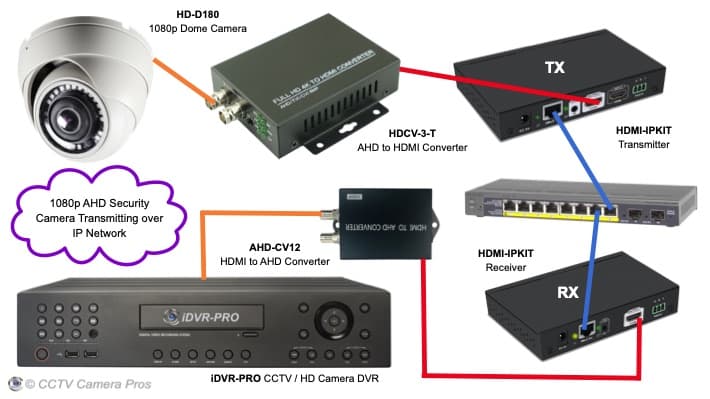
This is how it works starting from the upper left (at the camera).
- The HD-D180 dome 180 camera connects to the BNC video input on the HDCV-3-T BNC to HDMI converter. Please note that the HD-CV-3-T also supports HD-TVI and HD-CVI cameras, however, being that we only have an HDMI to AHD converter / decoder, we can only support AHD cameras at this time. Any of these 1080p AHD cameras will work with this setup.
- The HDMI output of the HDCV-3-T connects to the HDMI input of the HDMI-IPKIT Transmitter (TX).
- The RJ-45 Ethernet port on the HDMI-IPKIT Transmitter connects to the network switch or router using CAT5 or CAT6.
- The RJ-45 Ethernet port on the HDMI-IPKIT Receiver (RX) connects to the same network switch or router using CAT5 or CAT6.
- The HDMI output on the HDMI Receiver connects to the HDMI input on the AHD-CV12 HDMI to AHD converter.
- The BNC / AHD video output on the AHD-CV12 connects to one of the BNC video inputs on the iDVR-PRO surveillance DVR. These RG59 BNC jumper cables can be used.
This installation diagram shows how to install the HDMI-IPKIT as part of an AHD wireless transmitter system. This wireless design is useful for installations where one or more security cameras are mounted in a separate building from the DVR and main system. A WIFI-EH9500 wireless bridge can be used in conjunction with an HDMI-IPKIT and AHD to HDMI encoder / decoder to create a wireless AHD transmitter.

This is how it works starting from the upper left (at the camera).
- The building on the left contains the main system and DVR. Although they do not appear in the above diagram, the building on the left would most likely have security cameras hard wired to the DVR. This is an AHD DVR (hard wired HD BNC cameras using coax cable).
- The customer requires a single camera on a separate building (on the right). This may be a detected garage or barn for example.
- The AHD security camera on the right is hard wired to an HDCV-3-T AHD to HDMI converter using RG59 coax cable. This camera can be installed indoors or outdoors.
- The HDMI output of the AHD to HDMI converter connects to the HDMI input of the HDMI-IPKIT transmitter.
- The network / Ethernet port of the transmitter connects to the Ethernet port of the WIFI transmitter - part of this WIFI-EH9500 wireless camera system bridge.
- The wireless receiver (RX) on the building on the left receives the video signal over WIFI.
- The Ethernet port on the wireless receiver connects to the Ethernet port on the HDMI-IPKIT receiver.
- The HDMI output of the RX connects to the HDMI input on the AHD-CV12 HDMI to AHD converter.
- The BNC output of the HDMI to AHD converter connects to one of the BNC video inputs on the iDVR-PRO DVR.
HDMI IP Receiver
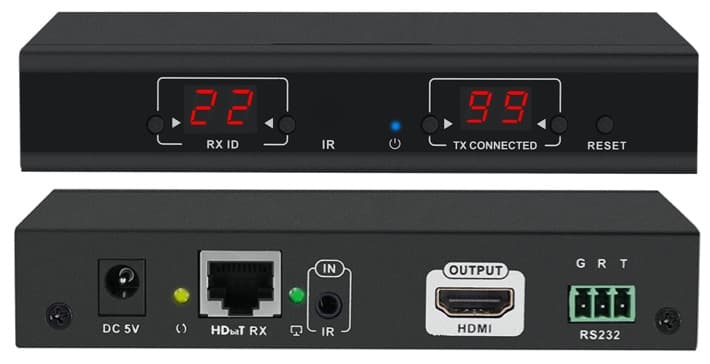
The above images show the front and back of the HDMI receiver that is included with the HDMI-IPKIT. The front of the receiver displays the it's ID on the left (in case you are using more than one RX), and the ID of the transmitter it is connected to on the the right. On the back of the case you can see the 5V DC power input, RJ-45 Ethernet connection, IR transmitter input, HDMI output, and RS-232 input. Please note that use of the IR transmitter and RS-232 input are optional.
Infrared Receiver Cable
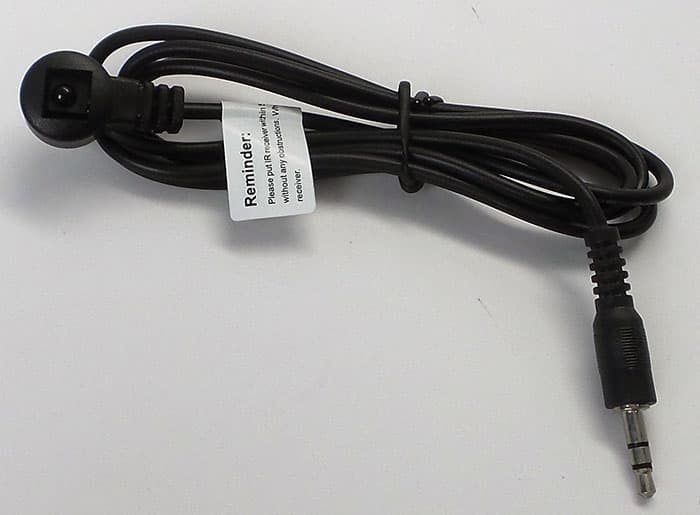
Here is a close-up of IR transmitter cable. The cable is simply plugged into the HDMI receiver so that an infrared remote control can be pointed at the receiver device to control your DVR, or other HDMI device.
HDMI IP Transmitter
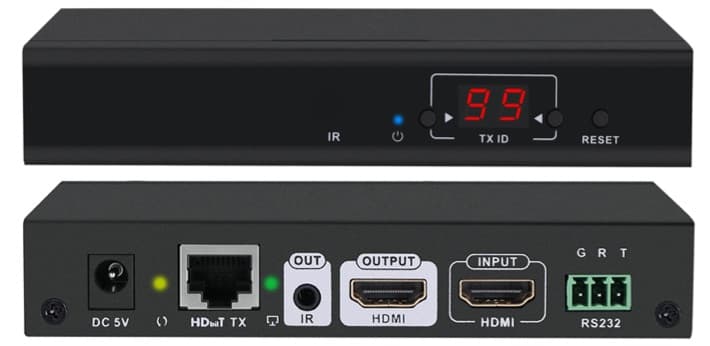
Here is a close up of front and back of the HDMI transmitter.
- The front displays the ID of the transmitter in case you are using more than one on your network and to make it simple to pair with a receiver.
- The back of the transmitter has a 5V DC power input, RJ-45 Ethernet port, infrared output port, HDMI output (in case you want to connect your DVR to a local monitor), HDMI input, and RS-232 output. Please note that use of the IR and RS232 ports are optional.
Infrared Transmitter Cable
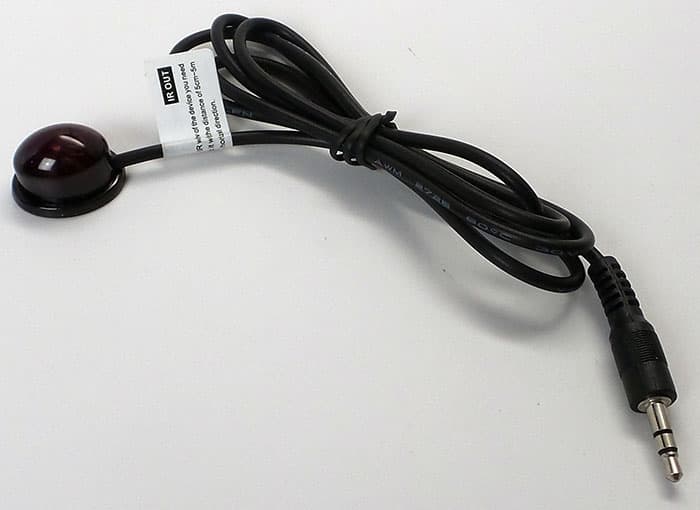
The IR receiver is plugged into the HDMI transmitter so that the signal that IR remote signal that received can be transmitted to the device, such as a DVR. The infrared dome should be positioned in front of the DVR (or other device) so that it has a direct line of sight to the IR remote input sensor.
Cat6 Cable
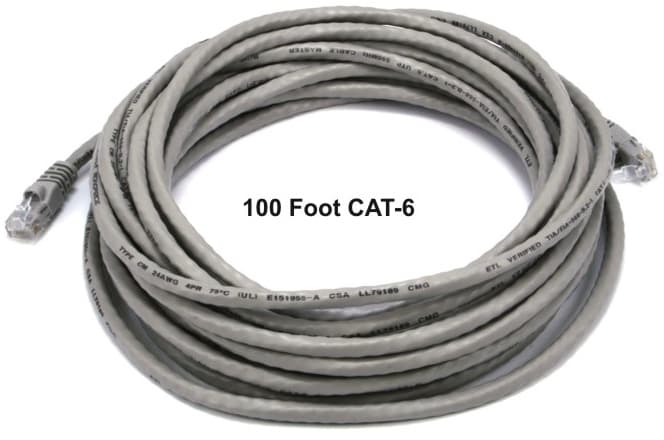
CCTV Camera Pros has
100 foot pre-made Cat6 cables that works great with this system. This is available as add-on option. We also have 50 foot Cat6 cable available for shorter runs and 1000 foot spool of Cat6 available for longer cable runs.
User Manual
Download the
HDMI-over-Ethernet user manual here.


 Great Customer Service and Product


