 |
 |
 |
|
The IPVS-MJ1 IP Video Server has been discontinued. We recommend the following network video servers as an upgraded replacement option:
The IPVS-MJ1 MJPEG IP Video Server allows you to connect a non-IP based security camera to a network via an Ethernet connection. The video server has a BNC input to connect the camera to and an Ethernet output to connect to a network via cat-5. The video server allow you to view the camera through a standard web browser.
IP Camera Server Features
- Compact design, easy installation
- BNC Camera Input
- BNC & Ethernet Output
- Enables web browser access to standard CCTV Camera
- Control PTZ Cameras from Internet Explorer
- Pan / Tilt / Zoom connection via RS-232 or RS-485
- Alarm / Motion Detection notify by Email or FTP
- Record to hard drive as AVI or JPEG
- Take still snapshots as JPEG
- MJPEG Video Compression
- This IP server is NOT compatible with 3rd party NVR software systems
bookmark this page for future reference
- Connect your CCTV Camera to the BNC video input of the IP server.
- Connect the video server to your network router or switch using a ethernet cable.
- Plug the DC power supply into the IP servers and plug the power supply in to power up the IP server.
- Insert the CD that came with your IP server that is labeled Network Solution into a windows computer that is attached to the same network as the IP server.
- Browse to the software folder on the CD and double click on the program named ipEditV3.exe. A screen should launch that looks like the below screenshot.
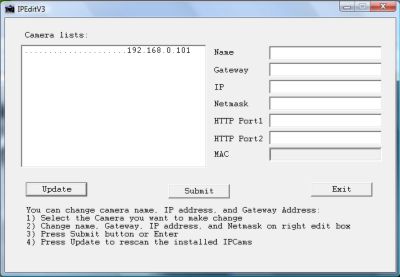
- Click on the Update button on the IP Edit screen. The software should detect the IP server's IP address on your network. This is the IP address that you will use to access your IP server and security camera video from locally on your network. This is also the IP address that you will need to setup port forwarding for later in these instructions for remote Internet access.
- Open your Internet Explorer web browser. There are two security settings that must be changed in order to allow the active X control that will access and control your video server to be downloaded.
- In Internet Explorer, select the Tools menu and then select Internet Options.
- Click on the Security tab at the top of the Internet Options screen.
- Click on the Custom Level button as seen below.

- This will open the Security Settings - Internet Zone screen. Scroll down the Settings list until you reach the settings that enable active X controls. The following two settings need to be set to "Prompt" or "Enable". It is more secure to set these to prompt as seen below.
- Download unsigned ActiveX Controls
- Initialize and script ActiveX controls not market as safe for scripting

- When you are done. Press OK. Then OK again to save those settings. Windows may ask you to also confirm that you want to change these settings. Confirm.
- In Internet Explorer type that IP address into the address bar that was detected by the ipEditV3 program. In this example http://192.168.0.101. This is the local IP address of your IP server. You can use this address to access your camera through Internet Explorer on your local network (LAN).
- The first time you access your camera from a computer, Internet Explorer may prompt you to install an Active X control by displaying a message in blue at the top of the web page as seen below. Click on the message and select Install Active X.

- When you are prompt for a Userid and Password the default userid is "admin" and the default password is "1234". Enter these values and press OK.
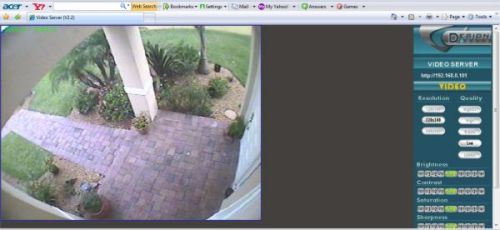
- After the active X control installs and you enter the login information, the IP server web page should appear and your security camera video should appear in your browser window as seen below.
- Your IP server is now setup for local network access (LAN).
- To setup your IP server for access over the Internet, you must setup port forwarding on your router's firewall to allow outside access to the server.
- Using the IP address that was detected using the ipEditV3 software, setup port forwarding on your router. You can reference these instructions: Port Forwarding Setup.
- After you have port forwarding setup, click on this link to find out what your external IP address is. This is the IP address assigned by your Internet Service Provider. Get IP Address
- In Internet Explorer try to access your video server by using the IP address that was detected by the ipEditV3 program. If you are able to access your IP video server using that IP address, you successfully setup port forwarding and can access your security camera over the Internet from outside of your local network.
- Ask your Internet Service Provider if you have a static or dynamic IP address for your Internet connection. If you have a static IP address, you can always use the IP address obtained in step 13 to access your server and security camera video remotely. If your ISP provides you with a dynamic IP address, you will want to setup dynamic DNS service so that when/if your IP address changes, you will be able to access your camera still. Click here for Dynamic DNS setup instructions.
- The last thing that you should do is make sure that your router always assigns the same IP address to your video server so that if you loose power to the server or it reboots for some reason, the same IP address will be assigned to it and your port forwarding rules will still be valid. Otherwise, f your IP video server reboots and is assigned a different IP address, you will loose your remote Internet connectivity. If you are using a D-Link router or another type of router that allows you to manually assign a static IP address to devices on our network, it is recommended to setup static routing on your router. You can reference these instructions for some routers: Static Routing Setup. If your router does not support static routing, aka static DHCP, you can setup the IP video server to always request the same IP address from your router by continuing the below instructions.
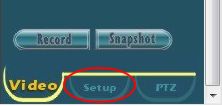
- On the web page of your IP server in Internet Explorer, click on the setup button in the lower right of the screen.
- Click on the Configuration button on the right.
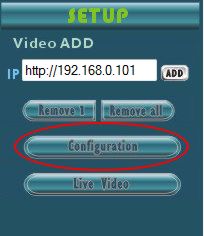
- Click on the Network link on the top of the screen to open the network settings page.
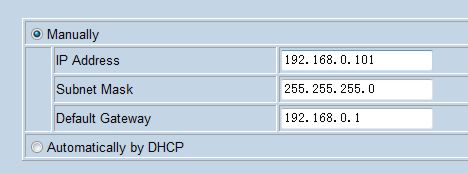
- Select Manually and fill in the IP address of your video server (192.168.0.101 in this example), Subnet Mask (you can obtain this from the status screen of your router, it is typically 255.255.255.0), and Default Gateway (this is the IP address that you use to access your router control panel from your web browser (typically 192.168.0.1 for D-Link, 192.168.1.1 for LinkSys routers).
- Press OK when done.
- You can return to the live video screen of your security camera by clicking in the Live Video button on the right hand side of the IP server screen.
| |
| Model No. |
IPVS-MJ1 |
| Video Format |
NTSC / EIA Auto Detection |
| Video Compression |
MJPEG |
| Video Input |
1 CH, BNC |
| Video Output |
1 CH, BNC |
| Audio Input |
1CH, RCA |
| Audio Compression |
AC-97 |
| Display Resolution |
640x480 (NTSC), 704x576 (PAL) |
| Display Frame Rate |
Max. 20 / 15 IPS (NTSC / PAL) |
| Recording Resolution |
640x480 (NTSC), 704x576 (PAL) |
| Recording Frame Rate |
Max. 20 / 15 IPS (NTSC / PAL) |
| Recording Quality |
High / Low |
| Recording Mode |
Manual |
| Alarm Input / Output |
1 / 1 |
| Alarm Triggered Mode |
Sensor Input |
| Alarm Action |
Relay Output, E-mail, FTP |
| Network Ethernet |
10/100 BaseT Ethernet (RJ-45) |
| Network Protocol |
TCP/IP, FTP, PPPoE, DNS, DDNS, DHCP, SMTP |
| Serial Connectors |
RS-232, RS-485 |
| Pan / Tilt / Zoom Control |
PELCO D&P |
| Power Supply |
AC100~240V 50/60 Hz, DC12V / 0.5A |
| Weight |
900 g |
| Dimensions (WxHxD) |
60x40x100 mm |
| Operating Environment |
30 ~ 80% RH, 5°C ~ 45°C (41°F ~ 113°F) |
|
|
|
|
 |
|
 |
|


