Geovision Surveillance DVR Recording Setup
The Geovision Surveillance DVR's feature multiple recording modes for many different applications. Users are able to set the recording mode of each camera such as Motion Recording, Round-the-Clock or Day and Night. The Day and Night mode allows users to have different recording modes for different time frames of the day.
Recording Setup
The instructions below explain how to set up the various recording modes of a Geovision Surveillance DVR.
1. Make sure the GV-System is open and running. The click the  on the main screen, then select System Configure and finally select Camera Configure. The menu below will appear. on the main screen, then select System Configure and finally select Camera Configure. The menu below will appear.
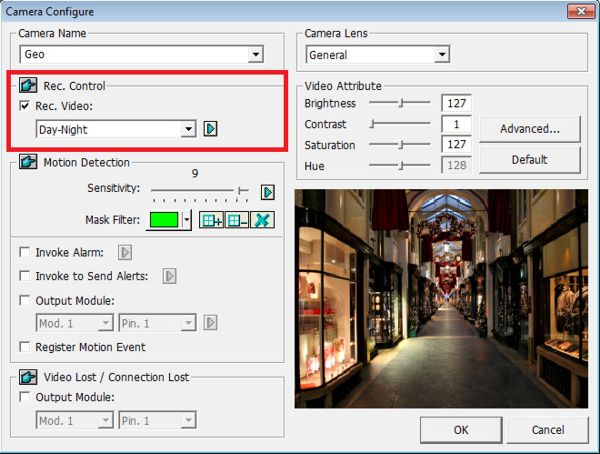
2. From the Camera Name drop-down list, select a camera.
3. In the Rec. Control section, select Rec. Video, and use the drop-down list to select either Motion Detection, Round-the-Clock or Day-Night.
4. If you select Day-Night, click the Arrow button, then click Day-Night Recording Mode to set up the timeframes you wish to record. (Shown Below)
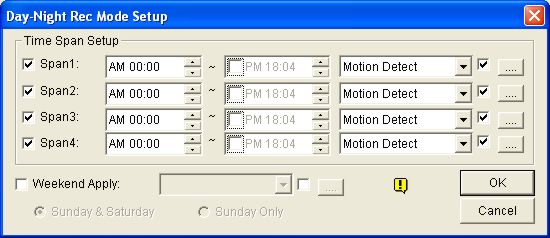
5. Enable Span1 and specify the Start time in the first field, then select the checkbox in the second time field and specify the End time.
6. Then use the drop-down list to select Motion Detect or Round-the-Clock to be the recording mode for Span1.
7. Now select the checkbox and click the [...] button to adjust the recording quality and noise detection level for Span1. Repeat the steps above to setup multiple spans if needed.
8. If you would like to start monitoring on the weekend, select Weekend Apply and select the recording mode to be applied. Define whether your weekend includes Saturday and Sunday or just Sunday only.
9. Click OK to apply the settings.
Schedule Setup
You can schedule the GV-System to record at a specific time each day. The instructions below explain how.
1. On the main screen, click the  button and select Schedule Edit. button and select Schedule Edit.
2. Select the Start and End time.
3. Then select the day or days you wish to record.
4. Select Rec and use the drop-down list to select Round-the-Clock or Motion Detection as the recording mode.
5. Then select the camera or cameras you wish to record.
6. Now click Add Schedule.
7. Click OK to apply the settings. (Steps 2 - 6 shown below)

Recording Resolution Setup
1. On the main screen, click the Video button. Then select A/V Setting and then select Video Source. The menu below will appear.
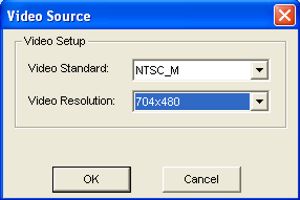
2. In this menu, select the desired Video Standard and Resolution from the drop-down list. Then click OK.
3. Return to the main screen and click the button, then select System Configure and finally click Camera Configure. The menu below will appear.
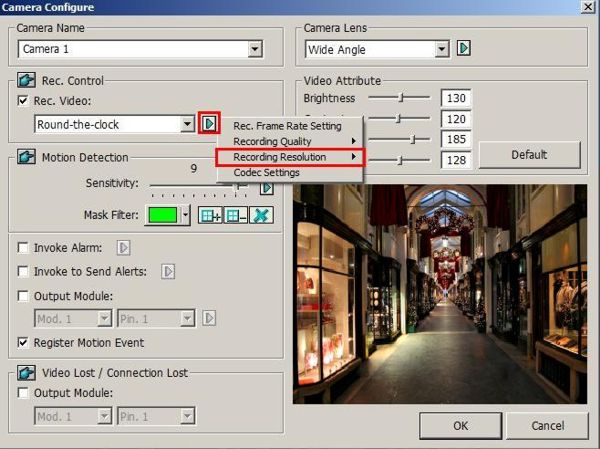
4. Select a camera from the Camera Name drop-down list.
5. Click the Arrow button and click Recording Resolution to select the desired resolution.
Repeat steps 4 and 5 to set up each camera.
6. Then click OK to apply the settings.
|
|
|


