Geovision Center V2 Central Monitoring Setup The Geovision Center V2 central monitoring station (CMS) software allows an operator to view and manage multiple Geovision systems in one integrated and centralized interface (from a single PC). The basic feature of Center V2 is to view live security camera video and receive video evidence (in an attachment format) when any alerts are sent to the Center V2. The Geovision Center V2 central monitoring station (CMS) software allows an operator to view and manage multiple Geovision systems in one integrated and centralized interface (from a single PC). The basic feature of Center V2 is to view live security camera video and receive video evidence (in an attachment format) when any alerts are sent to the Center V2.
There are two versions of Center V2. The standard version that comes with the Geovision CD that ships with all Geovision DVR cards and that can serve up to 5 subscribers and 80 channels. The professional version of center V2 can serve up to 500 subscribers and 800 channels. View a complete list of Geovision Center V2 features here.
Center V2 Installation Instructions
First, the Geovision Center V2 software must be installed on the Windows computer that the remote monitoring will be done from. Follow the below instructions to do this.
- Insert the Surveillance System Software CD to your CMSs (Central Monitoring Station) computer. It will run automatically, and a window appears.
- Select the Install Geovision V8.x.x.x. System item.
- Click Geovision CenterV2, and follow the on-screen instructions.
- At the end of the setup, you may be prompt to restart your computer. If you are, please restart before proceeding further.
Geovision Center V2 Controls
The installation should have added a Center V2 folder to your Windows start menu. Click on the start button in windows and under Programs, look for this folder and in it select Center V2 System. The Center V2 system will be launched. Look at the below screenshot to become familiar with the controls on the screen.
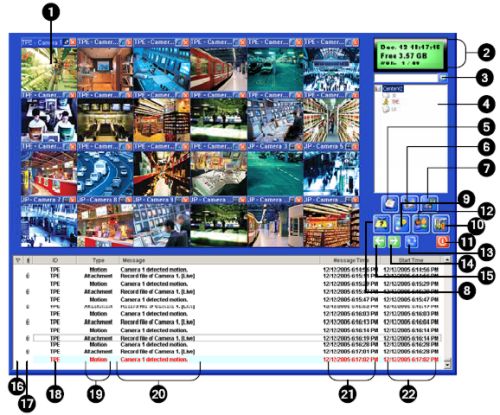
Center V2 Screen Reference
- Monitoring Window - Displays live video.
- Status Panel - Indicates the date, time, remaining disk space, and the total number of online channels versus available channels.
- Find A Subscriber - Type the desired ID in the Current Subscriber field and click this button to search.
- Subscriber List - Displays subscribers ID names and online status.
Blue Icon: Indicates the subscriber is online.
White Icon: Indicates the subscriber is off-line.
Alarm Icon: Indicates either motion has been detected or the I/O has been triggered at the subscribers site. - Event List - Accesses Event Log and Event List.
- SMS. Configures the SMS service.
- I/O Device - Configures and forces output devices at Center V2.
- Screen Division - In the 1024 x 768 resolution, you can select 6, 15, or 24 screen divisions for a single monitor; 9, 25, or 36 screen divisions for dual monitors.
In the 1280 x 1024 resolution, you can select 6, 12, or 24 screen divisions for a single monitor; 9, 20, or 42 screen divisions for dual monitors. - Host Info - Displays the connection status of subscribers.
- Preference Settings - Brings up these options: System Configure, Notification, Password Setup and E-mail Setup.
- Exit - Closes or minimizes the Center V2 window.
- Accounts - Adds, deletes or modifies subscriber accounts.
- Refresh Channel - Refreshes the connection status.
- Next Page - Displays the next page of camera views.
- Previous Page - Displays the previous page of camera views.
- Flag - Flags an event for later reference.
- Clip - Indicates an event coming with an attachment. Double-click the event to open the attached video file.
- ID - Indicates a subscribers ID.
- Event Type - Indicates the event type: Alarm, Attachment, Connection, Login/Logout, Motion, System, and Trigger.
- Message - Indicates associated information for each event type.
- Message Time - Indicates when Center V2 receives an event.
- Start Time - Indicates when an event happens at the subscribers site.
Create Subscriber Account
A center V2 user / subscriber account must be created before you start to access Geovision systems and bring security camera views into the center v2 console. Follow the below instructions to create a new subscriber account.
- On the Center V2 window, click the Accounts button (No. 12 from above). The address book window appears as seen below.
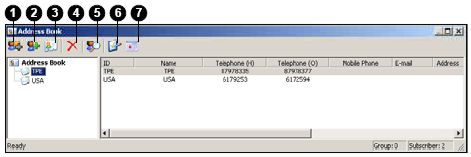
- Click the Add A Group button (No. 1 above) to create a new group. When you press this button, a new group will appear on the left-hand side below "Address Book". Name the group and press enter. For this example, we are going to name the group "Stores".
- Click on the new group so that it is highlighted.
- Click on the Add A Subscriber button (No.2 above). The Subscriber Address Book dialog box appears.
- Enter a Login ID and password (this is required). This will be the ID and password for the subscriber to log in to the Center V2 system. The ID is also going to be used in center v2 to identify all of the cameras for a particular system. You will be creating a different login for each store of the location you are going to monitor with center v2. For this example, we are going to name the first subscriber to the system "store1". You may optionally enter the subscribers contact information in the rest of fields. If you wish to send e-mail alerts to this subscriber, enter the e-mail address. If you wish to send SMS alerts to this subscriber, enter the subscriber's country code and mobile number.
- Click the OK button to save the above settings. You will be brought to a Subscriber Settings dialog box.
- On the Subscriber Settings box, set the Image Size that you want to use for remote monitoring.
- If you plan on using Geovision Center V2 only for remote monitoring and not to record events, uncheck the Auto Record Video checkbox.
- Click OK when you are finished setting the monitor and record options.
Connect Geovision Systems to Center V2
Now that you have a subscriber account setup on your center v2 system, each of your Geovision systems can subscribe to be monitored by it. You should follow the below instructions for each Geovision system that the center v2 system will monitor. The center v2 application should already be started before starting the setup on the remote systems.
- Start your Geovision system if it is not already started.
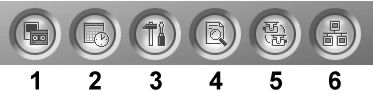
- Click on the Network button (#6 below) and select Connect to CenterV2 from the menu.
The Connect to CenterV2 screen will appear as seen below.
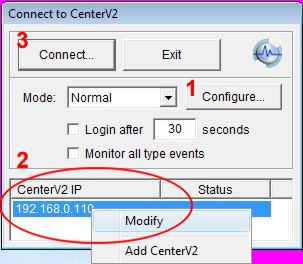
- Click on the configure button (#1) and select Advanced Settings. The Advance Settings screen will open.
- Click on the Camera tab at the top of the Advanced Settings screen. Using the right and left arrows, select each of your security cameras and choose the options that you want. Check the below options to be on or off by checking or un-checking the checkbox before each of the below options:
- Send to CenterV2 when Motion is Detected
- Allow CenterV2 to View Live Camera - NOTE: if you want to always be able to view the camera live from center v2, make sure that you select Emergency from the Event Type drop-down box.
- Allow CenterV2 to Control PTZ Camera - this must be enabled for each PTZ camera that you want to allow
- Notify CenterV2 when the following events come up (Intruder, Missing Object, Unattended Object, Scene Change)
- Click on the Other tab at the top of the Advanced Settings screen to configure any other options.
- If you are using and I/O devices, click on the I/O device tab to configure I/O output to Center V2.
- Click OK when you are done configuring all of your cameras and other options. You will return to the Connect to Center V2 screen.
- Click on the IP address (#2 in the above screenshot) and select Modify. If there is not already an IP address in the CenterV2 IP list, select Add CenterV2. The Login Information screen will appear as seen below.
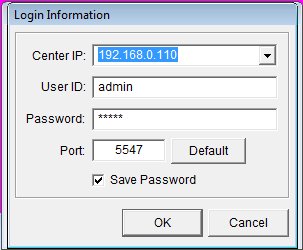
Enter the IP address of your Center V2 system in the Center IP field. Enter the User ID and Password that you set up on the Center V2 system during the create subscriber account part of these instructions. Leave the Port set to 5547 and check the Save Password option. Click OK.
- Click on the Connect button on the Connect to CenterV2 screen. After a few seconds, that screen should disappear and you should be connected to your center V2 server.
Center V2 Live Camera View Setup
Now that at least one of your Geovision surveillance systems is connected to your center v2 application, you may configure which cameras from those system(s) you want live views of on the screen. For these instructions, we will be working on the computer with the center v2 application installed.
- In the upper right-hand corner of the main center v2 screen, you should see the subscriber and camera list as seen below. This screen will display the subscriber group that you set up and any subscribers within that group. If a subscriber is connected, you can also click on the plus button next to their name and see the list of security cameras within that subscriber system.
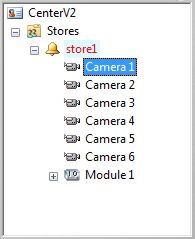
- Using your mouse, right click on one of the cameras in the list and select live view. That camera should be added to the center v2 screen as a live video feed from that particular security camera. You can do this for each camera that you want to be added to the screen.
-
For PTZ cameras, if you want to launch the PTZ controls to control a certain camera, right click on the camera in the list, then select Camera / Audio Control. A small new window will be launched with just this camera in view. Click on the PTZ control button on the bottom of that screen to launch the PTZ controls for that camera.
-
View live images from 80 channels of 5 GV-Systems using the free version
-
View live images from 800 channels of 500 GV-Systems using Pro version
-
Receive live images on motion detection, alarm, I/O trigger, panic button activation
-
View GV-Systems server information
-
Two-way audio communication
-
Real-time I/O monitoring
-
Receive incident notifications
-
Quick search by key-word in backup ViewLog
-
Remote PTZ control
-
Remote I/O device control
-
Create, edit groups of GV-Center V2 servers and subscribers
-
Keep track of GV-System's location ID, alarm status, and online status
-
Respond to alerts of video lost, motion detection, I/O module lost, I/O triggered, connection lost, subscriber login/logout, surveillance system abnormality, intruder, missing object, unattended object, POS loss prevention, and disk full
-
Send notification via alarms, SMS, and e-mails
-
Login to SMS server at startup
-
Avoid connection failure
-
1024x768 or 1280x1024 resolution
-
Live or attached videos at 320x240 / 640x240 / 640x480
-
Single monitor screen divisions: 6/15/24x, 6/12/24x
-
Dual monitors screen divisions: 9/25/36x; 9/20/42x
-
Dual monitor support: one for live videos display, the other for event lists
Display 7 types of event messages: alarm, video attachment, connection status, motion detection, subscriber login/logout history, system status, and module trigger
-
Video attachable files by event
-
Full event lists for quick search
-
Backup in Access format for later retrievals
-
Flag bookmarks for the highlight of important events
-
Event Log Filter as a search engine
-
Auto record video events
-
Pre-alarm and post-alarm recording on attachment mode
-
Attachment mode record by motion and I/O trigger
-
Receive video attachment on each event
-
Recycle feature: Delete old file for non-stop recording
|


