Embedding IP Camera Video into a Web Page
The following instructions will demonstrate how to embed a live video stream from an IP Camera into a web page that anyone can access. This is achieved by embedding the camera's plug-in code directly on your webpage. This concept can be applied to businesses that wish to share the live camera view with the public. For instance, pedestrian street traffic of an ocean front cafe or a nightclub's dance floor.
Important Note: this page was created years ago. You can find the
original Vivotek instructions lower on the page here. However, those instructions are no longer relevant. The newest and best way to embed an IP camera into a web page is right here.
This is a live streaming IP camera at CCTV Camera Pros using the latest and best method to embed a live stream. Click on the above player to start the stream. You can enable full screen view after by clicking on the full screen icon in the lower right of the player.
CCTV Camera Pros will be switching out which camera we use for streaming from time to time. Right now we are using our
auto-tracking PTZ camera. It is currently setup at a fixed point. However, you may come back here at a later date and notice that we have it setup on a tour or auto-tracking humans or cars. You can learn more about how-to setup Viewtron IP camera streaming to website here. Again, this is the latest and best way to do this.
How-to Embed Live Video from IP Camera
New! CCTV Camera Pros now recommend streaming using the IPCAMLive streaming service and our Viewtron IP Cameras. That is what is used in the above video stream. You can lean more about the IPCAMLive integration here. You can also find all of the compatible IP cameras with this new method here.
This is the legacy setup.
First you must assign a static LAN IP address to the camera using the following steps:
1. Install the Installation Wizard from the CD to you computer, connect the camera to your network switch or router with CAT5 cable, connect the power adapter and plug it in. Then run the Installation Wizard from the shortcut created on your desktop. The wizard will scan your system and display the device(s) that are detected.
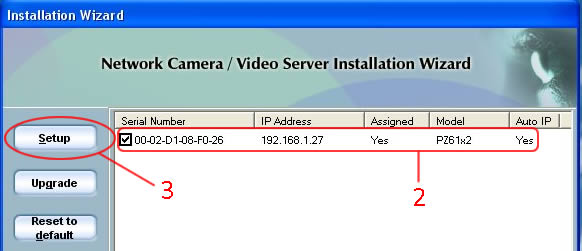
2. Select the device you wish to setup by clicking the check box.
3. Click the "Setup" button
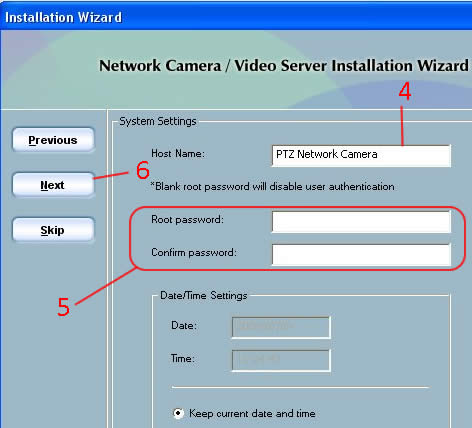
4. Enter Hostname (or leave the default name)
5. Leave "Root password" and "Confirm password" blank*
(*This is important because Internet Explorer does not support this command within the browser)
6. Click "Next"
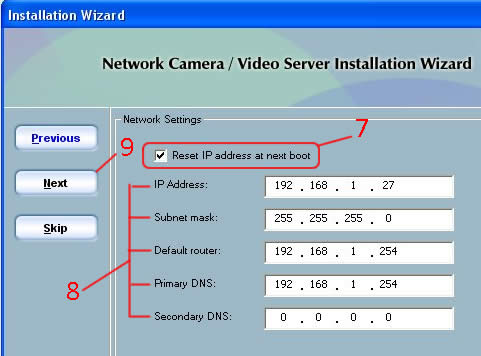
7. Click check box "Reset IP address at next boot"
8. Enter IP address, Subnet mask, etc. using proper Internet Protocol naming conventions
9. Click "Next"
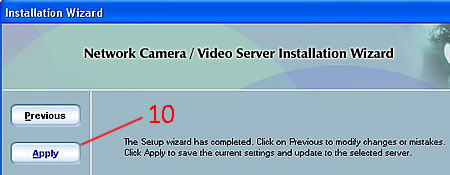
10. Click "Apply"
11. Update progress dialog box will appear. Press "Done" when completed

12. Click "Link to selected device(s)" at bottom right of the setup screen (not pictured). This should open up the Web Page Interface with Internet Explorer as shown below:

You are now connected to the camera on your local area network.
Port Forwarding Setup
In order to access your cameras live video stream from outside of your local network and over the Internet, you must setup port forwarding for you camera. The default port that is used by this camera is 80. Please refer to the following page to setup port forwarding. If you have a router that is not on the below page, you must consult the manual for your particular model router for port forwarding.
Click here for: Port Forwarding Setup Instructions
* The above link will open a new window. Return to this page when you are done.
Access your IP camera from the Internet
Once your port forwarding is setup correctly, try to access your camera from over the Internet. This is done by opening Internet Explorer and entering the IP address of the Internet connection at the location of your camera. If you do not know what that IP address is, please click on this link from a computer on the same network that your IP camera is located:
Get my IP address.
IP Camera Web Page Embed Video Code
The second part of this setup is adding the embed code to your web page that accesses the IP camera and requests the live video stream. Use the following script in the "<body>" section of the HTML code of your web page.
You may copy and paste the script below but you must change the IP address to the one of your Internet connection at the location of your IP camera.
Video Embedding Code
<SCRIPT language=JavaScript>

if ((navigator.appName == "Microsoft Internet Explorer")&&(navigator.platform != "MacPPC"))

{

document.write("<OBJECT ID=\"VAtCtrl\" WIDTH=362 HEIGHT=310 name=\"VAtCtrl\"");

document.write(" CLASSID=CLSID:210D0CBC-8B17-48D1-B294-1A338DD2EB3A");

document.write(" CODEBASE=\"http://60.248.39.149:1025/VatDec.cab#version=1,0,0,48\">");

document.write("<PARAM NAME=\"Url\" VALUE=\"http://60.248.39.149:1025/cgi-bin/control.cgi\">");

document.write("<PARAM NAME=\"VSize\" VALUE=\"SIF\">");

document.write("<PARAM NAME=\"Language\" VALUE=\"en\">");

document.write("<PARAM NAME=\"Deblocking\" VALUE=\"true\">");

document.write("<PARAM NAME=\"DisplayTimeFormat\" VALUE=\"1\">");

document.write("<PARAM NAME=\"DigitalZoomEnableChk\" VALUE=\"true\">");

document.write("<PARAM NAME=\"DigitalZoomEdit\" VALUE=\"true\">");

document.write("</OBJECT>");

}

</SCRIPT>

Change this to the IP address of your Internet connection.  You can also test with the IP address of the camera that was assigned in step 8 above, but this IP address will only work on the local network where the camera is located.
You may also accomplish this in a similar manner by using an "<iframe>" tag in your HTML code.
*NOTE: The iframe will include the entire Web Page Interface. Therefore you may want to restrict access to this page as anyone will now be able to use the camera's PTZ controls and gain access to the IP configuration settings.
Here's the code (remember to remove the quotation marks):
"<iframe src ="http://192.168.1.44/default.asp" width="100%" height="300">
<p>Your browser does not support iframes.</p>
</iframe>"
Change this to
the IP address of your Internet connection.  You can also test with the
IP address of the camera that was assigned in step 8 above, but this IP
address will only work on the local network where the camera is located.
We hope these instructions have helped you to set up an embedded live video stream from an IP security camera on your web page.
If you need additional help or want advice on an IP camera surveillance system that's right for you,
please call us at 888-849-2288 today.
|


