Internet Setup for MPEG4 Surveillance DVRs using Routers with No DDNS Support
 |
Our MPEG-4 Series Surveillance DVRs come with software that allows you to control all of the functions of the DVR and view your security cameras over the internet. The viewer software comes on the CD that ships with the DVRs or the most recent version can be downloaded here: MPEG-4 DVR Viewer Software. The DVR viewer software runs on a Microsoft Windows based computer.
|
For these instructions, we will be covering what to do if the Surveillance DVR is connected to the internet using a router that does NOT support DDNS (aka DynDNS). If you have not yet purchased a router, we recommend buying one that supports DynDNS natively. Otherwise, if your internet connection to your DVR uses a Dynamic IP address (as most cable and DSL connections do) you will be required to have a computer connected to the same router as your DVR in order to manage your IP address. Our instructions are broken up into 5 phases:
- Creating and Configuring a Dymamic DNS Account
- Installing the DynDNS IP Updater Software
- Locating the Network Address (IP) of your DVR
- Setting up Port Forwarding on a your Router
- Installing the Remote Viewer Software for Remote Internet Access
Dynamic DNS, also known as DynDNS or DDNS, is a service that allows you to configure a domain name, such as www.mydvr.com to route to a dynamic IP address. Typically cable and DSL internet access providers use dynamic IP address each time you connect to the internet. This means that your connection is assigned a different IP address each time you connect. DDNS allows you to remotely connect to your surveillance DVR over the internet if your DVR is connected to a cable or DSL internet connection. It is recommended that you purchase a router that supports DDNS and connect the router to your cable or DSL modem. There are many vendors that provide DDNS service. CCTV Camera Pros recommends Dynamic Network Services, Inc because it is free and we have tested it. Follow the setup instructions in this section to create and configure an account with Dynamic Network Services. NOTE: if your internet connection supports a static IP address, you can skip this section of the instructions. If you are unsure, please contact your internet service provider.
- Go to Dynamic Network Services website at www.dyndns.com and sign up for an account
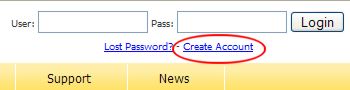
- On the home page click on the Create Account link as seen below:
- Fill on all of the required fields on the sign up page and submit the sign up form.
- The confirmation screen will let you know that an account confirmation email will be sent to you. Wait a few minutes to check your mail.
- When you receive the email, click on the link to confirm opening your account with DynDNS, then login to your account. The confirmation link will being you to a login link. After that, you can login from the dyndns.com home page anytime.
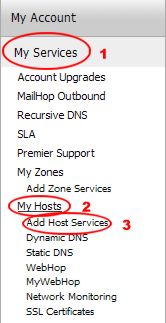
- Once logged into your account, 1) Click on the "My Services" link, 2) then the "My Hosts" link, 3) then the "Add Host Services" link as seen below:
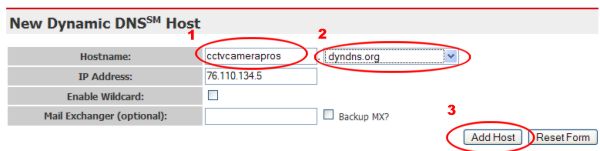
- The New Dynamic DNS Host screen will open. In the hostname field, 1) create a prefix and 2) select a domain name from the dropdown box. The page will automaticall detect your IP address, which you can leave for now. The other fields can be left blank. 3) Click on the "Add Host" button as seen below.
- If successful, a screen will be displayed to let you know that the hostname was created.

For these instructions, we assume that router that your DVR is connected to does not support Dynamic DNS. Because of this, you need to connect a Windows computer to the same router as your DVR and always have it running. DynDNS.com provides a free Windows based updater program that allows your computer to communicate to DynDNS.com anytime the IP adress of your internet connection changes. Follow the below instructions to download and install the IP Updater software on your computer.
- Connect your computer to the same router as your DVR using an ethernet cable.
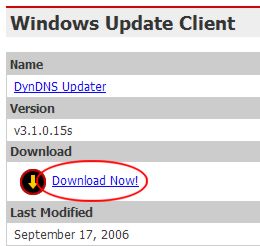
- Go to the following URL http://www.dyndns.com/support/clients/ and click on the Download Now! link:
- Either save the .zipped file to your hard drive or select open when you are prompted.
- Run the installation by double clicking on the Setup program in the zipped file.
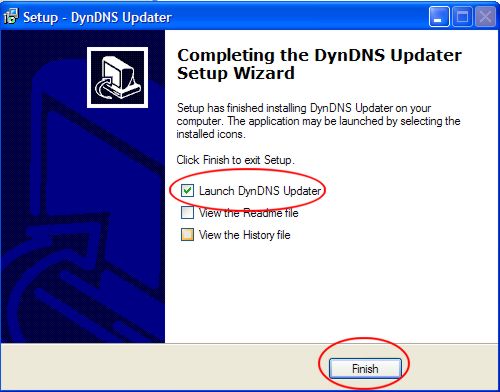
- The installation wizard will open, follow the instructions to complete the install. During the final step of the setup instructions, you will be given the option to launch the updater application as seen below. Click on the Launch DyDNS Updater check box and click on the Finish button.
- If you checked the above box, the DynDNS Updater Wizard should open. Click on the Next button when it opens.
- Select Local Area Network. Click Next.
- Click on the Detect My IP on the next screen, then click Next.
- On the next screen you will be asked to create a name for your Hostname Group. This can be anything that you choose such as "My DVR". Tyoe a name and click Next.
- On the next screen enter your DynDNS account Username and Password that you previously setup. Click Next.
- Click the "Yes, do automatically download" radio button. Click Next.
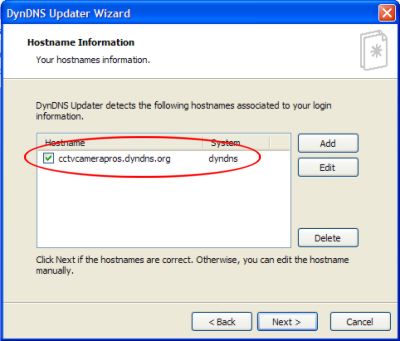
- On the next screen you should see your DynDNS account listed in the Hostname box as seen below. If you do not, click on the "Add" button. Click on the Next button.
- On the next screen, click on the "Enable automatic update" checkbox. Click Next.
- On the next screen, click on the "Start with Windows" radio button. Click Next.
- Click on the Finish button.
- You should notice a small icon in your Windows status bar (lower right of your screen) as seen below which confirms that the updater program is running:

The DynDNS updater program is now setup and should start automatically each time you restart your computer. Remember this computer must be running with the updater application in order for your DynDNS hostname to update anytime your internet connection IP address changes.
When you connect your DVR (or any other device) to a router, the router assigns the DVR an internal network address (IP address). This IP address allows your router to manage the location of your DVR on your network and direct any network traffic to it. Follow the below instructions to connect connect your DVR to your network and locate the IP address of your DVR.
- Connect your DVR to your router. This is done with a standard cat-5 Ethernet cable. Also, connect your DVR to a monitor if you have not already done so. Power the DVR on.
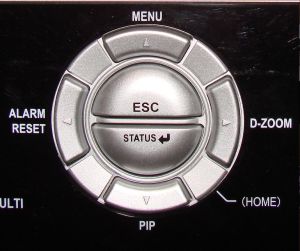
- On your DVR, push the the "MENU" button (reference the below image to help locate buttons). Then, click on the right arrow button on the DVR next to the "D-ZOOM" label until the LINK menu is highlighted on the screen. On the screen select the first option in the LINK menu which is NETWORK and push the "STATUS" button on the DVR. The screen will display the IP address that your DVR is connected to and the port that it is listening on. Note these two values. You will need them for the next phase of these instructions.
- Click the "ESC" button on the DVR twice to exit the NETWORK menu. Then, select "SAVE AND EXIT" on the screen and click on the "STATUS" button on the DVR to exit.
The purpose of this section is to configure port forwarding which allows internet access to your DVR. Remember the IP address that your router assigns to your DVR is an internal IP address (LAN). In order you to access your DVR from the internet, you need to tell your router to route requests on a certain port to your DVR (by default our MPEG4 series DVRs use port 5400).
Please consult your routers manual or contact the router's technical support to find out how to setup port forwarding on your router. Different vendors sometimes refers to port forwarding differently. D-Link calls it "virtual services". Remember to use port 5400. If you are using one of the following types of routers, you can follow the insructions below:
- From your computer, download and install the latest DVR software from here: MPEG-4 Series DVR Viewer Software.
The download is in zipped format. Using Windows XP, double-click on the
.zip file after it downloads, then double click on the setup.exe
program to install.
- After installation is complete, double-click on the DVR viewer icon on your windows desktop. Reference the below image to help locate the DVR viewer icon.

- You will be prompt for the userid and password to access. Leave the password blank and click "OK". The DVR viewer should then open.
- Click on the DVR List button as seen below:
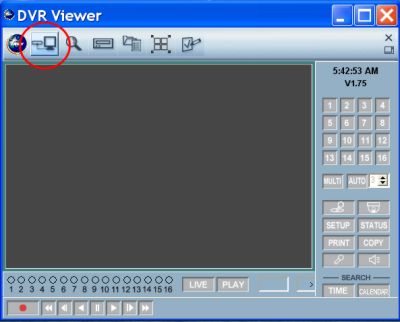
You will be prompt for a password which again you can leave blank and click "OK".
- The DVR list will open as seen below.
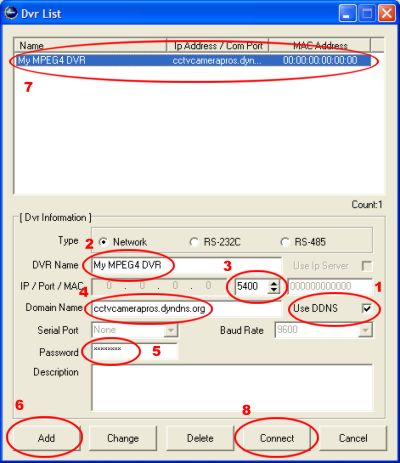
Follow these steps to add your DVR to the list:
- Check the "Use DDNS" checkbox
- Enter a name for your DVR. This can be anything you choose.
- Select port 5400 (or choose the port that you noted earleri from your DVR)
- Enter the Host Name that you setup with DynDNS.com in the Domain Name field
- Enter the password for your DVR. Default is "11111111" (8 ones)
- Click on the "Add" button
- The DVR should now appear in the DVR list. Click to select the DVR if it is not already highlighted.
- Click on the "Connect" button
- You will be prompt for a password to connect to the DVR. The default password is "11111111" (8 ones). Enter the password and click "OK".
If everything was successful you will be connected to the DVR.
|


