|
2-Wire Port Forwarding Setup
2-Wire port forwarding is done by creating a hosted application in the firewall settings of the router configurations. The application configuration allows you to configure inbound Internet connections to your 2wire router to be routed to specific devices on the network. In the context of CCTV cameras and surveillance systems, your router will be configured to forward requests to your surveillance DVR (standalone or Geovision) or directly to IP cameras. The IP address that your router
assigns to your DVR is an internal IP address (LAN) that normally can not be accessed from outside of your local network. This is why port forwarding setup is needed. By following these instructions, you are opening a gateway in your firewall to allow communication externally from a DVR viewer application to your stand alone DVR or Geovision. The following instructions are specifically for the 2Wire 2701 modem / gateway router.
- Open up a web browser (Intnenet Explorer or Firefox) on a computer that is connected to your 2-Wire router.
- Open your 2-Wire router's control panel in the web browser by going to this location https://gateway.2wire.net.
- After
you are logged into your 2Wire modem, click the Firewall tab.
- Click the Firewall Settings link under the tab to open the Edit Firewall Settings page as seen below. Please note the 4 sections that are labeled. These will be referred to in these instructions.
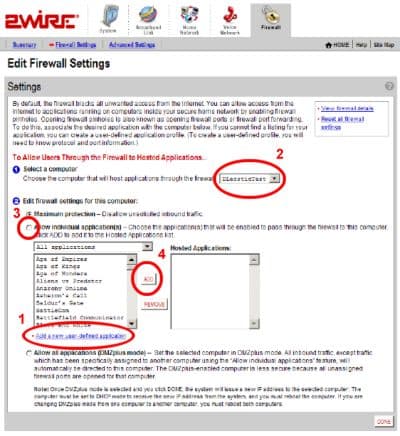
- Click on the Add a new user-defined application link, labeled #1 above, to open the Edit Application page. The below screen will open and this is where you will configure the settings for your DVR.
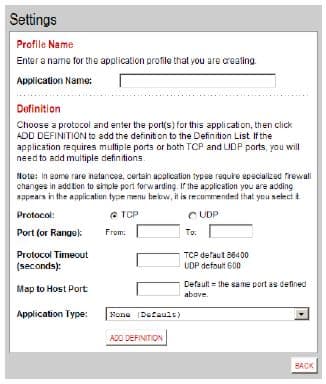
- In the Application Name field, enter a name for the application profile. You can enter any name you like,
although its recommended that you use the name of the application (for example, My Surveillance DVR or Geovision DVR).
- In the Definition panel, create a definition for your application.
A definition consists of a series of protocol-specific ports that are to be allowed through the firewall.
- In the Protocol field, select the TCP or UDP radio button. If the application you are adding requires
both, you must create a separate definition for each.
- In the Port (or Range) field, enter the port that your DVR uses. (For Geovision there is more than one so you must repeat these instructions for ports 80, 3550, 4550, 5550). Our JPEG DVRs typically use port 50000 or 8000. Put the same value in the From and To fields.
- In the Protocol Timeout (seconds) field, you may optionally enter a value for the amount of time that can pass before the application times out. We recommend that you leave the field blank, in which case the system uses the default values (86,400 seconds for the TCP protocol; 600 seconds for the UDP protocol).
- In the Map to Host Port field, leave that field blank so that it will default to the port you defined above.
- In the Application Type drop-down menu, select None (Default).
- Click ADD DEFINTION to add the values to the profile definition list.
- Click DONE.
- Click on the Firewall tab again, then click on Firewal Settings. The below screen will open again.
- Select your DVR from the dropdown box labeled 2 in red above.
- Click the Allow individual application(s) radio button.
- In the Applications panel, select the application that you created for your DVR (E.G. "My Surverillance DVR" or "Geovision DVR").
- Click the ADD > button. The application you selected now appears in the Hosted Applications pane.
- Click DONE.
- Repeat all of the above instructions for each port that you need to open for remote access to your DVR.
Your surveillance DVR or Geovision PC based system is now configured so that your router will allow access from your remote viewer application.
|
|


